R
ruben
Guest
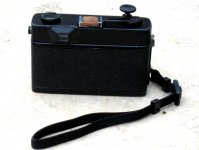
How do you obtain a diopter for a camera whose manufacturer never produced one, just for example a small Konica Auto S3 or an Olympus RC ?
First I locked myself for a daily tour at the newest daily arrived diopters from eBay. Currently there are some 150 (gross estimation) variants of diopters there. But if you need for example a +2, then the variants will be reduced to some 4 samples for you to choose, and try a home frankenstanization to the size of your camera viewfinder. Btw seekers of circular diopters will be much better favoured by the existing choices.
But rectangular specific diopters, that you will pay up to fifty bucks without knowing beforehand if you will be able to do something with them - this is a gamble I entered twice and today I went fed up.
So I went to make my own diopter out of plastic reading glasses, fitting the desired diopter and ended in success. Aesthetically, the mounted home diopter on my Konica S3 is not award winning, though the very possibility to have it is great for me, and I hope it may encourage you as well.
I am not going to make a sticky type post, but briefly mention some key points and in case something is not clear you can post here or mail me. My estimation is that out of a reading glasses of good quality you can milk at least some 12 diopters for a Konica Auto s3.
Hereby some points:
a) Reading glasses are plastic - hence the source making it easy.
b) The best part of eash single glass is the center one, i,e, some 20% of each side of each glass will be still usable but not the best quality like in the central area.
c) Once you took out one of the glasses, you cut it, say 1cm from the left, for your first diopter, with a hack saw (I mean here a small one rather designed to cut metal). To sustain the glass you'll need a simple device, whose name in English I do not find, that consists in a heavy and mobil "plier", fixed to a table, whose task in our life is to heavily sandwich by torque force whatever small piece of something we want to work on.
d) take care to cushion the glass on both sides and limit your pressure, since the glass is concave/convex.
e) Once you have your first chunk of glass to become a diopter, you bring it to close size with the help of a circular sanding head, attachable to your Black and Decker. I set my Black and Decker for very low constant speed and held the plastic piece with my hand. At higher speeds it may be HAZARDOUS.
f) So we have by now a rectangular diopter sized plastic, of the size of the external plastic frame, surrounding the viewfinder. If we look at our going to be diopter we notice its thickness is exagerated, never seen in a real glass diopter. Nevermind, we will take advantage of this thickness.
g) Now our goal will be to transform the cut block into a graded one: one side (the graded one) will "enter" into the camera window frame, the other (the non graded one) will match and be sticked to the viewfinder plastic frame.
h) to make the grade we will use a simple filer, BUT one that one of his thin sides is flat and doesn't file. I. e, we will file one surface each time, taking advantage of the non filing side.
i) Once we have the "perfect" size (don't be afraid of what you have, mine looked worse) you glue it with minimum minimal and less than that amount of rubber glue - NEVER EVER THOSE THREE SECONDS HARMFULL glues.
j) Finally, once the glue is dry you can use black tape to cover the protruding borders of your diopter, and this will give a much more nicer look.
It takes time, but it is easy and you will have something unachievable otherwise. Be proud of yourself
I have taken into account your intelligence for doing very obvious things I didn't mentioned, like filing a smidge the outer borders of your diopter to meet your eye, etc.
Fine, another issue behind us.
Cheers,
Ruben
Last edited by a moderator: