BW400CN
Bessamatic forever!
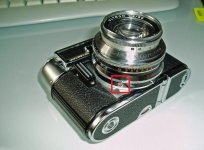
One last question, my III CS has a Prontor 500 SLK-Y shutter on the Ultron lens. It has a handle with a red dot on the lower left side when looking from the front side of the camera. I guess this may be the self-timer? I have seen a self-timer referenced in a Vitomatic IIa manual, also operated from the shutter, but the shutter on the IIa is different from the Prontor on the III CS. What is the function of the handle and how to operate it?
I don't know the Vitomatic that well - so can you please post a pic of it?
It can be the selftimer or (I´m ain´t sure if the vitomatic has had this) the flashsynchro when it is labed with X+M like the Bessamatic had (bulb and electronic flash mode)
Marco B
Member
It is the small protruding handle in the red rectangle I marked in the attached image. There is no X or M labeling next to it. The handle is in a slit of about 1 cm. It can't be moved just like that, so I haven't tried to force it until I know how it is supposed to be used.
Attachments
Marco B
Member
Well, OK, I think I can now answer my own question. After receiving my MR-9 battery voltage adapter and inserting film, I was finally ready to go and gives this camera a try!
I did do some extra work on cleaning as well. Not satisfied with the cleaning of the difficult to reach yellow lens, part of the range finder mechanism, I now found a way to clean it better. Problem is, you either need a very small cotton stick or something similar, because otherwise you can not reach it in between all the metal and other parts of the mechanism. I didn't have this. To better reach it, I took an ordinary cotton stick, and flattened it with a hammer. You need the "plastic" type for this, instead of wooden ones. After flattening it, I could just insert it in between all parts, and reach both the front and back side of the pretty dirty part.
So now I have a clean and clear range finder spot / image!
As to the handle referenced in the previous post: it is indeed the self-timer. You need to cock the shutter first, than move it. Once you hit the shutter button, it starts its 8 second or so delay. The handle moves quite stiff, but worked fine (well, still need to develop the first two rolls to make sure everything is in real order!).
However, as far as I can tell, this 45 year old Voigtländer Vitomatic III CS is fully revived... The metering still seemed pretty accurate, compared to my Minolta Spot meter. I am just suspecting the metering may be off at the extreme low end (which isn't really low, compared to modern metering cells), and may need an extra .5 to 1 stop.
I am beginning to like the camera handling too. Just the shutter button is a bit awkward, even for people with ordinary hands, the positioning is to low. But the focusing, and setting of exposure, is all pretty convenient. I am especially amazed how all the exposure info (metering, shutter speed, aperture) can be read from the view finder. Despite this being an over 40 years old fully mechanical camera, the clever way it is all incorporated into the view finder simply using prisms and mirrors, is amazing.
Well, probably nothing new for most folk here on the forum, but for someone who for the first time is really enjoying a rangefinder, it is...
errorlogin
Love vintage Hifi, too!
Hi Marco,
just saw your postings right now, I am not so often here any more.. Very nice work, have fun with your Voigtländer!
You had luck! I really would not recommend to bend these metal clips, they can break bending them the first time. I did once with a broken, cheaper IIb. . . never again, the risk to break one of them is pretty high.
And it is possible to clean the window very well without this dissasembling.
Cheers!
Jan
just saw your postings right now, I am not so often here any more.. Very nice work, have fun with your Voigtländer!
Hi all,
Anyway, these first photo's in this post show the top part. To get to the glass to be able to clean it from the inside, I did what Jan didn't do, I actually disassembled the front view finder glass assembly by bending the metal clips that hold it. I used a small screw driver for this, careful not to scratch the innards or break the small metal clips, only applying the minimal amount of force necessary to bent them. You can probably do this only a couple of times... There are six of them, that hold the glass in it's frame locked in the top part, see the left and right images.
You had luck! I really would not recommend to bend these metal clips, they can break bending them the first time. I did once with a broken, cheaper IIb. . . never again, the risk to break one of them is pretty high.
And it is possible to clean the window very well without this dissasembling.
Cheers!
Jan
Marco B
Member
Very useful Jan!
I have a couple of questions though, seeing your photo's and descriptions:
- I was surprised to see the "rubber tool"? What is it, and where do you buy these? Are there other options to remove this front part of the lens / shutter assembly?
- You mention no need for grease on the shutter and self-timer assemblies. Are these really designed from factory of to run without any kind of additional lubrication?
- You mention grease on the aperture blades, where is it coming from?
- What are the "helicoils" you mention applying grease to? Could you point these out in the pictures by marking them, or describe them better in combination with one of the pictures you posted?
Marco B
Member
Btw.: is there a difference in english language between grease, oil and lube? I am always a little bit confused about that.
In german it is clear what "Öl" and "Fett" means....but I have the feeling in english it is sometimes the same?
Thank you!
I think this Wikipedia webpage explains it quite well:
http://en.wikipedia.org/wiki/Grease_(lubricant)
As you can see, grease is actually a special mixture of an oil and a soap (= salt of a monoglyceride). Yes, a soap in the traditional sense of "soap"...
So a lithium grease has a lithium soap combined with a mineral or vegetable oil. The lithium ion is the positive ion of the lithium soap salt, where normal soaps have sodium or potassium.
Fats are generally triglycerides, that is, a combination / fusion of glycerol (an alcohol) with three fatty acid chains. A monoglyceride is combination of glycerol with one fatty acid chain.
What I never properly realized, but is explained there, is the special property of grease to become much more fluid / less viscous upon movement / shear.
richard700
Newbie
It may just need some cleaning inside like my II did -
mellowmonday
Newbie
Hi Marco!I think this Wikipedia webpage explains it quite well:
http://en.wikipedia.org/wiki/Grease_(lubricant)
As you can see, grease is actually a special mixture of an oil and a soap (= salt of a monoglyceride). Yes, a soap in the traditional sense of "soap"...
So a lithium grease has a lithium soap combined with a mineral or vegetable oil. The lithium ion is the positive ion of the lithium soap salt, where normal soaps have sodium or potassium.
Fats are generally triglycerides, that is, a combination / fusion of glycerol (an alcohol) with three fatty acid chains. A monoglyceride is combination of glycerol with one fatty acid chain.
What I never properly realized, but is explained there, is the special property of grease to become much more fluid / less viscous upon movement / shear.
I'm reviving this old thread as I'm currently working on my recently purchased Vitomatic IIIb (as well as a Vitomatic IIa). Your previous posts have been very helpful when cleaning the camera. However now I have another issue that relates to the shutter that has stopped firing. Have you done any work on the shutter on your Vitomatic IIIcs, potentially with pictures? There is a video on youtube showing the dismantling of the Vito CLR to access the shutter, which may be quite similar to the Vitomatic IIIb. But it would be good to learn some more before attempting this (seemingly) rather complex piece of work. Best, Gustav
mellowmonday
Newbie
Hi Jan! I'm working on my IIIb now (13 years later!) and your guide earlier in this thread is very useful. However, the explanatory photos are no longer accessible. Do you still have these and would it be possible to upload them again (or email to me)? Thanks a lot! Best, GustavI haven't been here for a while. But happy, that this thread is still alive.
Thank you all for the kind comments and the great pics!
The advance lever cocks the shutter only, if you have a film inserted. Maybe yours is just working right and you don't know!
Waiting for the picture of this worn out beauty!
Jan.
Marco B
Member
Hi Gustav,Hi Marco!
I'm reviving this old thread as I'm currently working on my recently purchased Vitomatic IIIb (as well as a Vitomatic IIa). Your previous posts have been very helpful when cleaning the camera. However now I have another issue that relates to the shutter that has stopped firing. Have you done any work on the shutter on your Vitomatic IIIcs, potentially with pictures? There is a video on youtube showing the dismantling of the Vito CLR to access the shutter, which may be quite similar to the Vitomatic IIIb. But it would be good to learn some more before attempting this (seemingly) rather complex piece of work. Best, Gustav
No, I haven't ever worked on the schutter or lens assembly. You've undoubtedly read it as it was pointed out before here in the thread and are aware of it, but the schutter cannot be used unless the camera has a film loaded.
I noticed this website has some photos of the disassembly of a Vito B. That is however a quite markedly different camera, e.g. notice the giant film advance ring around the lens assembly, whereas the Vitomatic III CS has a much smaller one at the bottom of the camera. Still, the lens disassembly might give some clues as to what to expect with the Vitomatic III CS:
Voigtländer
Voigtländer, Vito, Bessa II, Virtus, Color-Heliar, Color-Skopar, Ultron, Prominent, Dynamatic, Vitessa, Vitomatic, Bessamatic, camera information, photographs, collection
cjs-classic-cameras.co.uk
Marco
mellowmonday
Newbie
Thanks for your reply. One question: did you ever save Jan's pictures from earlier in the froum thread? They don't seem to be available anymore and I think it could be useful to have them. I've tried to contact him via the forum but so far to no avail.Hi Gustav,
No, I haven't ever worked on the schutter or lens assembly. You've undoubtedly read it as it was pointed out before here in the thread and are aware of it, but the schutter cannot be used unless the camera has a film loaded.
I noticed this website has some photos of the disassembly of a Vito B. That is however a quite markedly different camera, e.g. notice the giant film advance ring around the lens assembly, whereas the Vitomatic III CS has a much smaller one at the bottom of the camera. Still, the lens disassembly might give some clues as to what to expect with the Vitomatic III CS:
Voigtländer
Voigtländer, Vito, Bessa II, Virtus, Color-Heliar, Color-Skopar, Ultron, Prominent, Dynamatic, Vitessa, Vitomatic, Bessamatic, camera information, photographs, collectioncjs-classic-cameras.co.uk
Marco
Gustav
Share:
-
This site uses cookies to help personalise content, tailor your experience and to keep you logged in if you register.
By continuing to use this site, you are consenting to our use of cookies.