Jupiter-3 shimming for Leica HOW TO DIY

Spyderman

Well-known
Local time
6:00 PM
Joined
Apr 8, 2006
Messages
1,429
attachment.php


As you may have read in other threads Jupiter-3 is a Soviet Sonnar type lens made in Soviet Union from pre-war German design. The assumption of Dante Stella has been generally accepted that its focal length is 52.3 or .4 mm and therefore doesn't focus correctly on RF cameras that suppose the standard focal length 51.6mm.

Some lenses were a little off (i.e. closer to the Leica standard) since they were manufactured, some were modified at some point in their life, and some are still waiting to be modified and enjoyed by their owners.

Disclaimer: please attempt this only if you have some experience with lens repair and are able to do it properly. It would be a shame to destroy such a good lens as J-3 is. Better use it on Zorki than destroy it while trying to mod it for Leica.

There are basically 2 ways to modify such lens.
1) change the main shim that set the distance of optical block from film
2) change focal length by decreasing the distance between front and rear groups within the optical block

The option number 1 has been extensively discussed and you can find tips on how to do it in other threads. I want to point out that it is only partial solution - you can make the lens focus correctly only at 1 certain distance, all other distances will be slightly off. If you set the point of precise focus at 2m, half the error will be at infinity, and half at 1m. Or you can fine-tune it for the distance where you expect to use it most. The DOF might hide the error at other distances or it might not.
The option 2 is what I'm going to describe in this post.

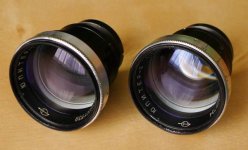
Changing the focal length is possible only on older versions of Jupiter-3. I have 2 samples (1 in Kiev mount and 1 in LTM) from 1962 and 1963. The older has unscrewable rear group and can be modified. The newer one has one-piece optical block and is much more difficult to modify (maybe using lathe).

attachment.php


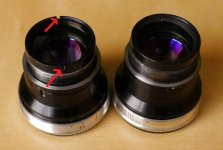
The one on the left is the older type. You can distinguish it by the 2 notches on the rear edge.

attachment.php


To shorten the focal length of the optical block you need to unscrew the rear group. Cover the inside of the front part with sticky tape to prevent fine dust from entering the diaphragm. Place sandpaper on flat surface, and start sanding the rear of the front group shell by rotating the front group block on the sandpaper while pressing down lightly. You want to remove material equally along the circumference. Use vernier caliper to measure the length of the front group block before sanding and often check how much you've taken from the material. About 0.3 to 0.5 mm shortening is enough.

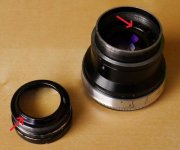
It is possible that after the sanding, it won't be possible to screw the rear group fully in. The problem with my lens was that the bevelled edge of the rear group (red arrow in the lower left corner of image 3) would touch the ring inside the front part (second red arrow). I had to file some material from the rear group bevel and then blackened it with marker pen (you can use other flat black paint). If you need to do this filing - first remove the rear group glass from the aluminum tube.

After putting it together, the main shim needs to be adjusted (lens collimation, to make the lens focus at the distance indicated by rangefinder). After the modification, the distance scale can no longer be reliably used.

I managed to adjust my lens this way and make it focus correctly at 1m and infinity according to the Leica rangefinder.
 

Attachments

  • J3back2.jpg
    J3back2.jpg
    26.5 KB · Views: 6
  • J3front2.jpg
    J3front2.jpg
    28.9 KB · Views: 6
  • J3open.jpg
    J3open.jpg
    30.3 KB · Views: 6
That is the complicated way.

In the first picture you can see the shiny metal shim that the factory used to set the lens correctly in the helicoid. It is correct for a 52.4mm lens (Contax standard). Thickening the shim with 1/10mm of a millimeter by using copper tape and screwing the optical block back in sets the whole optical block further forward in the helicoid, effectively shortening the focal length of the lens to the desired 51.6mm that a Leica standard lens is. As a result, the infinity mark and the aperture mark will not line up perfectly anymore but that is a small price to pay for a lens that can be used on Leica's without limitations.

Much simpler, does not involve any sanding down of metal, or even opening the optical block. All the 'Sweenyfied' lenses are set to the correct Leica focal length using the technique I describe here. It's not an invention of me, but of Brian.

I don't think anybody will argue with the results that Brian Sweeney had from his lenses.
 
buzzardkid: you are describing the method number 1 - reshimming the lens doesn't change the focal length. It just moves the optical block farther from the film, makes it focus a little bit closer at each indicated distance (e.g. 1.0m instead of 1.05m, 9.5m instead of 10m but also something like 50m instead of infinity) an splits the focussing error between close focus and infinity. As I wrote: the DOF might cover the error, or it might not. If the reshimming works for your particular lens, it's a lot easier and you needn't do the second method described in my post.

PS: maybe I should have chosen a different thread title... (other word than shimming)
 
buzzardkid: you are describing the method number 1 - reshimming the lens doesn't change the focal length. It just moves the optical block farther from the film, makes it focus a little bit closer at each indicated distance (e.g. 1.0m instead of 1.05m, 9.5m instead of 10m but also something like 50m instead of infinity) an splits the focussing error between close focus and infinity. As I wrote: the DOF might cover the error, or it might not. If the reshimming works for your particular lens, it's a lot easier and you needn't do the second method described in my post.

That's the point, Brians method (of shimming to agree focus on 1mtr and wide open )has proven successful on all lenses he worked on, with the exception of certain factory specimens that were probably created by trainees as a study object. Those were not within specs to begin with.

The DOF always covers the error if the lens is within factory specs to begin with and it set to focus correctly on 1mtr and wide open. So as long as one does not own a basket case lens, or one that has been assembled by a no-know or dishonest seller, it can be set to agree with Leica by thickening the shim with only 0.1mm. Copper tape proved more versatile to use than a paper shim. Again, per Brian Sweeney.

I've shimmed only two or three Jupiter-3s like this and it always worked fine. Correct focus was easy to check with the Leica M8 I owned. I stopped re-doing them when I sold the M8. It can also be checked with any Leica M with the back door removed and a piece of Scotch tape across the film plane to the image can form on that. All you need to complete the test is a tape ruler and a tripod. But to me, that was too much hassle.

It's a simple fix. I'm always amazed that people jump on the Sweeneyfied Jupiter-3s in the Classifieds and pay top dollar for them, really anyone with some copper tape and a pair of scissors and some patience can do it.
 
Perhaps you are right, the modification of shim is easier to do. But I wanted to share my experience from the modification in case someone for any reason needs to do it the more complicated way.
Also the modification of Jupiter-9 85mm/2 is similar (no sanding needed - only the shim between front and rear group is thinned or removed and main shim is adjusted accordingly)

One disadvantage of the easier modification (adding shim) is that when you focus at 1m, all the DOF is behind the point where you focus by RF, because the actual point of focus is a little bit behind the point of RF focus (and the point of RF focus is at the very front of the DOF wide open). Also if you want to enlarge the picture above say A4 format, DOF becomes smaller and you have a problem.
 
Spyderman; Use vernier caliper to measure the length of the front group block before sanding and often check how much you've taken from the material. About 0.3 to 0.5 mm shortening is enough. After the modification said:
I suspect the scale error would be rather minor, and since the whole idea here is to make the lens work correctly with the rangefinder it is a small price to pay. The measurement of 0.3 to 0.5mm is rather wide- do you know the correct nominal reduction for both the J3 and J9 lenses? Or is the unit-to-unit variation in these lenses so much that this is as close as you can estimate it?

Thanks,
Dez
 
The measurement of 0.3 to 0.5mm is rather wide- do you know the correct nominal reduction for both the J3 and J9 lenses?
I haven't calculated it, I found it by trial. IIRC I shortened my lens by 0.4mm. I checked at 0.3 and found that it needed a little bit more... therefore it's best to remove less material and often check if it's enough.

For Jupiter-9 I have no idea. Problem with the sample I have is that after removing the secondary shim (between front and rear group) and removing the main shim, the lens still can't reach infinity (can't screw the optical block close enough to film) and there I stopped my experiments...
 
Related question: Once I open the lens, what should I use to lubricate the helicals and the focus/aperture rings? I want them to be smooth but not to be prone to accidental moves either. Any suggestion?
 
mszargar: I've put the helicals into an ultrasonic cleaner (water + some dish washing fluid), then brushed them afterwards with an old toothbrush. Lubed them with a small amount of vaseline (like in the old times ;) ). It's now veeeery smooth :cool:
 
Watch out and mark the exact position where the helicals go apart! There are several possibilities to put them together but only one is the right one!
 
Actually, I have already misplaced them and that is why the focus ring does not drive the cam to infinity. I guess this time I open it I will have to spend some time finding the correct position.
 
I messed around with my J3 for a long time. I wasn't able to locate it's problem, it just acted somehow weird. I even managed to contact Brian Sweeney what to do, because this lens was in fact not only back focusing at short distances but also severely front focusing at longer distances (+ a ton of glow & aberrations). I tried different positions of the rear group, but no matter what I did, something was always off.

Today I took a closer look at the rear group and I think I've found it's problem. The whole rear group was not fitted right into its shell, therefore the front-to-rear-group-distance was way to big (I guess something like 0.5 - 1mm).

yeah.... Soviet quality control... it explains why the "lens cap"-Zorki4 which came together with my J3 was so out of specs, I guess someone adjusted the camera to work together with this Jupiter.

...I refitted the rear group and pre-shimmed the lens as far as I could without burning a test-roll. It seems now to be spot on at 1m, 4m and 20m.
Now I have to load some film into my IIIf and test the Jupiters focus :)
wish me good luck :)
 
It worked! Maybe the lens still needs some slight shim modifications, but it now seems to focus more or less spot on :cool:
+ the enormous amount of glow disappeared and it seems to distort less :D
 
hi all, I am sorry, I know there are several threads about it, but I just can't get it done.
I mounted my just arrived J3 on my Leica m240 and it back focuses. I tried another adapter, same story. I tried shimming with a metal shim and now it seems to focus fine but I have lost infinite focus. I doesn't go past 50 meter (around). Is it normal?
 
Back
Top Bottom