02Pilot
Malcontent
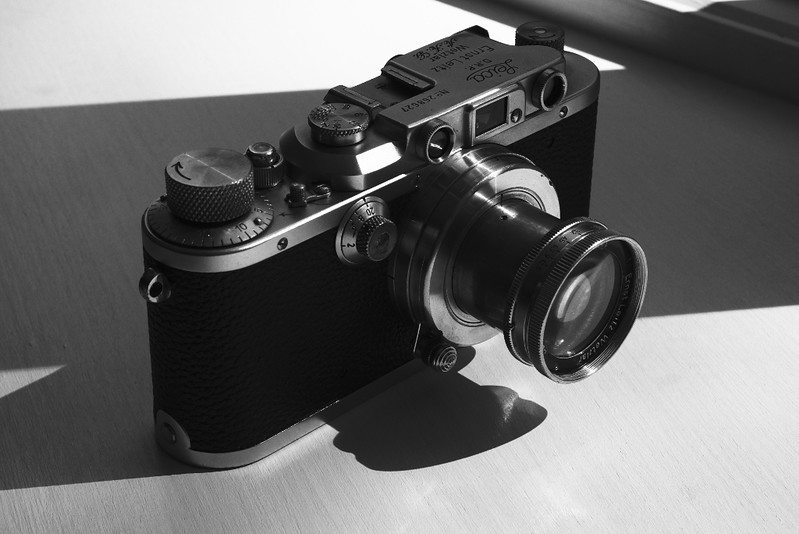
Just finished restoring this 1938 IIIa with 1937 Summar. The kit came to me in a sorry state: vulcanite half gone, everything dirty and stiff, Summar filthy and scratched all to hell.
I tackled the lens first. I disassembled it, cleaned all the glass surfaces thoroughly, and repainted the interior areas where the black paint had gone missing. Polishing the front element was another matter; it was really badly scratched, to the point that it was like looking through multiple layers of wax paper - totally unusable. I got some cerium oxide and went at it with Q-tips and cotton pads, figuring I had nothing to lose. Slowly but surely, it started to clear up. I checked it frequently on my X-E1 to make sure I wasn't introducing any distortion. I stopped short of getting it totally smooth, for fear of creating a problem, but overall I'm quite pleased with the improvement (see samples below).
On to the body. This was much more straight-forward. Took it apart, cleaned everything, lubed sparingly where necessary, and reassembled. Beamsplitter was in good shape, as were the curtains, so no need to replace either. Finished it off with a new body covering from Hugo Studio (very nice, BTW) and called it done.
There's still a few bumps and scratches in the body from a drop at some point in its life, but functionally it's good to go.
No film through it just yet, but here's a couple of the X-E1 sample shots. Both are wide-open, no post-processing except to reduce the size and stick on the border.
I tackled the lens first. I disassembled it, cleaned all the glass surfaces thoroughly, and repainted the interior areas where the black paint had gone missing. Polishing the front element was another matter; it was really badly scratched, to the point that it was like looking through multiple layers of wax paper - totally unusable. I got some cerium oxide and went at it with Q-tips and cotton pads, figuring I had nothing to lose. Slowly but surely, it started to clear up. I checked it frequently on my X-E1 to make sure I wasn't introducing any distortion. I stopped short of getting it totally smooth, for fear of creating a problem, but overall I'm quite pleased with the improvement (see samples below).
On to the body. This was much more straight-forward. Took it apart, cleaned everything, lubed sparingly where necessary, and reassembled. Beamsplitter was in good shape, as were the curtains, so no need to replace either. Finished it off with a new body covering from Hugo Studio (very nice, BTW) and called it done.
There's still a few bumps and scratches in the body from a drop at some point in its life, but functionally it's good to go.

No film through it just yet, but here's a couple of the X-E1 sample shots. Both are wide-open, no post-processing except to reduce the size and stick on the border.


Emile de Leon
Well-known
Nice! I have a similar set up w/Summar..nice painterly lens.
ray*j*gun
Veteran
Nice job! I love seeing a Barnack brought back to life. In my mind these were the absolute beginning of modern photography.
02Pilot
Malcontent
Thanks, guys. I find myself shooting my Barnacks more than anything else these days, so I'm sure this one will see some use rather than just sitting on a shelf looking pretty.
Great work. Would love to learn more about the optical restoration.
Hugo has by far the best vulcanite replacement. I've sent him some shells which he's used to fine tune his patterns.
02Pilot
Malcontent
Great work. Would love to learn more about the optical restoration.
Hugo has by far the best vulcanite replacement. I've sent him some shells which he's used to fine tune his patterns.
I was impressed by the replacement skin. It's comforting to know that there's a reliable source of high-quality body coverings - hopefully he will expand to add more styles to the catalog.
What more would you like to know about the lens work? I'll try to explain the best I can.
David Hughes
David Hughes
Impressive; any idea how many hours it took?
Regards, David
Regards, David
Mr_Flibble
In Tabulas Argenteas Refero
Lovely restoration.
I draw the line at taking lenses and shutter crates fully apart :\
johnnyrod
More cameras than shots
How did you get on with the cerium oxide? I have a camera with quite a hazy rear element. I've tried everything, I suspect the only way to make it usable would be to polish the surface. I guess I also have nothing to lose but would be interested in how you went about it. Great looking job you did there and the pictures look good.
02Pilot
Malcontent
any idea how many hours it took?
I wasn't keeping track, but I'd guess around 8-10 for the lens (the vast majority polishing the front element) and 4-5 for the body.
I draw the line at taking lenses and shutter crates fully apart
Lenses don't bother me; I've taken so many apart it's second nature at this point, and in many cases it's amazing how much even seemingly clean old lenses can be improved. Shutter crates come apart only under extreme circumstances.
How did you get on with the cerium oxide? I have a camera with quite a hazy rear element. I've tried everything, I suspect the only way to make it usable would be to polish the surface. I guess I also have nothing to lose but would be interested in how you went about it.
"Nothing to lose" was the principle I was working under. Basically, you start with a good-quality, fine cerium oxide powder. Using cotton pads (the type used for removing makeup) and Q-tips, I moistened them and then applied a bit of the cerium oxide to form a slurry. Working with virtually no pressure and in as much of a random orbit pattern as I could manage - small circles, bigger circles, changing direction often - and reorienting the lens element frequently to maintain even coverage, I simply continued polishing. The cerium oxide eventually dries up as you work, at which point I would wash it off, inspect, and continue as necessary.
About every half hour or so, I would screw the lens back together and check on my X-E1 to see how it looked. Once I got to a point where I was content with the results, I stopped. There's still a bit of imperfection in the center and more toward the edges, but it wasn't worth it to me to keep going. If it somehow turns out to be unsatisfactory, I can always go back at it, but at this point I think it's 95% as good as it's going to get.
citizen99
Well-known
Very interesting and informative; thank you 
02Pilot
Malcontent
OK, film testing is complete and I'm pleased to report that everything is working properly. Shutter speeds seem good, with no signs of capping even at 1/1000. Lens is behaving as expected based on the digital tests. Here are a few samples from the test roll.


David Hughes
David Hughes
Wow! Or, perhaps two wows...
Regards, David
Regards, David
grouchos_tash
Well-known
Excellent, well done!
Bill Clark
Veteran
Beautiful.
Photographs look great!
02Pilot
Malcontent
Thanks, folks. I was pleased with how things worked out.
Share:
-
This site uses cookies to help personalise content, tailor your experience and to keep you logged in if you register.
By continuing to use this site, you are consenting to our use of cookies.