Leica LTM Leica Screw Mount Conversions - Show Yours

Leica M39 screw mount bodies/lenses
Peeling around lettering happens pretty often, chemical reaction with the alloy. Might be related to how the camera was stored. Btw in the reality this was not Woods metal, melting temperature of 60C would be too low. This is another alloy based on Bismuth with addition of Zn and Pb.
Polishing - yes, however carefully, lettering alloy is pretty soft.
 
Btw in the reality this was not Woods metal, melting temperature of 60C would be too low. This is another alloy based on Bismuth with addition of Zn and Pb.

Very interesting information. Do you know the procedure how this lettering was applied? This still remains a mystery to me. Years ago some RFf-members tried to find an answer on this question in a thread, but to no avail.

Erik.
 
Many years ago I worked in a shop that made large diameter rings for jet engines out of high temperature alloy's. Many of these rings were very thin and holding them in the lathe's stress free was a challenge. To get around it they used something called Cerro metal. This metal would melt at a little below the boiling point of water. The ring was placed in a fixture and we used a small squirt bottle (and thick gloves) to pour the Cerro metal around the part which would cool and hold the part well enough to allow machining. I expect a much smaller bottle or syringe could hold the liquid metal and allow a skilled hand to fill an engraving. Speculation for what it's worth. Joe
 
Very interesting information. Do you know the procedure how this lettering was applied? This still remains a mystery to me. Years ago some RFf-members tried to find an answer on this question in a thread, but to no avail.

Erik.

Erik,

I understood that the item was painted, the paint hardened then engraved and then the bismut/bismuth/Woods metal or whatever it is was, was wiped over, sticking to the exposed brass but wiping off the already hardened paint. This could just be 'legend' mind you...

What I do know is that if you take a small torch/gas soldering iron etc and heat the underside of some of this lettering you can get the lettering to appear to 'shine up' as if it has been partially re melted in situ. I did this once some time ago, Peter at CRR has also done it with some success but I wouldn't suggest that we all start trying it and watching our nice black cameras start to bubble!
 
This is the process as I heard. I was doing some experiments in the past, however with no real success. There are two critical aspects, firstly to find precise chemical formula for alloy and secondly timing between engraving and applying alloy. It has to be done immediately after engraving otherwise brass is oxidizing and alloy does not stick to brass.
 
All these assumtions are sounding immensely complex in my ears. Thousands of cameras have this type of lettering. It must have been something relatively simple, also given the fact that this type of metal is very toxic.

Erik.
 
I think it is less complicated then it sounds. Few years ago I heard it from former Leitz employees. This October, when meeting very well known Leica repairman from Wetzlar he confirmed the process. I was however not able to get info about formula of alloy. Either they really do not know or keep it as a secret.
For engraving Leica used so called pantograph, later on, mainly with chrom plated they switchedto stamping. Stamping was used as well for black Leicas, lettering was done with white paint. You may observe it for example on sync conversions.
Toxity of heavy metals was not a subject in 20ties and 30ties and Soldering metal used nowadays contains both Pb and Sn.
 
Thank you Jerzyw for this information. Is the very well known Leica repairman Ottmar Michaely?

I know the pantograph, pantographs were also used for the lettering on the early Nikons. The difference between stamping and engraving is easy to see; as far as I know the serial numbers were always engraved. The conversion-Leicas were always engraved completely, presumably because of the low quantity.

Erik.
 
Shot with my black post war Leica II conversion.

Leica II, Color-Skopar 50mm f/2.5, Tmax400.

Erik.

23064286589_1c3f056ebb_c.jpg
 
Leica IIIa upgrade to IIIa-syn

Leica IIIa upgrade to IIIa-syn

My Leica IIIa upgrade to IIIa-syn

attachment.php
 

Attachments

  • leica-iiia.jpg
    leica-iiia.jpg
    30.4 KB · Views: 1
Help with this 1a converted???

Help with this 1a converted???

Hi, just joined RFF, have a few M cameras and have just started collecting a few old LTM's. I would appreciate any help that you LTM gurus might be able to give regarding just what has been done to this camera. Its a 5 digit 1a but obviously has had the "hockey stick" modified, cut back... Also, it came without a lens and when i bought it (at an online auction with zero info about it) I had thought it was modified to take standardized lenses, but that is not the case... the threaded mount on the lens ring as shown on the camera will not take a standardized nickel Elmar 5cm that i bought for it, and even when I dis-assembled the lens, the barrel thread will not start in the on camera ring either, although it seems to be very close. Could be that the threads are bad?

Basically I would like to know more about it, and get a lens on it... Any ideas or thoughts would be appreciated, thanks
 

Attachments

  • Leica Model 1a-330.jpg
    Leica Model 1a-330.jpg
    20.8 KB · Views: 3
  • Leica Model 1a-330a.jpg
    Leica Model 1a-330a.jpg
    30.7 KB · Views: 3
I would say that the ring on the camera is the female part of the focusing assembly. The male part of the lens unit is removed. When you remove the screw with the long head at least the male part of the original lens should fit. I don't know if a male part of any Elmar will fit.

It looks to me a normal late Leica I with rather strange strap lugs added.

The camera is partly repainted or is it dirt? Maybe you can remove this with lighter fluid. The camera will look better and maybe the serial number will become readable.

Erik.
 
Thanks Erik

Thanks Erik

Thanks for the info Erik. Yes, it looks to have been at least partially repainted some decades ago, and the paint over the serial number has been mostly removed so that I can make out the serial number, just.

For the female lens ring on the camera, I had removed the 'long head' screw and tried installing the female section of the standardized nickle lens (see photo attached here) but as I mentioned, the threads would not start easily, and I did not try to force the issue.

So then, the female ring that is on the camera has the upper part of it cut flat to fit under the top plate... so I assume then I need to find a lens like that to install on the camera, correct? I have had a look around on eBay and did not see any like that, rare I suppose, all are the fully round type. Not sure about the 7 vs 11 oclock lens issue so will study up on it to see if there is some thread variation?? :bang: Thanks again :)
 

Attachments

  • s-l1600 (1).jpg
    s-l1600 (1).jpg
    16.3 KB · Views: 0
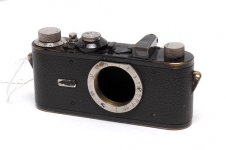
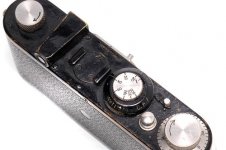
I agree with Erik regarding the ring or mount. No clue about those odd lugs.

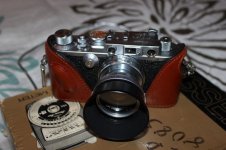
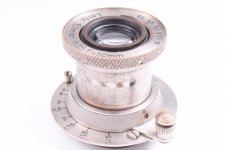
To make things worse it is possible, though unlikely, that the missing lens might have been a Hektor...

I think the fixed lens cameras have a different mount to film distance. I remember that certainly the earlier ones had the lens mounted over machined vulcanite and were built accordingly.

Ages ago we had a thread about 'short' and 'long' 50mm Elmars that highlighted differences between fixed or converted and interchangeable lenses. Obvious a converted lens has the same mount to film distance as an interchangeable one, the differences being taken up in the mount.

Furthermore I haven't got anything to check it with but isn't the 'throw' of a fixed lens different from that of an interchangeable one? If so this would mean the helical's pitch was different.

Islandor has got a bit of a problem here. The solution would be to find a whole 'fixed' lens and mount. It will need shimming etc. He'll also need to find a hockey stick too but that is not essential.

Curiously, here's one but at that price and bearing in mind the condition of the camera (and this lens) I would think twice.

http://mwclassic.com/product/leitz-...for-leica-i-model-a-with-leica-i-flange-only/

Please correct me if I am wrong, don't want to start any internet myths!

Michael
 
Not sure about the 7 vs 11 oclock lens issue

These names indicate the position of the knob of the lens at infinity seen from front. Originally it was 11-o-clock, but later this became 7-o-clock.

An advise: do not remove and replace the screw with the long head too often. This screw goes right into the soft aluminium of the housing of the camera. The thread into the aluminium is easily damaged. This is the weak point of the Leica I with fixed lens. Take care!

Erik.
 
Michael:
The solution would be to find a whole 'fixed' lens and mount. It will need shimming etc. He'll also need to find a hockey stick too but that is not essential.

Curiously, here's one but at that price and bearing in mind the condition of the camera (and this lens) I would think twice.
Erik:
HTML:
These names indicate the position of the knob of the lens at infinity seen from front. Originally it was 11-o-clock, but later this became 7-o-clock.

An advise: do not remove and replace the screw with the long head too often. This screw goes right into the soft aluminium of the housing of the camera. The thread into the aluminium is easily damaged. This is the weak point of the Leica I with fixed lens. Take care!
Thanks guys, great info... so it seems that I need the Leica 1 "fixed lens" similar to the one for sale in that link, only that one seems to have the long head screw well stripped out... so guess I will look for one as I would like to get it back in shape so that it will work as intended.

Cheers, Bob
 
Last edited:
Thanks Michael

Thanks Michael

HTML:
They do come up for sale a little more often than you might think. 

Good luck

Michael

Glad to hear it, thanks !
 
Back
Top Bottom