Leica LTM LTM Engineering Specs: Need Help

Leica M39 screw mount bodies/lenses

trittium

Well-known
Local time
2:22 AM
Joined
Oct 3, 2005
Messages
649
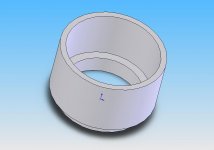
Hi Everyone, I am planning on putting some of my engineering skills to work and design an uncoupled adapter from arri to LTM. I was wondering if anyone knew or had access to detailed drawings (with measurements) of the mounting system. So far I have found that....

Thread is a m39 with 26 turns per inch

I have all the information for the arri lens, but not for the leica

Any help would be greatly appreciated.

I got this idea from an online auction. I am currently in collage, but will be graduating school soon. I would like to finish this quick while I have the machining resources available.
 
Only other spec I have is he flange-to-film (flange-back) distance is 27.8mm for Leica screw mount (courtesy of Karen Nakamura)
 
LTM registration distance is 28.8 +- 0.02mm. Which Arri do you have and
what else do you need to know ? For the start of the helix,
best might be to check a lens or an adapter.

Best,

Roland.
 
rogue_designer said:
Only other spec I have is he flange-to-film (flange-back) distance is 27.8mm for Leica screw mount (courtesy of Karen Nakamura)

27.8 is the M mount, I believe.

Roland.
 
Leica thread mount is 28.8 and M mount is 27.8. Arriflex bayonet seems to be 52. So you must have anadapter spacing of 23.2 for infinity focus.

-A
 
I have started doing some of the CAD. I forgot how to make threads. I remember it being tedious.
 

Attachments

  • arri adapter.jpg
    arri adapter.jpg
    31.4 KB · Views: 0
Hey, Trittium.

Looks like you're using...Solidworks? If so, I think there's a thread layout tool somewhere in there. It's just a rotation and axial parameter, I think...but it's been awhile. Besides, I was never a real mech designer, just a fellow with a now-useless degree in aerodynamics.

Are you at RPI? I spent '96-'97 there on the way to a Master's. Didn't like it at the time, but I miss the place now and then.


Cheers,
--joe.
 
I thought there was a thread function. I have to find it, I am using a newer version, I am not use to yet. I am at RPI. It took me a while to get used to this school and area, but now I rather enjoy it.

planetjoe said:
Hey, Trittium.

Looks like you're using...Solidworks? If so, I think there's a thread layout tool somewhere in there. It's just a rotation and axial parameter, I think...but it's been awhile. Besides, I was never a real mech designer, just a fellow with a now-useless degree in aerodynamics.

Are you at RPI? I spent '96-'97 there on the way to a Master's. Didn't like it at the time, but I miss the place now and then.


Cheers,
--joe.
 
I hit a snag. It is going to cost $250 for the adapter to be made and $75 for each additional adapter. I was thinking about canabalizing an enlarger lens and welding a tube to it. Does anyone have an extra crappy m39 enlarger lens lying around. It would be even better if it was a fat lens
 
David Murphy has this M39 enlarger lens in the Classifieds. Good luck with the project - and cheers to a fellow 'tech Engineer.


Cheers,
--joe.
 
planetjoe said:
David Murphy has this M39 enlarger lens in the Classifieds. Good luck with the project - and cheers to a fellow 'tech Engineer.


Cheers,
--joe.

Thanks Joe, but I thought of another way to do it. I threw all my engineering skills out the window, and switched on the left side of my brain. I used thermosetting plastic clay to mold an adapter (aka Sculpy Modeling Clay). I used a rear lens cap to make the threads. It is really ghetto. It looks like I smushed gumby to make it. I took some test shots. If They come out I will post the photos and a picture of this very unprofessional adapter.
 
Screw professional; we're engineers. A Latin phrase I once heard put this notion into proper context:

"Aut viam inveniam aut faciam" - "I will either find a road or make one"

Now, something in the dark recesses of my education tells me it's poor Latin; but then, it's idiomatic anyway. Sounds like you had a good idea. If your idea works, you can always mold a negative from it and pour it in resin.


Cheers,
--joe.
 
planetjoe said:
Screw professional; we're engineers. A Latin phrase I once heard put this notion into proper context:

"Aut viam inveniam aut faciam" - "I will either find a road or make one"

Now, something in the dark recesses of my education tells me it's poor Latin; but then, it's idiomatic anyway. Sounds like you had a good idea. If your idea works, you can always mold a negative from it and pour it in resin.


Cheers,
--joe.


Oo0o0o, you gave me a good idea. I could make a wax cast. Then coat it in layers of ceramic and investment cast it. That would require a foundry though :(
 
rather than machining the whole body (I'm assuming that was the primary cost) - are there not a pre-fab pipe stock sizes you can nest and weld, that will get you close enough to hand cut threads to the required spec?

I'm just tossing out ideas. I have no idea if that would even be possible. Just going by your quick cad model.
 
rogue_designer said:
rather than machining the whole body (I'm assuming that was the primary cost) - are there not a pre-fab pipe stock sizes you can nest and weld, that will get you close enough to hand cut threads to the required spec?

I'm just tossing out ideas. I have no idea if that would even be possible. Just going by your quick cad model.


I thought about that, but the clay was way easier, faster, and cheeper. It took me about 45min to make. I was also concerned with the welding. I would probably take the mount from another lens, and weld a pipe to it. I wasn't sure how well the aluminum weld would adhere to the chrome coating. I guess I could grind it off. I don't know. I don't really feel like battling for time in the student machine shop.
 
IT WORKED! I can't believe it. This lens doesn't cover the full 35mm frame, but I was informed that lenses 40mm and longer will. This would probably work really well on the RD-1. I really like the vintage look.

Leica IIIC, 25/2 Astro-Berlin Gauss-Tachar, FP4

462145802_1d9a46571b_o.jpg


462145698_79c6aae88f_o.jpg


462167748_c081e45e38_o.jpg
 
Last edited:
Back
Top Bottom