hamustar
Member
With interest I read about the M8's IR capability and hence my old hoya R72 filter was digged out from my dry box.
The following were taken with my M8.2 with a R72 Hoya IR filter stuck in front of the 35mm Summicron v4.
Focusing was pretty tricky since IR focusing points are slightly closer than normal.
The following were taken with my M8.2 with a R72 Hoya IR filter stuck in front of the 35mm Summicron v4.
Focusing was pretty tricky since IR focusing points are slightly closer than normal.


D&A
Well-known
Nice Images,
Would it be possible to elaborate on some of the technical aspects (in camra settings and post processing) to achieve the "blue-ish" sky and white trees? Was white balance initially on Auto or some other setting? Once the image was brought into Photoshop (or whatever editing software you used), I'd be curious to know what adjustments to the original file you performed. I used an R72 on a M8 but had difficulties achieving the look you were able to, although I did employ a number orf recommended techniques. The focusing part actually turned out to be relatively easy, but then again I was using a wide to ultra wide angle lens. Thanks!
Dave (D&A)
hamustar
Member
M8 IR Step-by-step
M8 IR Step-by-step
Hi Dave, thanks for your kind comments.
Think it's a good idea to share the step-by-step of the work-flow....may not be the best but it works
Software used:
a) LightRoom 2 for importing of files from the SD card. Actually any photo editor with WB adjustment can do.
b) GIMP version 2.6.x : freeware !! You'll need this for Channel Mixing.
I've chosen an example photo for walking through since it has typical white leaves from foliage.
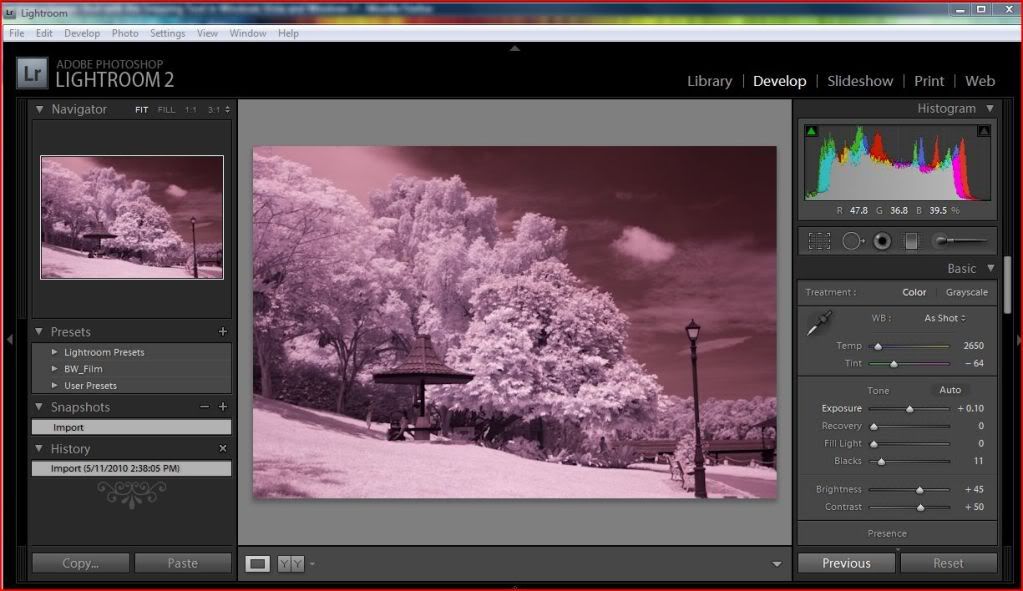
1) Shoot in RAW. Through the dark red Hoya R72 filter, everything is captured as reddish.
- Import into LR2.
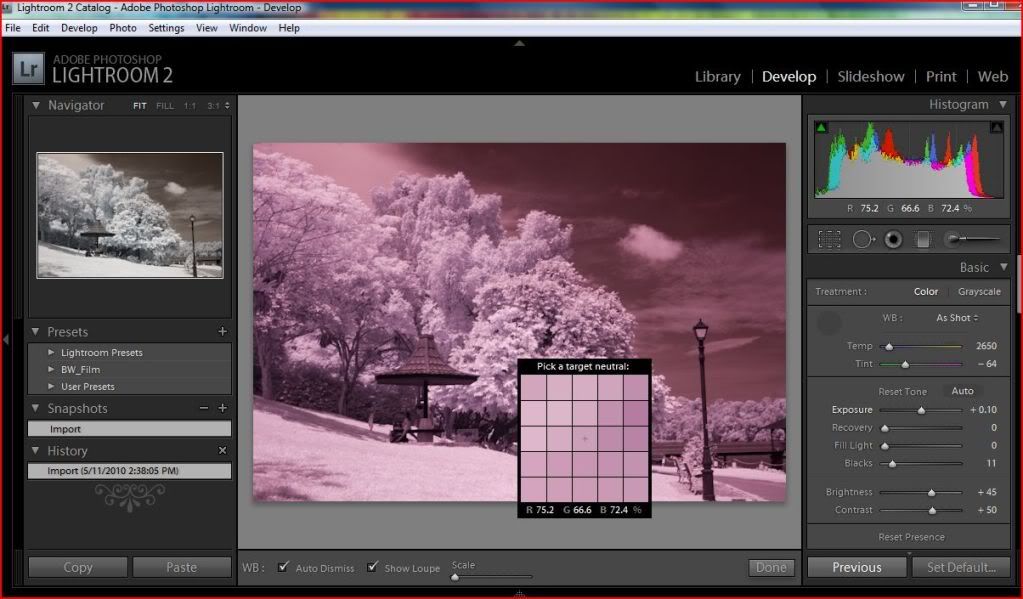
2) Use the whitebalance tool to select a point for which determines your WHITE point. In usual cases, choose a point within the green leafy foliage.
- in this photo it's the leaves in the middle of the picture
You can see a preview on the smaller window.
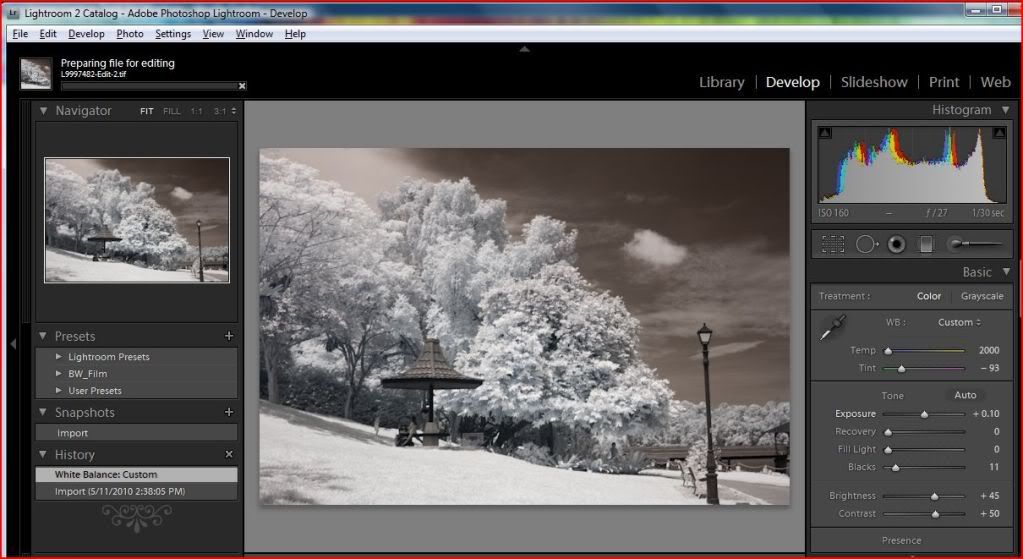
3) This is the result in LR2 before exporting to external editor (GIMP). Some of you may use Photoshop CS.
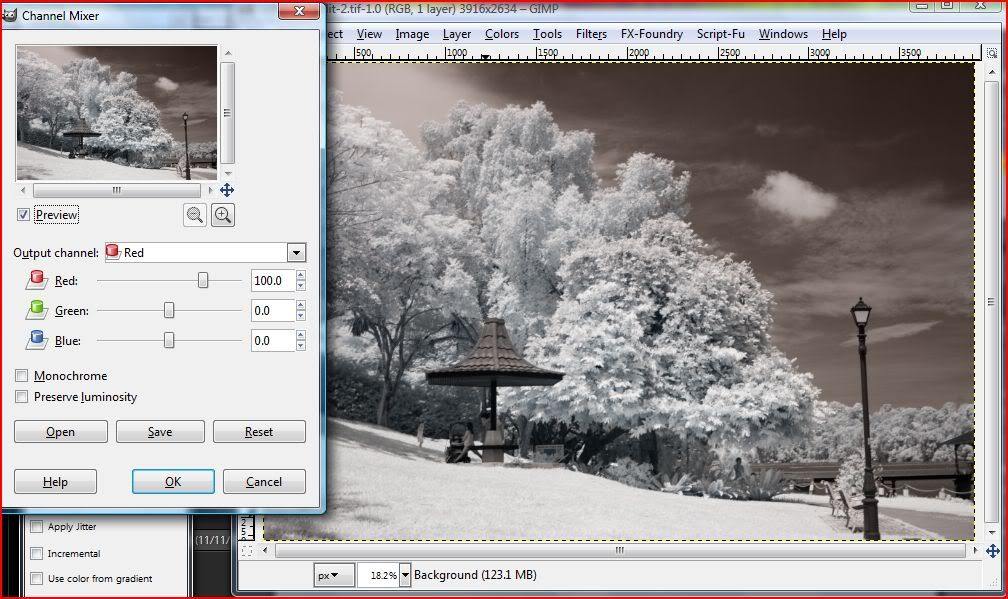
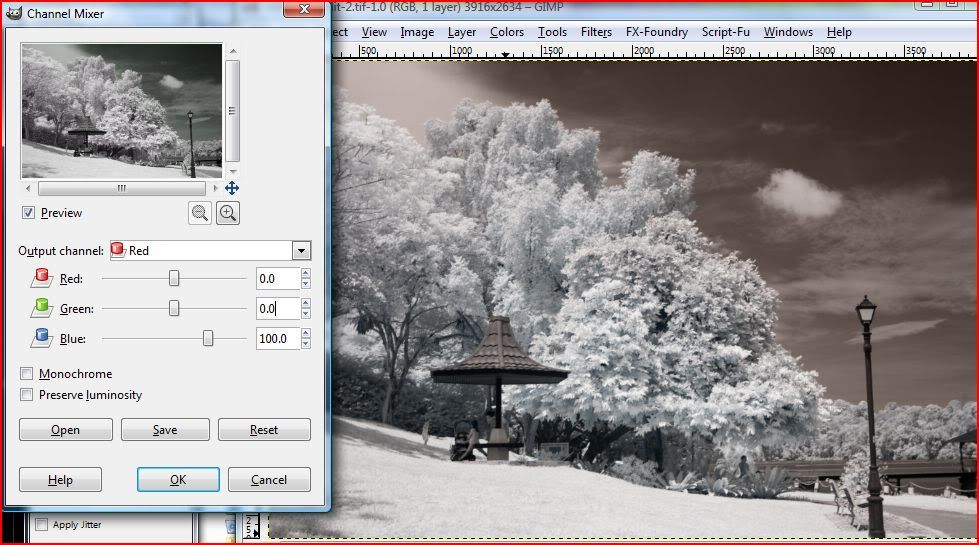
4a) In GIMP, open up the channel mixer.
-> Colors -> Component -> Channel Mixer
The first output channel you see is RED.
4b) Slide the "Red" slider to 0, and slide the "Blue" one to 100
- see the preview on the smaller window?
- You shd get the output as seen in the preview window
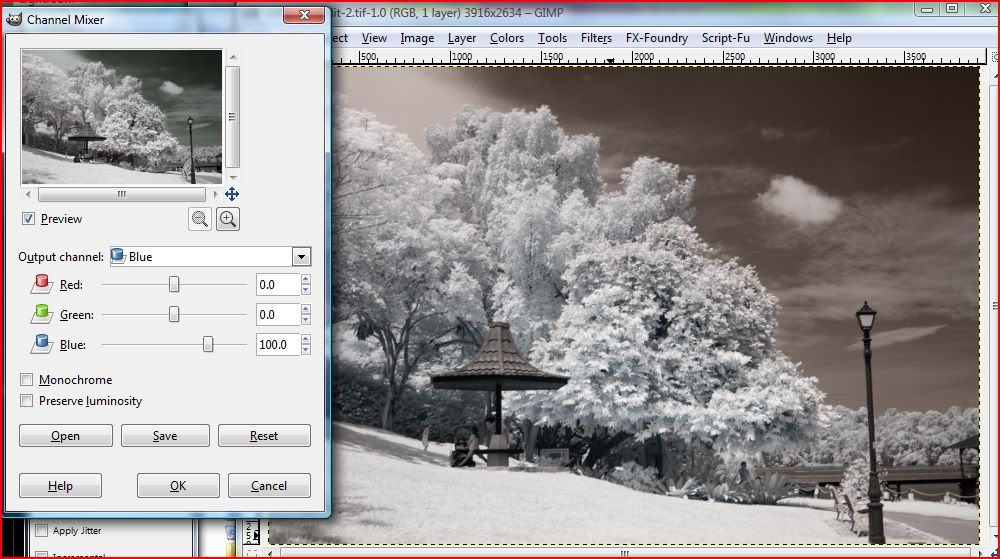
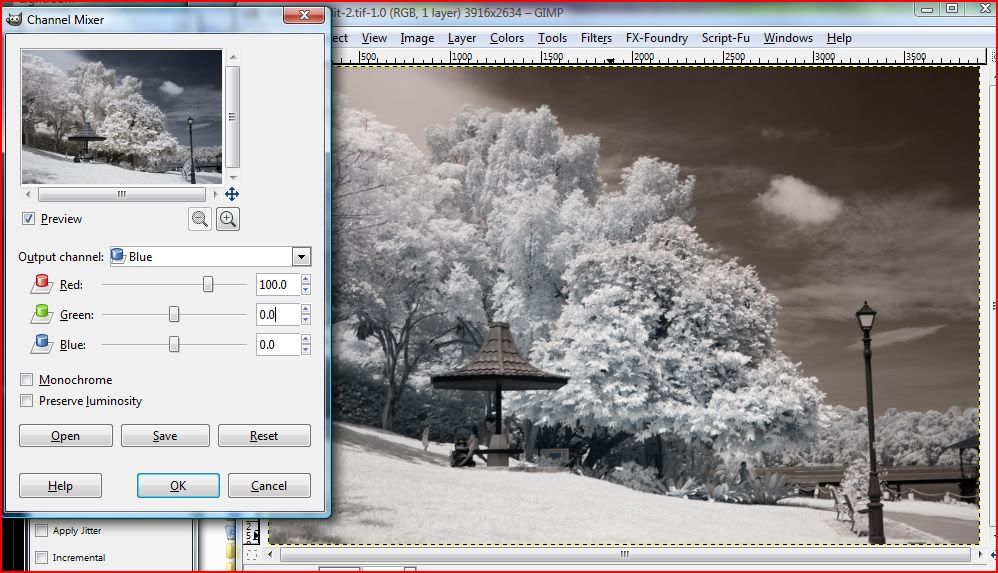
5a) Now click the dropdown box and select the BLUE output channel.
5b) Do the vice versa. Slide the Blue slider to 0, and the red one to 100.
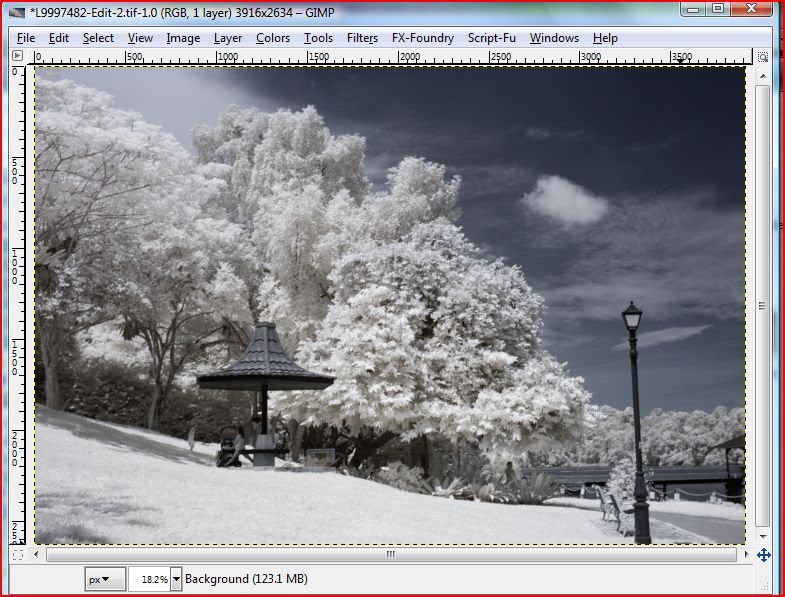
6) That's it!
After this step, you may want to adjust the curves to your taste.
I felt the most important step is to get the original WB correct which is easy to do if you shot in RAW/DNG.
Hope this helps
M8 IR Step-by-step
Hi Dave, thanks for your kind comments.
Think it's a good idea to share the step-by-step of the work-flow....may not be the best but it works
Software used:
a) LightRoom 2 for importing of files from the SD card. Actually any photo editor with WB adjustment can do.
b) GIMP version 2.6.x : freeware !! You'll need this for Channel Mixing.
I've chosen an example photo for walking through since it has typical white leaves from foliage.
1) Shoot in RAW. Through the dark red Hoya R72 filter, everything is captured as reddish.
- Import into LR2.

2) Use the whitebalance tool to select a point for which determines your WHITE point. In usual cases, choose a point within the green leafy foliage.
- in this photo it's the leaves in the middle of the picture
You can see a preview on the smaller window.

3) This is the result in LR2 before exporting to external editor (GIMP). Some of you may use Photoshop CS.

4a) In GIMP, open up the channel mixer.
-> Colors -> Component -> Channel Mixer
The first output channel you see is RED.

4b) Slide the "Red" slider to 0, and slide the "Blue" one to 100
- see the preview on the smaller window?
- You shd get the output as seen in the preview window

5a) Now click the dropdown box and select the BLUE output channel.

5b) Do the vice versa. Slide the Blue slider to 0, and the red one to 100.

6) That's it!

After this step, you may want to adjust the curves to your taste.
I felt the most important step is to get the original WB correct which is easy to do if you shot in RAW/DNG.
Hope this helps
R
Roberto
Guest
Please sticky this thread!
Thanks for the info!
sepiareverb
genius and moron
Thanks for this. Sticky indeed.
hamustar
Member
2 more samples ...


sprokitt
Established
Cool!! I played around with the M8 and IR. Your workflow is helpful. I think I'll try some more now that I have a bit of a better plan.
Thanks for posting.
Thanks for posting.
kalex
Established
Thanks for the detailed guide
D&A
Well-known
Hi hamustar,
Like everyone else, I'd like to thank you for sharing your wonderful tutorial. Very informative and it leave lots of room to experiment. Your images certainly show your excellent work in using the M8.2 for IR work. Yes, this thread should become a "sticky" . Thanks again and much appreciated!
Dave (D&A)
hamustar
Member
Thanks guys, your comments were very encouraging. Like many of us here, I'm also experimenting and learning.
Dear moderator, if you are reading this, i wonder if you are able to make this a sticky? If possible also change the title to "IR with M8 Workflow". Thanks!
lovetodraw
Member
Thanks guys, your comments were very encouraging. Like many of us here, I'm also experimenting and learning.
Dear moderator, if you are reading this, i wonder if you are able to make this a sticky? If possible also change the title to "IR with M8 Workflow". Thanks!
VEry beautiful images. All I can say oh my ..... Very good. You got me inspired.
Thanks you very much for sharing your knowledge. I tried once to do IR on my m8 but the entire image was red. So. I stopped, now with your information I will revisit this technique.
Thanks again.
Share:
-
This site uses cookies to help personalise content, tailor your experience and to keep you logged in if you register.
By continuing to use this site, you are consenting to our use of cookies.