Corran
Well-known
Sorry but that's exactly what it is...just like manipulating the color channels on your enlarger head. There is no "black magic" involved. Scanning with a high-end flatbed as a positive and adjusting the color channels + color curves is how I scan my film, but the same would apply to a DSLR "scan."
The problem with "profiles" or anything that purports to remove the orange mask is that it's imperfect - due to film age, development, etc. Also, there are issues with regard to density, DMax and range, etc. with regard to scanners (or DSLRs) that can greatly affect the results of scans.
By the way, there are some negative films available without an orange mask. I really like Rollei's CN200 film.
I'm with you that each film has a "look" to it. Obviously that's true, otherwise we wouldn't have the variety of CN films available as they would all be identical. But the color balance is still subjective in that you can change it to your whim and it's not "visible" on the light table, as compared to slides.
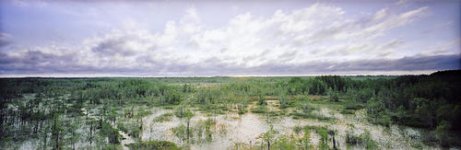
This is a 6x6 Fuji 160S scan from my Screen Cezanne, scanned as positive, inverted, and balanced with individual RGB channel settings and curves:

The problem with "profiles" or anything that purports to remove the orange mask is that it's imperfect - due to film age, development, etc. Also, there are issues with regard to density, DMax and range, etc. with regard to scanners (or DSLRs) that can greatly affect the results of scans.
By the way, there are some negative films available without an orange mask. I really like Rollei's CN200 film.
I'm with you that each film has a "look" to it. Obviously that's true, otherwise we wouldn't have the variety of CN films available as they would all be identical. But the color balance is still subjective in that you can change it to your whim and it's not "visible" on the light table, as compared to slides.
This is a 6x6 Fuji 160S scan from my Screen Cezanne, scanned as positive, inverted, and balanced with individual RGB channel settings and curves: