danieldumanescu
Member
Sixth part: reassembly of the shutter (lens) on its base
Sixth part: reassembly of the shutter (lens) on its base
Sixth part: reassembly of the shutter (lens) on its base
If you didn’t clean and lubricate the shutter firing mechanism seen in image 7, please do so.
Place the lens on the table, facing downwards and put the firing and coking rings into position. Watch for the position of the flashmatic ring, which engages with the focusing ring. This part may prove to be time consuming and frustrating. Sheer force is futile. When you get it all aligned, it simply falls into its place. You’ll know it. Replace the “deepest ring” we talked about in the beginning.
Replace the rear lens element – make sure it is clean before doing so. There’s no need to overtighten it, the vitamin tube did the trick again here. Then I put in a new light seal over the “deepest ring”.
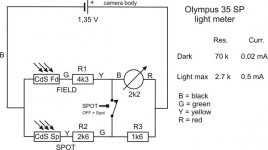
Put the whole thing near the camera body and resolder the white and green wires to the PC socket. Make sure the black power supply wire is making proper contact with the “minus” blade in the battery chamber.
The whole assembly is now ready to return to the camera body. It helps to set the focus to 0.85 meters – the rangefinder lever on the focusing helicoid will be in its outermost position and will cause minimum interference. Once again, be careful not to break the rangefinder window with the needle trap mechanism.
Tighten the four screws (under the leatherette) that hold the whole thing to the camera body.
Now go to the needle trap in image 3. The meter needle should just squeeze under the blade; the lower rim of the blade shouldn’t be way above the needle. Adjust the eccentric screw to get it right.
Sixth part: reassembly of the shutter (lens) on its base
Sixth part: reassembly of the shutter (lens) on its base
If you didn’t clean and lubricate the shutter firing mechanism seen in image 7, please do so.
Place the lens on the table, facing downwards and put the firing and coking rings into position. Watch for the position of the flashmatic ring, which engages with the focusing ring. This part may prove to be time consuming and frustrating. Sheer force is futile. When you get it all aligned, it simply falls into its place. You’ll know it. Replace the “deepest ring” we talked about in the beginning.
Replace the rear lens element – make sure it is clean before doing so. There’s no need to overtighten it, the vitamin tube did the trick again here. Then I put in a new light seal over the “deepest ring”.
Put the whole thing near the camera body and resolder the white and green wires to the PC socket. Make sure the black power supply wire is making proper contact with the “minus” blade in the battery chamber.
The whole assembly is now ready to return to the camera body. It helps to set the focus to 0.85 meters – the rangefinder lever on the focusing helicoid will be in its outermost position and will cause minimum interference. Once again, be careful not to break the rangefinder window with the needle trap mechanism.
Tighten the four screws (under the leatherette) that hold the whole thing to the camera body.
Now go to the needle trap in image 3. The meter needle should just squeeze under the blade; the lower rim of the blade shouldn’t be way above the needle. Adjust the eccentric screw to get it right.