jzagaja
Well-known
I've calibrated focus using 2x2cm crop and switched on Autofocus:
https://docs.google.com/file/d/0ByP8kkW_h00uaEV2Vmd2N3pHdVU/edit?usp=sharing
tsiklonaut
Well-known
I've calibrated focus using 2x2cm crop and switch on Autofocus:
https://docs.google.com/file/d/0ByP8kkW_h00uaEV2Vmd2N3pHdVU/edit?usp=sharing
Congratulations! Now you're finally getting there...
If you're interested PM me for a CQ non-demo mode tip.
jzagaja
Well-known
Not so easy
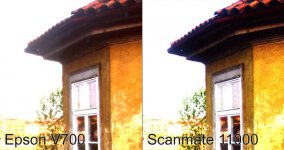
I have a problem with Velvia - Epson sees more detail while Scanmate makes banding 
https://docs.google.com/file/d/0ByP8kkW_h00ubHpJUVVQZGY4OFE/edit?usp=sharing
jzagaja
Well-known
Do you also have such a color noise in your Scanmate scans? Epson in shadows is smooth - I've tried diffrent modes, profiles and no change. In RAW mode edges are jagged. Please check your Velvia scans and let me know.
Fernando2
Well-known
Do you also have such a color noise in your Scanmate scans?
No, I have very smooth shadows, I can pull up levels without issues.
I don't apply any curve in ColorQuartet, no correction profile, no sharpening, no levels / black point setting / contrast etc. Just a plain untouched scan.
I scan in TIFF RGB 16 mode, ProPhoto output color space.
Do you perform a White Point Calibration before a scanning session (after 15-20 minutes of warming up)?
Fernando
tsiklonaut
Well-known
Ditto to Fernando - no problems.
Jaggies (distorted straight-line details) are already explained above that can be caused on various reasons.
But SM5000/11000 can have lines in the shadow - i.e. if you push out levels to max left you should see noticable straight dark lines in the shadows. This needs a control board modification by ABC-scan. See my post some pages back on this tread.
tsiklonaut
Well-known
Some Velvia 100F that I never liked myself and don't miss it (V50 is the real thing and 100 [non-F] for long exposures), but in some situations the 100F's wierd slightly "twisted" colours can work well:
jzagaja
Well-known
jzagaja
Well-known
It's a pain work in OS9 - I cannot use linear ICC profiles because I have no possibility to convert them from Windows
Maybe linear ICC profile is solution to my problem with truncated shadows?
Found this:
http://www2.chromix.com/ColorSmarts...&-session=SessID:4FB8B23F141ed1626BUki3E9D4F5
But hqx file is not recognized.
Found this:
http://www2.chromix.com/ColorSmarts...&-session=SessID:4FB8B23F141ed1626BUki3E9D4F5
But hqx file is not recognized.
jzagaja
Well-known
In CQ there is linear profile called SvRGB10. It helps but still shadow detail is low. See below:
https://docs.google.com/file/d/0ByP8kkW_h00uSlJySkhyVVAyc1E/edit?usp=sharing
Attachments
jzagaja
Well-known
Here's for example Stouffer step wedge. SM sees up to number 37 (3.65D):
https://docs.google.com/file/d/0ByP8kkW_h00uWEVlXzNaaWRBaU0/edit?usp=sharing
tsiklonaut
Well-known
Here's for example Stouffer step wedge. SM sees up to number 37 (3.65D):
https://docs.google.com/file/d/0ByP8kkW_h00uWEVlXzNaaWRBaU0/edit?usp=sharing
Can't see the file, some premission issue again.
But from the examples sounds like you need to adjust PMT biases, could be your PMTs are faded or dichrotic filters/optics dirty - my SM11K beats the crap out of V700 in shadow performance, there's no much comparison in overall quality IMHO.
Yours definitely isn't working correct. PMT scanners do create some little noise in the E6 shadows, but it's because elite drum scanners bring out the most shadow details than any other scanner on Earth.
hqx file you just need to drop on Stuffit Expander application in OS9 apps utilities folder.
Dude, are you an ego-maniac or someone who just can't think for himself or do any homework?
Cheers,
Margus
jzagaja
Well-known
You are making a great job thanks guys! What do you mean by PMT bias change?
Stuffit Expander is missing in my OS 9 and installer from website was also hqx
tsiklonaut
Well-known
You are making a great job thanks guys! What do you mean by PMT bias change?
I'd ajust light tube and clean all optics before and check again. Maybe there's some misalignment with bulb or light tube-to-sensor or just dirty optics / faded optical fibres causing your bad shadow data (meaning too little light or weakened PMTs - the first scenareo is more probable).
PMT Bias/Gain - this is a bit complicated. Do not touch those unless you're fully fluent in electronics - PMTs have high voltage converters, thus it's very dangerous or can be even fatal when doing something wrong. Get SM11K service manual for some info (although there's no full info on gain adjustment). There're PMT gain screws on each PMT module and TP14 (Red) TP13 (green) TP12 (Blue) connectors on control board to measure gain on each channel with a multimeter.
Evanjoe610
Established
Margus,
Wow! You are wealth of information regarding PMT. I salute your vast knowledge and as well as Fernando's too! It brings back many years of fond memory when I used to work and maintenance the drum scanners when I first enter the Graphic Arts field out of school.
I moved on from the drum scanners as technology permitted it onto the early stages of CCD flatbed scanners (Scitex) and the refined drum scanners (Fuji-Crosfield) PMT scanner that scanned directly from RGB into CMYK COLOR SPACE.
I enjoy learning from this thread and thank everyone involved for speaking their mind, thus allowing others to learn or in my case rehash my past experiences.
jzagaja
Well-known
I'd ajust light tube and clean all optics before and check again.
My very first step was cleaning the optics. But I will check again. Should I open the head with fibers and lens?
Light misalingmenet - have you used multimeter like manual says or just by eye?
BTW: manual says fluorescent tube 24VDC 6W while in my scanner there is Dulux L 12v/24W.
tsiklonaut
Well-known
Evan,
I'm by no means a drum scanner tech specialist, I just know few things about this particular scanner
Cheers,
Margus
I'm by no means a drum scanner tech specialist, I just know few things about this particular scanner
Cheers,
Margus
Wow! You are wealth of information regarding PMT. I salute your vast knowledge and as well as Fernando's too! It brings back many years of fond memory when I used to work and maintenance the drum scanners when I first enter the Graphic Arts field out of school.
tsiklonaut
Well-known
My very first step was cleaning the optics. But I will check again. Should I open the head with fibers and lens?
Light misalingmenet - have you used multimeter like manual says or just by eye?
BTW: manual says fluorescent tube 24VDC 6W while in my scanner there is Dulux L 12v/24W.
Just to make absolutely sure - did you white calibrated from a completely clear area of the drum?
I haven't had a need to re-align my light tube yet. You can try to algn it with an eye, but it's the most precise to do it with the voltmeter method as noted in the service manual.
Fluorocent tube doesn't matter, it's just to illuminate the scanner's internal while the lid is open. Some background light is nice to inspect your drum while the lid is open but it's not important. It's the light tube that is important for scanning!
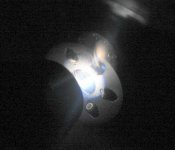
Also open the rear bulb door (while the bulbs stay inside) and run a scan - to see how evenly they illuminate the optic fibre mouth holes. If the light circle is off the hole too much you can bend the lamp frame a little to align it.
Have you tried other lamps as well? I.e. for an experiment swap transmission and reflection lamps. Make white calibration with the new lamp and see if you get any better shadow detail.
Just in case try white cal + scan with Color Trio software as well.
Margus
Share:
-
This site uses cookies to help personalise content, tailor your experience and to keep you logged in if you register.
By continuing to use this site, you are consenting to our use of cookies.