carlosecpf
Member
Hi Guys,
On Dec 17th I will be exhibiting some of my pictures at the SoHo Gallery in NYC. I am super excited about this opportunity. However I am unsure about how big I can print the pictures taken with my R-D1s.
I shot in RAW and converted them using EPSON's Raw Editor, selecting the 13.5MP option. After that, I post processed each file using Aperture 3.1 .
I was planning to print 16x20, but I am unsure if a RD-1 file could be enlarged that much without loosing quality.
Also, I would appreciate any tips regarding resolution I should send each file to the printer and the type of paper that would look great in a gallery.
Thanks in advance!
Carlos
mickbroughton
Newbie
Hi,
The natural resolution of the RD1 raw image is 3008 x 2000 pixels, so by selecting the 13.5MP option the images are being interpolated; I am not sure how good the Epson sofware is, but this may introduce some loss of quality.
You may be better selecting the 6MP option so that there is no interpolation, and save these as TIFFs as the JPEG option will introduce some compression and loss of quality.
It is generally regarded that 300dpi is the optimum print resolution, which for 3008 x 2000 images equates to a print size of around 10 x 7 inches.
However, images can be printed down to 200dpi before any serious visible reduction in quality occurs, this would give prints of around 15 x 10.
If you need to do any interpolation, for moderate amounts the Photoshop Bicubic interpolation is regarded as quite good, for anything more significant I would check out the Genuine Fractals plug in.
Mick.
On Dec 17th I will be exhibiting some of my pictures at the SoHo Gallery in NYC. I am super excited about this opportunity.
Congrats on the show Carlos. Please let me know what night the opening will be on... I'd love to come.
Thanks, John
carlosecpf
Member
Hi Mick,
Thanks for your reply.
I am considering to print sizes: 18x12 or 24x16.
After your feedback, the workflow I plan to use is the following:
1) Convert RAW files in Epson Photo RAW
2) Save them as TIFF, Adobe RGB, 16bit, 6MP, 300 dpi
3) Open them on Photoshop Elements 9
4) Use Perfect Resize 7 and set the desired printing size and the resolution to 200dpi
5) Use Aperture to do any post-processing I might want
6) Send to lab for printing
Is there anything I am missing?
Thanks in advance!
carlosecpf
Member
Congrats on the show Carlos. Please let me know what night the opening will be on... I'd love to come.
Thanks, John
Hi John,
The show will be on Dec 17th, on the SoHo Gallery at 6pm. It is part of a photo workshop I am attending. Even though it is not my own private show, I am excited!
I will be presenting some of the pics I took at the Chop Shop, that great place you took me in Flushing, Queens!
")
Mcary
Well-known
Carlos,
If you're sending them out to be printed you might want to check with the printer to see what they recommend as some places recommend just sending the files in their native size and letting them to the resizing as they have software that is designed to work with their specific printers.
Mike
If you're sending them out to be printed you might want to check with the printer to see what they recommend as some places recommend just sending the files in their native size and letting them to the resizing as they have software that is designed to work with their specific printers.
Mike
gekopaca
French photographer
Hi Mick,
Thanks for your reply.
I am considering to print sizes: 18x12 or 24x16.
After your feedback, the workflow I plan to use is the following:
1) Convert RAW files in Epson Photo RAW
2) Save them as TIFF, Adobe RGB, 16bit, 6MP, 300 dpi
3) Open them on Photoshop Elements 9
4) Use Perfect Resize 7 and set the desired printing size and the resolution to 200dpi
5) Use Aperture to do any post-processing I might want
6) Send to lab for printing
Is there anything I am missing?
Thanks in advance!
IMO it's better in that way :
1) Convert RAW files in Epson Photo RAW
2) Save them as TIFF, Adobe RGB, 16bit, 6MP, 300 dpi
3) import it in Aperture to do any post-processing you might want
4) export it as TIFF, Adobe RGB, 16bit, 6MP, 300 dpi
5) Open them on Photoshop Elements 9
6) Use Perfect Resize 7 and set the desired printing size and the resolution to 200dpi
7) Send to lab for printing
mickbroughton
Newbie
Hi,
I think Gekopaca's suggested workflow is probably the optimum, although as Mike suggested it may be worth contacting your printer beforehand.
For example my local pro-lab like to work with pre-sized images, and require that images are set to 254dpi, resumably to match their print resolution.
Cheers.
akk2
Established
The largest I did is 50" LONG
RD1s+ZM21/2.8

For a Digital version of the Picture, Click here, #6 in the set
RD1s+ZM21/2.8
For a Digital version of the Picture, Click here, #6 in the set
Particular
a.k.a. CNNY, disassembler
The tricky thing with print size is that the larger you print the image, the further spectators will stand from the print, and the lesser resolution you can get away with. What it really depends on is the type of image. If your image has a lot of fine detail (small things to see in the image) people are more likely to put their nose up to the print and notice the print quality. I have printed from the R-D1 up to 10"x15", and do find that while there was enough info to print larger, that at that size details start getting that 'digital look'. They just don't look good.
The only way to really know is to do test prints. Print some of the images (or a detail of one) at different enlargements and put them up on a wall and compare.
That is the only real way to know. There is always the urge to print large, but sometimes images just look better at a smaller size.
The only way to really know is to do test prints. Print some of the images (or a detail of one) at different enlargements and put them up on a wall and compare.
That is the only real way to know. There is always the urge to print large, but sometimes images just look better at a smaller size.
That is the only real way to know. There is always the urge to print large, but sometimes images just look better at a smaller size.
Yeah, I agree... printing large is fashionable these days, but some images just do not benefit from it.
ZorkiKat
ЗоркийК&
For what's its worth, I've had, and seen others' Epson RD-1s jpg files (shot at maximum resolution, best quality) "blown up" to 12X18 inch prints. Most of the time, conventional resizing through Adobe PS was used. Quality would match a similar sized 'optical' print from a 6X6 cm negative. Given those outputs' qualities, it is still possible to print even larger.
Mcary
Well-known
There is always the urge to print large, but sometimes images just look better at a smaller size.
Small prints force the viewer to stop maybe even take a few steps closer and take their time. While larger prints much like Billboards only require a quick glance as one wizzes by.
SteveM_NJ
Well-known
whatever you decide -- let us know, R-D1 owners interested.
P.S.- isin't this cutting it close to the deadline ... days away - yikes.
(sending work out, i'm nervous for you).
best of luck !
P.S.- isin't this cutting it close to the deadline ... days away - yikes.
(sending work out, i'm nervous for you).
best of luck !
punkromance
Poor art student
I used to work at a photo lab and I often blew up photo from my D70 (as far as I know it uses the same 6MP sensor as the R-D1) to A1 (59x84cm). Looked perfectly fine. I later compared them to an A1 print I got from my D80 (10MP) and you couldn't tell which came from which camera.
All we did was change the image size in PS to the target print size. The resizing algorithm they use is good enough. Though if you really want to get the best possible quality, download Alien Skin Blowup.
All we did was change the image size in PS to the target print size. The resizing algorithm they use is good enough. Though if you really want to get the best possible quality, download Alien Skin Blowup.
alantochterman
Member
Hi
All I ever shoot with are 6mp sensors. Two things will affect your image quality. One of them is viewing distance. As your images get larger, people will view them from farther away. So the resolution may not (at first ) be as critical.
I have made excellent 13 x 19s using Camera Raw in Photoshop (I do not like the Epson plug-in that well) and then finishing my work in Photoshop with the final step being to up-res using Genuine Fractals. I sent the print resolution to my printer's native DPI - 360 and then tell the software what size print or crop I want. It does the rest. I do not use their sharpening nor grain functions. After upressing, if I need any further sharpening, I do it in Photoshop.
Alternatively, Camera Raw also has the ability to up-res. I think Genuine Fractals does a better job, but if you are on a budget, it will produce better results then either Epson Photo Raw or the upressing function in Photoshop itself.
Good Luck
gekopaca
French photographer
I used to work at a photo lab and I often blew up photo from my D70 (as far as I know it uses the same 6MP sensor as the R-D1) to A1 (59x84cm). Looked perfectly fine. I later compared them to an A1 print I got from my D80 (10MP) and you couldn't tell which came from which camera.
All we did was change the image size in PS to the target print size. The resizing algorithm they use is good enough. Though if you really want to get the best possible quality, download Alien Skin Blowup.
Be careful with Alien Skin Blowup, you will have "more precise" pixel but you will loose the R-D1 specific granulation.
carlosecpf
Member
Guys,
Thank you SO much for all the tips you have shared here. I will follow them and will post here the results soon!!
Thank you SO much for all the tips you have shared here. I will follow them and will post here the results soon!!
mn4367
Established
IMO it's better in that way :
1) Convert RAW files in Epson Photo RAW
2) Save them as TIFF, Adobe RGB, 16bit, 6MP, 300 dpi
3) import it in Aperture to do any post-processing you might want
4) export it as TIFF, Adobe RGB, 16bit, 6MP, 300 dpi
5) Open them on Photoshop Elements 9
6) Use Perfect Resize 7 and set the desired printing size and the resolution to 200dpi
7) Send to lab for printing
+1
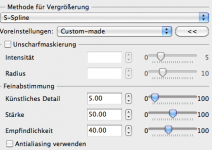
As an alternative you could use Photo Zoom Pro from Benvista. The most important key to get good results when upsizing is to choose the correct algorithm. I once had the chance to use a demo version of Photo Zoom. I tried a lot of settings and found one which, to my eyes, gave the most natural look (in fact, they were quite stunning). At first sight, all other tools I tried produced very good results at first sight. But looking closer they were a little bit too clinical and artificial with smooth lines, sharp edges etc. Attached is a screen shot with these settings (in german, sorry).
I'd use an enlargement of 200%, that helps the algorithm a bit. The correct scaling for the output is better done by Aperture, Lightroom or whatever. Also it's worth trying to do sharpening after the re-import in Aperture. Sharpening introduces artifacts which would also be up upsized if it's done before.
And remember that optimal sharpening for print output is different from sharpening for screens. There are a lot of articles and tools with regard to sharpening for print in the web. Adding a little bit of grain (sic!) with for example Alien Exposure can also help to produce a good look.
The biggest size I can print is 13x19in. With ISO 200 it gives very good results, I'd say it's very usable for exhibition. Higher ISOs especially in BW can look beautiful too; probably due to the fact that many of us are still used to seeing grain in prints. Printing bigger touches the limits of the R-D1, the biggest one I have (made on a big Epson device) is 60x40cm, but it's still OK.
But the most important aspect is that you are exposing your pictures and the stories they tell, not megapixels. Most of the visitors won't be aware of the how-big-can-i-print-problem and if they are, I think they won't be interested. They come to see your pictures which are fantastic IMO and well deserve exposition, good luck!
PS:
Personl opinion: I'd stay away from the Epson RAW converter. It may produce nice and unique colors, but todays software like Aperture, Capture One and LR (which I use) are really ahead in all aspects (start the flamewars!
). As an example, I could never reproduce the claim that the Epson software reveals more details. Instead it tends to just look a little crispier by applying a default sharpening or higher contrast. Stay as long as you can in your favourite RAW converter and only escape to special tools if the converter hasn't a builtin equivalent at the same quality level.Attachments
akk2
Established
I blowed everything up in Camera Raw, ProPhotoRGB, 16bit and do post it photoshop and sharpening. and printed 50" long with a cropped image.
RD1s ZM21/2.8 F2.8 1/8s ISO800
RD1s ZM21/2.8 F2.8 1/8s ISO800
Share:
-
This site uses cookies to help personalise content, tailor your experience and to keep you logged in if you register.
By continuing to use this site, you are consenting to our use of cookies.