Kevin Brown
Established
Love your Ricoh 500G (Sears 35|RF) but hate the cheesy 'sprooingg' sound the shutter makes upon release?
Turns out it's pretty easy to eliminate. Under the front faceplate there are two springs that are activated upon release of the shutter. If these are dabbed with very tiny amounts of silicone grease (being careful not to get it on anything else) - no more K-Mart camera sound!
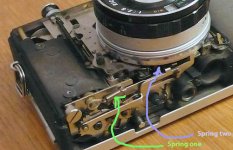
As you can see in the photo, spring one is easily accessable; spring two is barely visible by shining a strong light into the slot indicated by the arrow - it will be the only spring visible in there. Here you're getting very close to the actual shutter machanism, so be extra careful to get grease only on the spring. Just spread a small amount along most of the length of both springs. You want a mostly silicone grease so it won't harden with age.
Photos of getting into the camera to this point are readily available online, but I'll summarize -
- Back off the three set screws around the aperture ring and remove the ring.
- Remove the two tabs on opposite sides of the shutter speed ring.
- Now there is clearance to remove the front plate by peeling back the two pieces of leatherette on either side of the lens just far enough to remove the four screws for the front plate. I don't know if it's the case on all of them, but on my example the leatherette was attached with a soft, sticky adhesive that allowed sticking the pieces back down afterward without re-gluing.
It may seem like a small thing, but this makes the camera far more pleasant to use. You don't notice the noise so much until you actually start taking pictures with it - that twangy spring noise so close my ear just put my teeth on edge.
Turns out it's pretty easy to eliminate. Under the front faceplate there are two springs that are activated upon release of the shutter. If these are dabbed with very tiny amounts of silicone grease (being careful not to get it on anything else) - no more K-Mart camera sound!
As you can see in the photo, spring one is easily accessable; spring two is barely visible by shining a strong light into the slot indicated by the arrow - it will be the only spring visible in there. Here you're getting very close to the actual shutter machanism, so be extra careful to get grease only on the spring. Just spread a small amount along most of the length of both springs. You want a mostly silicone grease so it won't harden with age.
Photos of getting into the camera to this point are readily available online, but I'll summarize -
- Back off the three set screws around the aperture ring and remove the ring.
- Remove the two tabs on opposite sides of the shutter speed ring.
- Now there is clearance to remove the front plate by peeling back the two pieces of leatherette on either side of the lens just far enough to remove the four screws for the front plate. I don't know if it's the case on all of them, but on my example the leatherette was attached with a soft, sticky adhesive that allowed sticking the pieces back down afterward without re-gluing.
It may seem like a small thing, but this makes the camera far more pleasant to use. You don't notice the noise so much until you actually start taking pictures with it - that twangy spring noise so close my ear just put my teeth on edge.