
You are using an out of date browser. It may not display this or other websites correctly.
You should upgrade or use an alternative browser.
You should upgrade or use an alternative browser.
Scanning with a digital camera
- Thread starter Huss
- Start date
- Latest activity Latest activity:
- Replies 932
- Views 114K

Greyscale
Veteran

Greyscale
Veteran

css9450
Veteran
D7000 scan, a pic from my Komaflex-S.

Huss
Veteran
Sony A7ii scan, concave Ultron 50/1.8, Panatomic X Aero
Icarex 35-S, Ultron 50/1.8, Panatomic X by Mike Novak, on Flickr

Mike that looks great!
Huss
Veteran
D7000 scan, a pic from my Komaflex-S.
Very nice!
Huss
Veteran
Ha Huss, seems you really got that camera scan thing down, excellent!
I gave up myself and for the little amount of 135 film I still do, returned to and older Polaroid Sprintscan 35...
The Canon Auto Bellows setup with macr lens included I put up in the classifieds hasn't stirred any attention so far so I might just shelve it and try camera scanning again this winter or so...
Thanks!
The key really is to use negativelabpro.com to convert the images. Super easy w great results.
ColSebastianMoran
( IRL Richard Karash )
Yes. Tried them all, Negative Lab Pro is a break through for camera-scan of color-negative material.
coogee
Well-known
I use a Sony a7r2 and M/LTM lenses in combination with a set of M mount Novoflex extension tubes I've had for a while.
It does the job for me - I like the flexibility over a scanner. Especially for rolls/frames that are awkward for whatever reason - overlapping frames or different sized formats - and for getting better output than my Pakon 35mm scanner especially from black and white film (not that I always want/need this.)
I use a little 35mm enlarger as a copy stand on top of light table and neg carrier from Durst M70, plus a cardboard tube between lens/negative to eliminate any flare (this makes a big difference in my setup)
I prefer the 'top down' approach myself, since I'm always skipping between sizes/formats and the 42MP sensor means I don't have to worry about framing, it only takes a moment to adjust up/down for focus.

Scan from negative, IIIc, 50/3.5 Elmar, Ilford HP5+
One area I haven't got to is digitizing prints – anyone have any particular tips for that? Ideally I’d like to capture the print as a whole (ie; including border) to show that it is a print but flattening fiber prints, you know the drill. I get them nice and flat in my press after toning but then they go into portfolio books or paper boxes or get matted/framed once in a blue moon – it’d be nice to ‘scan’ them as a routine part of the process.
Perhaps I'd be better off making a matboard carrier for the print and front mounted flash?
It does the job for me - I like the flexibility over a scanner. Especially for rolls/frames that are awkward for whatever reason - overlapping frames or different sized formats - and for getting better output than my Pakon 35mm scanner especially from black and white film (not that I always want/need this.)
I use a little 35mm enlarger as a copy stand on top of light table and neg carrier from Durst M70, plus a cardboard tube between lens/negative to eliminate any flare (this makes a big difference in my setup)
I prefer the 'top down' approach myself, since I'm always skipping between sizes/formats and the 42MP sensor means I don't have to worry about framing, it only takes a moment to adjust up/down for focus.
Scan from negative, IIIc, 50/3.5 Elmar, Ilford HP5+
One area I haven't got to is digitizing prints – anyone have any particular tips for that? Ideally I’d like to capture the print as a whole (ie; including border) to show that it is a print but flattening fiber prints, you know the drill. I get them nice and flat in my press after toning but then they go into portfolio books or paper boxes or get matted/framed once in a blue moon – it’d be nice to ‘scan’ them as a routine part of the process.
Perhaps I'd be better off making a matboard carrier for the print and front mounted flash?
Attachments
Huss
Veteran
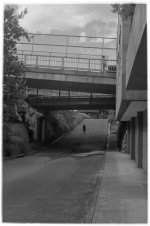
Fed 2, 50 2.5 lens, C200, Z7 scan, negativelabpro

Scapevision
Well-known
One area I haven't got to is digitizing prints – anyone have any particular tips for that? Ideally I’d like to capture the print as a whole (ie; including border) to show that it is a print but flattening fiber prints, you know the drill. I get them nice and flat in my press after toning but then they go into portfolio books or paper boxes or get matted/framed once in a blue moon – it’d be nice to ‘scan’ them as a routine part of the process.
Perhaps I'd be better off making a matboard carrier for the print and front mounted flash?
You can probably use mounting tape on the back of a frame that's slightly encroached on the print border, or sandwich between two magnetized frames. You can DIY a magnetic strip along each edge of the frame and have a metal backing with the print between
ColSebastianMoran
( IRL Richard Karash )
Huss, that's a great beach scene, and all the recent images are terrific.
Camera-scanning is here to stay!
Camera-scanning is here to stay!
Huss
Veteran
Huss, that's a great beach scene, and all the recent images are terrific.
Camera-scanning is here to stay!
It's all thanks to negativelabpro.com
Wish I had this years ago!!
ColSebastianMoran
( IRL Richard Karash )
I use a little 35mm enlarger as a copy stand on top of light table and neg carrier from Durst M70, plus a cardboard tube between lens/negative to eliminate any flare (this makes a big difference in my setup)
One person I know is using a Pringles can where you have a cardboard tube. Inside is blackened, I believe. I've got a bellows lens shade for this purpose.
Yes, important to eliminate reflections and stray light.
Huss
Veteran
Using the ES-1 or ES-2 copier for 35mm film there is obviously no need to shade anything, as it attaches directly to the lens.
Using my copy stand to scan 120/220 film, I do it on the evening and make sure all the lights are off when I scan. I also keep the deep lens hood on my 50 2.8G Nikon lens.
Using my copy stand to scan 120/220 film, I do it on the evening and make sure all the lights are off when I scan. I also keep the deep lens hood on my 50 2.8G Nikon lens.
Huss
Veteran
Fed 2, 50mm 2.5, Fuji C200, Z7 scan, negativelabpro

Huss
Veteran
Zeiss Ikon Nettar 517/2, Ilford Delta 400, Z7 scan

Godfrey
somewhat colored
Yes. Tried them all, Negative Lab Pro is a break through for camera-scan of color-negative material.
Looks good! I haven't done much color neg work in years, perhaps it will give me an opportunity to shoot some with the Fuji GS645S. I have a couple of rolls of Portra to play with. 🙂 $99 though ... a lot of money for a plug-in if I'm not using it much. Hm.
I did a batch of B&W negatives yesterday that I'd made with that camera. Took the time to use DNG Profile Editor to generate an inversion CPP for the Leica CL. That sped up my processing by a factor of three at least ... basically, one click and all of the exposures were converted to a passable positive rendering from the original DNGs. They did take some slight tone curve changes in three groups.
This was the most difficult one because of the huge contrast difference between the white blossoms and the dark green foliage:

Fuji GS645S Wide 60
Fuji HP5
HC-110 @ 74°F @ 9 minutes in Kodacraft processing tank
Capture Leica CL + Macro-Elmarit-R 60mm f/2.8
ISO 100 @ f/8 @ 1/6
LR + Leica CL BW Invert profile
I had to jigger the curve a lot, and then do some spot editing on the blossoms to get the whole range in. (Click on it to see the full resolution JPEG.) I don't count it as 'finished' yet, but that's not bad for about 20 seconds work. 🙂
One person I know is using a Pringles can where you have a cardboard tube. Inside is blackened, I believe. I've got a bellows lens shade for this purpose.
Yes, important to eliminate reflections and stray light.
I darken the whole room and mask the negative image pretty tightly, frame by frame. I haven't found there to be much difficulty with flare or stray reflections using this setup (Leica CL, Macro-Elmarit-R 60mm on a Novoflex copy stand with an ancient flat panel light box as the illumination).
G
ColSebastianMoran
( IRL Richard Karash )
Godfrey, that's a great image, well done.
NLP is $99, but download for free and convert 12 images without obligation.
NLP is $99, but download for free and convert 12 images without obligation.
Huss
Veteran
Leica M3, Summicron 40 f2, Fuji NPS160, Z7 scan, negativelabpro.com

Similar threads
- Replies
- 3
- Views
- 256
- Replies
- 3
- Views
- 361
- Replies
- 4
- Views
- 654
- Replies
- 0
- Views
- 218