Show us your digital M black and white conversions.

Keith

The best camera is one that still works!
Local time
8:48 AM
Joined
May 5, 2006
Messages
19,237
Location
Australia
If you feel like it please add some info about your processing methods as I'm curious to learn and view results from the various alternatives.

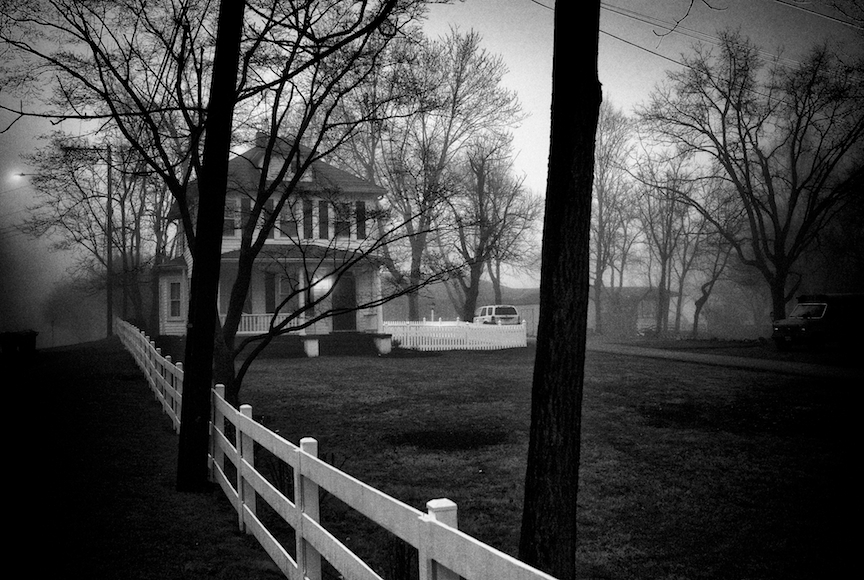
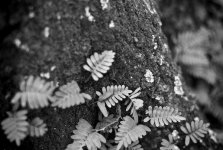
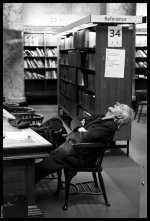
These are shot as in camera black and white at ISO 2500, converted to tifs for adjustments and a little noise removal and back to jpeg and resized for posting here of course. I actually prefer the look I get from this method to shooting raw and converting to mono!


L1021306.jpg


L1021314-1.jpg
 
I usually process the DNG file in either Capture One or LightZone, applying either one of Jamie Roberts' B&W profiles in C1 or one of the B&W conversion filters in LightZone. I've also gotten good results converting color in-camera .jpgs to B&W in LightZone.

Here's a few done with LZ:


And a few from C1:


In studio, I've been shooting at ISO 160. I do raw conversions in C1. Then I do B&W conversions with the silver efex pro. With that, I often use one of the film filters, but sometimes not.
With available light or outdoors, I'm generally shooting at ISO 640.

4372376648_b4e75cc08b.jpg


4331381865_0aaa35387f.jpg


4123365087_57fcba0af6.jpg


4012439857_f13ca31e5e.jpg
 
I use RPP (Raw Photo Processor) for all my RAW conversions. I am extremely satisfied with it. I did some comparison with Silver Efex Pro and I was amazed how much more information RPP squeezed out of the files. The highlights, in particular, were completely blown out with SEP.

4207856671_b73b1657d5.jpg


4184811460_eaea4f4281.jpg


4315165979_0bf48d840c_b.jpg
 
The following pictures use Aperture as RAW converter and then Silver Efex for converting from colour to B&W. I've also tried Raw Converter, LightZone, C1 and ACD under Photoshop and Lightroom and find that Aperture has the best highlight recovery, of this which the first picture below, shot in extremely bright and contrasty light, is a good example:


Bangkok | M8.2 | Elmarit-21 ASPH | ISO 320
3562939816_3d713f6e44_o.jpg


Sri Racha | M9 | Summilux-50 pre-ASPH | ISO 320
4196327900_f80dac1e89_o.jpg


Wiang Pa Pao | M8.2 | Elmarit-21 ASPH | ISO 320
3604830891_79a93aa7e8_o.jpg


Potomac, MD | M8.2 | Summicron-28 | ISO 1250
3390048374_158e1a151f_o.jpg


—Mitch/Manila
Bangkok Hysteria: Book Project
 
Last edited:
4358963341_becc7271f4_o.jpg


4358961509_5aeb4d6b71_o.jpg


4358962485_3baccc1f07_o.jpg


I use a few ways to convert the image. Usually process the raw in Lightroom with a preset I created. Or, I bring it in to PS and add warm filter, then convert to BW. I sometimes duplicate the layer and overlay with screen to gives a little more lighter tone. It really depends on the feeling I like to portray.
 
Last edited:
from M8 and M9 using Silver Efx Pro
 

Attachments

  • emma11.jpg
    emma11.jpg
    187.1 KB · Views: 0
  • L1011867bw2.jpg
    L1011867bw2.jpg
    174.7 KB · Views: 0
  • L1016119.jpg
    L1016119.jpg
    151.6 KB · Views: 0
Leica24mmTwoshotToneMap.jpg

M8.2/24mmElmarit, 2 shots developed and tone-mapped with Photomatix, then converted to B&W with PShop. It's cheating a little to tweak first and convert later.
 
For me it's RAW processed in Lightroom.
I have a preset that steepens the curve a little to heighten the contrast. Then I tweak the sliders a bit here-and-there, often adjusting the exposure and colour channels and a bit of dodging and burning if necessary.

I do find every image requires a slightly different treatment though.

4429301683_b2ba4415c6_o.jpg


4357172198_8df75a4d12_o.jpg


Apologies for the JPG compression artifacts. 😱
 
Bobfrance...

I really like the first image but feel the background doesn't feel natural (top 1/3). Did you burn in a lot of areas? I understand the need to reduce well lit areas of an image (it's inherent for the eye to notice bright areas first). What did the original B & W conversion look like?
 
Bobfrance...

I really like the first image but feel the background doesn't feel natural (top 1/3). Did you burn in a lot of areas? I understand the need to reduce well lit areas of an image (it's inherent for the eye to notice bright areas first). What did the original B & W conversion look like?

Thanks, I'm glad you like it. 🙂

You're right, I placed a graduated exposure adjustment at the top to bring down the flare from the lights and added a vignette all with the intention of drawing the eye to the subject and the nice lighting he had on him.

I'm conscious of being too heavy handed at times, as I don't like to see it in other people images, but as I'm sure we're all aware, it is sometimes hard to tell if you've over laboured your own shots.
That said, I think it was needed in this instance.

I've attached a version with no spot adjustment.
Your Flickr gallery is really interesting BTW.

All the best!

Bob.
 

Attachments

  • Sleeping - no burn.jpg
    Sleeping - no burn.jpg
    36.2 KB · Views: 1
Last edited:
Thanks.

You definitely had the right idea but I'd tone it down a bit with the burning. Some of the burning really kills the mid tones as well as the shadows in main parts of the image. You may want to select some of those nasty highlights, feather for effect and try reducing them that way. With the M8 1.33x crop it is acceptable to add some vignetting to capture some off that "wide open" lens effect. You did a good job creating that with the edges.

There's nothing wrong with the original but I agree that a little tweaking to isolate the subject does enhance the image. Somewhere I think there is a balance between the two. Regardless... I still think it is a fine moment.
 
I usually process the DNG file in either Capture One or LightZone, applying either one of Jamie Roberts' B&W profiles in C1 or one of the B&W conversion filters in LightZone. I've also gotten good results converting color in-camera .jpgs to B&W in LightZone.

Here's a few done with LZ:


love you b&w pics, excellent conversion! very vibrant images
 
Great idea Keith!

Great idea Keith!

There are some really beautiful frames here to explore.
I share some from yesterdays shooting with the 15 Heliar + Frankenfinder.

set_L1031829.jpg

"after the shock"

Find out about the title "after the shock" in my blog.
Either the finder or this tall laowai made the model of this shoot scream in shock ;-)


oakley_L1031851.jpg

"oakley girl"

taylor_L1031838.jpg

"taylor"

roof_L1031844.jpg

"…"

ice_L1031853.jpg

"…"


I updated my site with some photographs with the Voigtlander 15 f4.5 Heliar today. Have a visit, if you like ;-)
 
Back
Top Bottom