So who needs film?

ChrisN

Striving
Local time
9:25 AM
Joined
Apr 6, 2005
Messages
4,496
Anyone shooting with paper negs?

Playing around today in the shed - shot this with the Speed Graphic, using Ilford MG RC VC glossy paper, rated at iso 3, 10-second exposure. Developed the neg as per a normal print, then scanned the neg and inverted in Photoshop. I like the blacks!

Good fun! You get to load the "film" under a safelight, and the results are there to see really quick.

attachment.php
 

Attachments

  • 4x5_paperneg_001.jpg
    4x5_paperneg_001.jpg
    102.7 KB · Views: 0
Last edited:
I've been shooting paper in pinhole cameras for the last 15 years or so. And also paper in a Speed Graphic and also several homemade 8x10 box cameras.

I've taken to using grade 2 RC paper, preflashed, then developed in dilute paper developer. I also know of others who do similar. It's a great medium, in some ways better than film: besides the convenience of handling under safelights, there's less problems with dust, since you only see dust artifacts from the front side of the paper; and the cost is especially good compared to film.

Here's an image I like, shot atop the cliff at Delicate Arch, in Arches National Park this last April. I was shooting paper in an 8x10 foamcore pinhole box camera.

5601689176_7be49a9fe9_b.jpg


*Joe
 
bloody marvellous - unbelievable! you do mean photo print paper Chris? just shoved it in the developing tray?

Yep, exactly that. It comes out as a negative, of course, and you either scan and invert it in Photoshop, or you can contact print it, same as you would for a normal contact print. In the few that I have done so far, the contact print doesn't have as good resolution as a scan of the original neg (inverted in PS).
 
Preflashing is to increase apparent speed of the paper. The theory is that it takes a while for the emulsion to get into gear, and preflashing it helps it get past its initial inertness.
 
Wow !! That looks great !! :) ISO3 is the rating for photo paper out of the box ?

I have friends who say ISO 6 for paper. I suppose somewhere between 3 & 6 is the answer. Personal testing always gets the job done. :cool:

I have two boxes of Ilford paper that went off & are no good for enlarging. Paper negatives would be a good use for the paper.
 
Joe - bravo! Could you explain the pre-flasing procedure for us, and the reason for it?

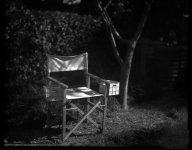
I preflash not as much to increase the paper's speed, but to improve shadow detail without blowing out the highlights; that is, to tame high-contrast light.

I use a slight, even exposure from a dim 7.5 watt bulb that would yield a faint, gray tone on the paper if then immediately developed. This faint exposure adds to the camera's shadow detail exposure (which is just below paper white in a negative image), helping to improve the shadow detail. But the highlights are virtually unaffected, since each step in the zone system is logarithmic, such that the faint preflash exposure adds very little density to the highlights.

Another useful aspect of photo paper is the difference between VC paper and graded paper. Graded paper is UV/blue sensitive only, and of a fixed contrast. VC paper has two components to its emulsion, a high contrast blue sensitive emulsion and a low contrast green sensitive emulsion. Since daylight is primarily UV and blue, the use of VC paper as an in-camera negative results in excessively high contrast images. Thus, I tend to use grade 2 paper for negatives, whose contrast is independent of the scene's spectrum.

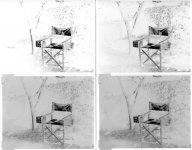
As for the "speed" of paper, I've run calibration tests on my paper, setting up the darkroom in the daytime, making a series of exposures outdoors at various ISO settings on my meter, immediately processing them, then examining the resulting paper negatives to see which has the best tonal range and values. My paper of choice (Arista's grade 2 RC paper) I rate at an exposure index of 12. The caveat to this speed rating is that the developer must be freshly mixed (Ilford Universal paper developer diluted 1+15) and at 68f in temperature.

I develop the negatives to completion by inspection.

I know of another pinhole photographer who posts his work on F295 that uses this same paper and developer, but rates the paper at ISO6, then mixes the developer much more dilute, and includes a water bath between two such development steps in order to permit the shadow detail to come up without the highlights getting too dense.

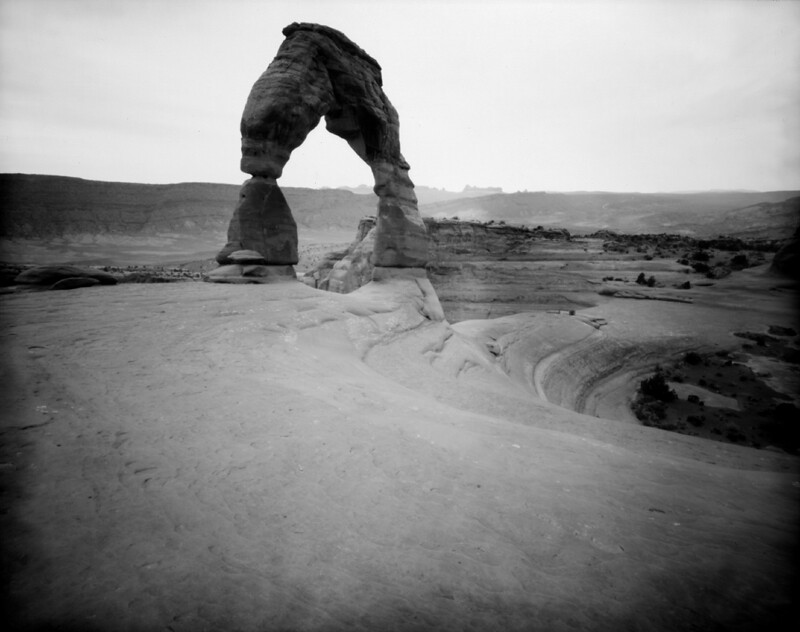
One more note about metering a scene with paper. The sky will usually get blown out white, because of the predominance of UV and blue as compared to the landscape. So I therefore meter for the landscape or whatever principal subject matter, and let the sky blow out as it may. You see similar tonal effects in 19th century landscape imagery that used orthochromatic or actinic emulsions of similar sensitivity as paper, where the skies always look whited out, and skin tones are darker than normal (lack of red sensitivity in the emulsion). Portraits are thus possible with paper, but makeup is usually desired; plus, the blue sensitivity of the paper will reveal blotches under one's skin.

For exposing indoor scenes under artificial lighting, you can't trust your normal camera meter, which is sensitive to such light; but the paper is only sensitive to daylight wavelengths. Therefore tungsten or other incandescent lighting needs to be calibrated for your paper via testing, and exposure times are much longer than under daylight. But I've found that for daytime portraits, indirect daylight from a north-facing window gives good results.

~Joe
 
Thanks for the detailed explanation Joe, especially the metering aspects.

I've done a little testing this morning, both with preflashing and with a new lens I've acquired.

The preflashing was done with my enlarger lens set at f/16, and times of 0.3s, 0.6s and 0.9s, all of which were just below the threshold of giving apparent grey when developed normally.

The photos were taken with a Speed Graphic, with a Meyer Goerlitz Trioplan 8 3/4 inch barrel lens at a measured f/5.6 and 1/50s on the focal plane shutter

Here's a straight scan of the four negs:
attachment.php


Inverted in Photoshop:
attachment.php


And the best result I can get seems to come from the one with the 0.9s preflash.
attachment.php


Definitely worth playing with!
 

Attachments

  • paper Neg - preflash test.jpg
    paper Neg - preflash test.jpg
    61.9 KB · Views: 0
  • paper Neg - preflash test - invert.jpg
    paper Neg - preflash test - invert.jpg
    65.3 KB · Views: 0
  • paper Neg - 0.9 sec preflash.jpg
    paper Neg - 0.9 sec preflash.jpg
    54.8 KB · Views: 0
Last edited:
What wattage (or bulb) do you use and what is the distance between the negative stage and the easel?

I'm using a type S-11 bulb, 7.5 watts, 120vac standard base, white frosted round bulb about the size of a table tennis ball, installed in a handmade housing made from a metal soup tin, with a 3mm aperture, suspended 30 inches above the surface. This setup gives me preflash times in the 5-10 second range, slow enough to permit accurate timing with my ancient Gralab timer, but fast enough so as not to be too long.

I think any 7.5 watt nightlight bulb, frosted white, with the proper aperture for controlling intensity, would work. My main goal was getting reasonably long exposures so as to be able to accurately control the time. I usually use 8 seconds preflash with this setup.

I had originally tried my enlarger, but even at f/22 the proper times were too short (1-2 seconds) to accurately time with my old timer.

I also know of another photographer on F295 who has made a combination safelight and preflash light source that's ceiling mounted in his darkroom above his work table, that's operated through his timer.

~Joe

PS: I've also heard of people having good results with a yellow filter over the pinhole, but it tends to slow down the exposures even more so, and sometimes the filter can add hazing and other artifacts to the image. I haven't tried a yellow filter; preflashing works fine for me.
 
@ChrisN: I really like the 0.9s preflashed image. Great tonality you have there, and the OOF areas of the image are wonderfully soft. I think you're on to something, keep shooting, I want to see more.

~Joe
 
Thanks Joe. I'd like to try this combination for a portrait, if I can get one of the family to sit still long enough. :)

JSU - I preflashed with my Durst Laborator 1200 with CLS450 color head (no filtration), 50/2.8 enlarger lens set to f/16, the neg stage at 80cm (on the column), and timed with an electronic timer that allows 1/10s adjustments. I think the enlarger has a 150 watt bulb. For comparison, my normal print exposures at f/5.6 are around 16 seconds. You really need to run a test strip - cover half the strip lengthways (to leave a paper white area to check against) then do the normal test steps over the uncovered section. I incremented in 1/10s steps. I selected the last exposure that I could not distinguish from paper white. My enlarger is pretty bright - Joe's method with a low wattage bulb might be easier to work with.

Cheers!
 
Last edited:
Interesting stuff. I would love to try this with my 8x10 camera if I ever get time to fix the bellows. Any of you get the chance, please show more photos and how you got them.
 
I very much like the 0.9s preflashed version too. Again, here it comes again, that 3D feeling, even more pronounced than with MF. Lovely
 
Has anyone tried the Ilford direct positive paper?

Yes. Shutterbug test on the way. I've even tried it in my 15x12 Gandolfi. Salient points:

It's contrasty.

It's slow.

FB is less contrasty than RC.

Preflashing reduces the contrast of both.

And of course the image is mirror-reversed. This is not necessarily a serious problem unless there's text in shot.

Cheers,

R.
 
Back
Top Bottom