SUCCESS!! Calibrating QL17 GIII for ISO 1600!! :)

dmr

Registered Abuser
Local time
12:14 PM
Joined
Feb 8, 2005
Messages
4,649
Location
Somewhere in Middle America
I'm gonna write this up in depth, in case anybody else wants to try this, but here's a preliminary report.

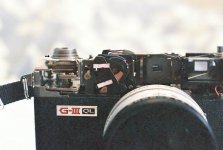
I love the QL17 GIII, but one of the minor quirks is that the highest ASA/ISO it is intended to work with, at least for auto exposure, is 800. Since this is now my main low-light camera, I really wanted to be able to use the Fuji 1600 film in it.

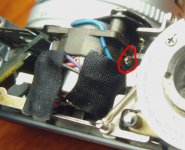
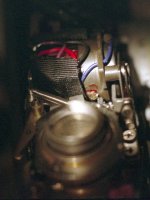
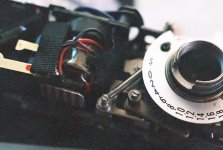
To make a long story long ... I've wanted to try this for over a year. I've put it off, figuring that it's not really broken, so why fix it, but yes, it had a shortcoming which I did not like. Well, on Sunday, I thought hard, took a deep breath, said "what the {heck}" and very carefully proceeded to intentionally mis-calibrate it by about one F-stop.

The good news is that it appears to have worked! 🙂

The bad news is that I STILL really have NO CLUE as to how accurate the exposure is, in reference to any standards. All I really have to go on is the way the negatives look, which look quite normal. I do plan to shoot a roll of Kodachrome, carefully bracketing, in order to get more of an idea where it really is. The only thing I really have to compare it with is the Pentax, and there are differences, as much as an F-stop, at various points on the scale. I really don't know which is closer to being really accurate. My light sources were an east facing window and a blank wall in the bathroom with lights on dimmers.

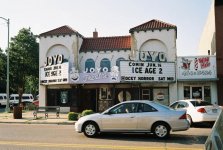
But anyway ... my first test was to shoot a "control" roll of film, in this case the Walgreens/Fuji 200, as a sanity check to be sure it (still) worked properly under normal light with more of a normal film. I did this yesterday, late afternoon to early evening. This was, of course, now exposed with the setting of 100, but in actuality 200. Yes, the majority of the shots looked quite "normal" on the negatives. The first 2 below are from the "control" sanity check roll.

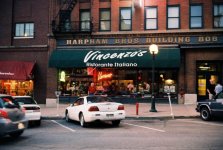
The real test, however, was to wait until dusk and try some Fuji 1600 and see how it looks. I admit I was a bit impatient (the way-ayy-ting is the hardest part) so I started shooting this just about as soon as the street lights came on. As I went to drive home (about 10:00pm) I was thinking that I should have waited until it was more dark-dark, but now I'm glad I didn't, since the twilight and afterglow gave more of a "normal" light and it showed that the metering was indeed working close to normal for that range of light. I do like to shoot urban night scenes under darker conditions, but this was a real good test of the metering.

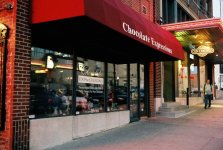
The last 3 below are from the roll of 1600. They actually look like there's more light there than there was. The one of the front of the restaurant was close to wide open at 1/30 and you can see the detail of the inside of the restaurant clearly. (In the full size one, it looks like I attracted the attention of the 2 diners up front.) 🙂

Anyway, I'm quite optimistic about the success of the "surgery" on this camera. 🙂

Oops, it looks like I can no longer attach 5 images to a message. 🙁 I'm not sure whether this is the new software or some limit that the Powers That Be have imposed on the plebean users, but anyway, attached are one of the sanity check images and 2 of the actual 1600 test roll images. 🙁
 

Attachments

  • sanity1.jpg
    sanity1.jpg
    74.9 KB · Views: 1
  • test1.jpg
    test1.jpg
    70.2 KB · Views: 1
  • test2.jpg
    test2.jpg
    67 KB · Views: 1
Last edited:
Hi,

interesting story, but I have the impression something's missing. What exactly did you do to the camera to adjust it for 1 f-stop? Did you modify the camera in some way? Electronics or mechanics? I guess you could either tune the meter by making it more sensitive to light (seems hard) or you could tune the way the meter controls the aperture to make it close down a bit further than it should (seems hard as well), or you could tune the way the shutter speed or ISO setting influences the meter by making it believe the shutter speed or ISO is lower than the actual value (may be feasible...).

I've got no clue how this could be done, so please shed some light on this...

Groeten,

Vic
 
vicmortelmans said:

Hewwo 🙂

interesting story, but I have the impression something's missing. What exactly did you do to the camera to adjust it for 1 f-stop? Did you modify the camera in some way? Electronics or mechanics?

What I ended up doing was much simpler than I had planned.

I wanted to do a real two-point calibration (those who have worked in a clinical lab will call it a "zero and span" calibration) but I could not find an easy or obvious way to set the low end of the scale. Some documents on the web say that the meter body can be rotated slightly to do this, and some say that there is a mechanical meter zero adjustment, but I could not find either when I took the top cover off. So, I ended up skipping the zero part of the calibration and adjusting the span part.

I did find the meter's electrical adjustment, the variable resistor or potentiometer (sp?) which is hidden right behind that red-striped flag which moves when you wind the film.

What I did was to very carefully coax the electrical adjustment to the right a wee bit at a time, comparing the readings on the Canon to the readings on the Pentax. When I got to what was close to one stop from where I started, I stopped, double-checked it several times, and put it back together.

Before I started, I first compared the Canon and the Pentax with the existing batteries. At the very bright end of the scale, the Canon was close to one stop underexposed when compared to the Pentax. At the very dim end, the Canon was about 1/2 stop overexposed compared to the Pentax. I have no clue as to which is closer to a true standard, but both do seem to meter reasonably well in real life.

I then installed a fresh battery in each. There was no change at all in either at the bright end of the scale, but the Canon seemed to overexpose just a wee bit more at the dim end, but this seemed to be within the margin of error. You do seem to get slightly different readings at times when picking up the camera, aiming, and metering the same scene. I then did the actual adjustment, preserving the observed "errors" between the two.

The difference in the setting of the ISO (ASA) slider and the electrical meter adjustment now offset each other, and the result is that it will meter for 1600 film (by setting to 800) while losing the low end of the ASA/ISO scale.

I do want to write this up, maybe this can be a start on that. 🙂
 
dmr,

I would like to see your results from slide film, negative film has soooo... much latitude it makes it difficult to draw conclusions.

Your results are very nice though and if you always shoot negative ISO 1600 at night it looks like it works!!!

Wayne
 
oftheherd said:
That's neat.

Thanks. 🙂

What has it done to the high end now? That is, what is the practical lower ASA film you can now use?

Now it's ISO 50, by setting the slider to 25. Since the slowest I'll probably ever use is Kodachrome 64, it will work fine by setting to 32.

My next test will be to shoot a roll of Kodachrome, carefully bracketing under various conditions, to try to get a better idea of how close the meter on this thing is.
 
Wayne R. Scott said:
I would like to see your results from slide film,

I would too! 🙂

negative film has soooo... much latitude it makes it difficult to draw conclusions.

I know. What I really wish I had was some kind of a known reference, either a known light source (other than "afternoon sun on a clear day") or a meter that's known to be accurate.

Our maintenance department at work actually has a light meter, huge thing with kind of a paddle like sensor, which I'm sure I could borrow. It reads in lux or footcandles, and I really don't feel like doing all kinds of messy calculations to try to convert that, plus, I don't know how accurate it is.

Rocky Horror Picture Show at Midnight? Brings back memories from college days a couple of eons ago.

That's one of the area's very few surviving indie theaters. It's in an older revitalized business district on the east end of town. I took that way coming in, figuring I would catch a few normal shots for the 200 control roll in that area.

(Let's dooooooooooooooo the time warrrrrp againnnnnnnnn!)
 
great! ive been wanting to do this for a long time, but wasnt sure how or if it were possible..


i always wished that one of these small, affordable fixed lens rf's went up to 1600, but
it seems
they all stop at 800
 
Last edited:
I tried to do this today but I couldn't get to the little screw (red circle in the attached picture), the wind mechanism is in the way 😡. Does anybody have a way to work around this?
 

Attachments

  • z 002.jpg
    z 002.jpg
    118.9 KB · Views: 3
Twigs said:
I tried to do this today but I couldn't get to the little screw (red circle in the attached picture), the wind mechanism is in the way 😡. Does anybody have a way to work around this?

Uh, I thought I posted notes about removing the frame counter and such. Maybe that was on one of the other systems. I do have photos and a write-up on it.
Lemme look and I will (re?) post them. 🙂
 
Here is a re-post of the text I thought I posted here and elsewhere following part 2 of the recalibration.

I think the accompanying photos are on the laptop at the office, so I'll (re)post those tomorrow unless for some reason I end up going in today ...
. . . . .

History:

I love the Canonet QL17 GIII. However, it's not ideal. One shortcoming
that has always bothered me was the limitation of ASA/ISO 800 as the
fastest film that could be used with its internal meter. Since the GIII
is one of my primary low-light cameras, this is of great importance to
me.

The one question which was brought up when I first mentioned the idea of
the recalibration in some on-line forums (fora?) was that of the
adequate range of sensitivity in low light conditions to properly work
with 1600 speed film at the slower hand-held speeds. A quick check at
ASA/ISO 800 at 1/4 second (two speeds slower than I ever expect to use
hand held) showed that yes, the meter was responding to light of that
level.

The intended procedure is to perform a "two-point calibration" where
adjustments (if needed) are performed on both the low ends and the high
ends of the scale. This is similar to the "zero and span" calibration
common on clincal laboratory equipment.

Test equipment:

I do not possess any test equipment whose calibration can be traced to
any established standard. The closest I have is the meter in the Pentax
K1000, a camera which over the years has consistently given good
exposures on both print and slide film under daylight and artificial
light conditions.

Two light sources are used, a blank (eggshell, neutral, but slightly
warm) bathroom wall with both the overhead lights and vanity lights on
dimmers, and an east-facing window overlooking a grove on the edge of a
forest preserve. Depending on the exact conditions, this gives exposure
readings of 1-2 stops less than pure "sunny 16" conditions.

Sanity check:

The very first test was a "sanity check" on both the GIII and the Pentax
using the existing batteries of both, the age of which are unknown or
long forgotten. 🙂

ISO 400 daylight 250 f8 250 f11 Canon ~1 stop under
ISO 400 avail light 15 f2.8 15 ~f2.5 Canon slightly over

This is similar to what I remember the last comparison to be, with the
Canon slightly underexposing at the high end of the scale and
overexposing slightly at the low end of the scale.

The next part of the test was to install fresh batteries in both of the
cameras in order to eliminate the variables of unknown battery age and
condition.

I've always used the "wrong" newer 1.5 volt 625 battery in the Canon.
That was in the camera when I bought it, and even with the wrong battery
it's always agreed within one stop of the Pentax under both bright and
dim conditions. As could be expected, the response of the meter with
this approximately 15% overvoltage was "hot", meaning greater span than
normal, which is reflected by the high meter readings under bright
conditions and the low(er) meter readings under dim conditions.

ISO 400 daylight 250 f8-11 250 f11-16 Canon ~1 stop under
ISO 400 avail light 15 f2.8 15 ~f2 Canon 1 stop over

With fresh batteries, the difference of the Canon to the Pentax is
slightly greater, indicating a possible partly depleted battery in the Canon.

Procedure:

The indended steps for this recalibration are as follows:

1. Disassemble the top part of the Canon.

2. Set the Canon ASA/ISO to 200, corresponding to ISO 400 film.

3. Mechanically adjust the meter on the Canon so the meter indicates
f2.8 to agree with the Pentax using the low light test source.

4. Electrically adjust the meter on the Canon so the meter agrees with
the Pentax using the bright light test source.

5. If necessary, repeat steps 3 and 4 as required.

6. Re-assemble and shoot test rolls.

The first step is to remove the ring on top of the film advance lever.
Many claim that this can be done by hand using a rubber jar opener or a
rubber washer for grip, however, when I first got the camera and needed
to take the top off, I could not get this to budge. I carefully drilled
two small indentations in the ring for a spanner wrench.

Once the advance lever and hardware are removed, the rewind crank is
removed by holding the inside of the film rewind shaft and unscrewing
the crank.

Removing three small screws allows the top cover to be removed.

On the first attempt, I failed to locate the screw that allows the
mechanical re-adjustment of the meter for the low or zero setting.
Instead I just adjusted the electrical adjustment at the high end of the
scale. I made several back and forth adjustments, comparing the effect
of the adjustments on the high and low ends of the scale. It was very
obvious that the electrical adjustment had far more effect at the high
(bright) end of the scale.

I decided to split the error somewhat between the high and low ends of
the scale. I settled on a setting that resulted in approximately a 1/2
stop underexposure at the high end (bright) of the scale and about a 1
stop overexposure at the low (dim light) end of the scale. This leaves
at most a one stop error on the low end, and that is in the direction of
overexposure, which I consider to be a lesser evil than underexposure
when dealing with low light situations.

After recal Pentax Canon (@ISO 200)
ISO 400 daylight 250 f8-11 250 f11 Canon ~1/2 stop under
ISO 400 avail light 15 f2.8 15 ~f2 Canon 1 stop over

Note that the readings on the GIII are with the ASA/ISO set to 200, for
a true ISO of 400, adjusted for the one-stop intentional miscalibration.

The obvious next step is to shoot some test rolls under real-world
shooting conditions. First, a sanity check roll of ISO 200 (camera set
to 100) and next a roll of 1600 to test the end result of this
procedure.

Upon studying some online photos of the GIII, I was able to locate
that elusive screw and perform the mechanical calibration at the low
end of the scale.

Although the elusive screw can be seen after the top cover is removed,
loosening this screw actually requires further disassembly, the removal
of the film counter assembly. Once this is done, a thin screwdriver may
be used to loosen the screw, allowing the meter assembly to be rotated.

First, the top cover of the camera is removed as described above. Next,
the film counter indicator dial is removed by first removing one screw
and sliding the dial off. This leaves the film counter assembly exposed
and ready to be removed.

Three items must be un-done in order to remove the two pieces of the
film counter assembly:

1. A "clip ring" which holds the outer film counter wheel to the shaft
under the film advance lever. This is tricky. I got this off carefully
with two very small screwdrivers. Be careful to avoid letting this snap
loose and fly across the room!

2. A screw post which holds one end of the film counter spring.

3. A screw opposite the post holding the spring. This is longer than it
first looks and also holds the camera strap bracket in place.

Once the elusive screw is exposed, apply a bit of nail polish remover
to the lacquer holding it in place. After the remover has softened the
lacquer, the screw may be loosened with a small screwdriver.

Rotating the meter assembly is tricky. I used a combination of a dental
explorer (that pick a dentist uses on your teeth) and a hemostat (a
serrated surgical clamp) to gently coax the assembly one way or the
other as needed.

I adjusted my low light source to indicate an exposure of 1/15 at f2.8
ay ISO 400 on the test camera. You can use any test source of similar
brightness, measured with a meter or camera that is known to be
accurate.

REMEMBER TO SET YOUR QL17 ASA/ISO TO HALF THE ISO OF YOUR METER OR TEST
CAMERA!

Rotate the meter assembly until the reading agrees with that of your
test camera or meter. It's best to repeat the reading several times,
capping the lens and allowing the meter to re-indicate the exposure.

When this meter consistently agrees with your test camera or meter,
tighten the elusive screw and proceed to the high brightness
calibration.

My known good camera read right between f/8 and f/11 at 1/250 at ISO
400. You can use any scene or light source somewhere in this range.

Adjust the electrical adjustment (potentiometer) until the reading on
the QL17 agrees with that of the known good camera when metering the
bright scene. It can be tricky to adjust this, but a dental explorer in
the "dimple" of the adjusment arm of the potentiometer moves it easily.

Again, take several readings, capping the lens in between, and make the
meter re-indicate each time. When you're satisfied that the QL17 reads
the same as your known good camera, you can proceed to re-check the low
light reading.

You will find that the electrical adjustment affects the readings at the
bright end of the scale far more than those at the dim end of the scale.
The mechanical adjustment affects both readings equally. Therefore, the
mechanical adjustment is used at the low end and the electrical at the
high end.

You may very well find that even after the electrical adjustment, the
available light low end reading still agrees very closely. If this is
the case, no further adjustments are necessary.

If they do not agree, loosten the elusive screw again and repeat the low
end adjustment. Then check/adjust at the high end, then the low end,
rinse, repeat! 🙂

After second recal Pentax Canon (@ISO 200)
ISO 400 daylight 250 f8-11 250 f8-f11 On the numbers!
ISO 400 avail light 15 f2.8 15 ~f2.8 Very close!

As you can see, the Canon now agrees well within 1/2 stop of the Pentax
under both dim and bright light.

The final step after assembly was to paint a very conspicuous red dot
by the ISO setting. This serves as a reminder, a "string around the
finger" so to speak, to set the ISO to half of the actual film speed.
 
Here are some close-up shots of the area you will be working in. The first one shows the position of that elusive screw that must be loosened to rotate the meter. The second shows the clip ring (arrow) that must be removed to allow removal of the stuff under the film counter dial. The third shows the screw post and spring that can be unscrewed to make the removal of this stuff easier.

Hope this helps. 🙂
 

Attachments

  • recal11.jpg
    recal11.jpg
    70.1 KB · Views: 2
  • recal6nia.jpg
    recal6nia.jpg
    62.4 KB · Views: 2
  • recal3ni.jpg
    recal3ni.jpg
    69.1 KB · Views: 2
Thanks dmr!

I modified the QL17 tonight, and now I've realized it's not really working.

1. The needle doesn't go above f/1.7 into the "red zone", so there is no lock when there is not enough light. and thus when you want to open up the aperture, you have to close it down and then open it back up step by step to make sure it's at f/1.7 instead of inside the red zone.

2. The actual aperture doesn't match the meter reading. I shot a mirror at different f-stops and the actual openings were smaller than what the meter suggested.

3. Since the needle gets into the lower red zone easier, you have to be extra careful not to push it even further down, otherwise the needle will act weird once it comes back up (a tap on the camera fixes it)

I'm gonna use this for a while and decide if I will fall back to the old setting.

So how did your tests go, dmr?
 
Last edited:
Back
Top Bottom