understanding 35mm b&w grain?

jano

Evil Bokeh
Local time
3:49 AM
Joined
Jul 13, 2005
Messages
1,203
I'm confused.

It appears no matter what combination developer/film I use, skies that are in a middle-tone or darker tend to appear rather grainy, whereas skies that are lighter have far less grain, even so far as to say milky and smooth. On one hand, it makes sense, since the thicker/black the negative is, the less light.. ah, heck, who am I kiding, it doesn't make any sense :p

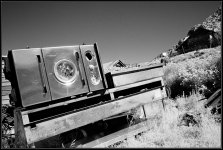
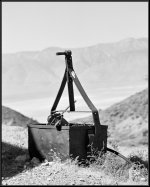
Observe the sky in the attached two shots, both from the same roll of film, fuji acros (very fine grain) with a fine grain developer (xtol 1:1). Maye I'm doing something wrong in development, or is this something that's expected? Scanned on nikon CS V with vuescan.

Thanks,
Jano
 

Attachments

  • ysbdbw0003.jpg
    ysbdbw0003.jpg
    264.9 KB · Views: 0
  • ysbdbw0012.jpg
    ysbdbw0012.jpg
    214.2 KB · Views: 0
What you're seeing is grain aliasing, a phenomenon that's caused by scanning rather than what film you use or how you develop it.

It causes images made on conventional b&w films to look much grainier when scanned than they do when printed conventionally. (Chromogenic b&w and color films don't suffer from it as much because their grains consist of soft-edged dye clouds rather than hard-edged clumps.)

Here's a link with a very comprehensive explanation of it.

"Aliasing" is just a term for any image feature that appears because of the digitizing process, rather than being present in the original. To oversimplify a bit, what's happening in your case is that the film's grain structure consists of hard edges with a random pattern, while the scanner's CCD array consists of hard edges with a regular pattern.

You can see that if a grain edge and a CCD edge happen to line up with each other, you'll get a more pronounced texture than if a grain edge happens to land in the middle of a CCD pixel or vice-versa.

Since the grain pattern and the CCD pattern are almost but not quite exact multiples of the same size, they interact as the scanner sweeps across the film to produce a larger random pattern of these enhanced edges. Your eye interprets this as exaggerated grain.

Since this is a fundamental characteristic of the way film and scanners work, there's no easy way to eliminate the effect. You can use a variety of techniques that subdue it by blurring the film's grain structure, but these also soften fine details in the image. Or you can try software filters such as Noise Ninja, which try to analyze the pattern and cancel it out -- but I've found these also affect subject textures such as fabric and hair.

One technique I've used with some success is to scan the negative twice (usually I do one scan that favors the highlights and another that favors the shadows, to make sure I'm capturing the negative's full density range.) I combine the two scans as layers in a Photoshop file and use the transparency controls to blend them together.

Since the scanner head never returns to exactly the same position for the second scan, the grain patterns of the two images are very slightly offset, and this somewhat cancels out the aliasing effect. If I need more cancelling, I'll sometimes select one layer and use the arrow keys to nudge it by one pixel in various directions, until I find a direction that suppresses the grainy appearance.


(Apologies to those who remember a very similar answer I posted on a different thread recently, but this is a subject that just seems to keep coming up as more and more people try scanning their treasured b&w negatives and being disappointed with the results.)
 
Grain is always most apparent in blank areas of midtone, even when printing traditionally. You're not alone, Jano, it's just something we have to live with. Scanners add their own complications.
 
Jano

Not sure exactly what you are asking here but if you are talking about making wet prints the traditional way then lots of factors are involved:

Here are a few based on my style printing:

- when printing overexposed negs the grain becomes enhanced in the flat mid tones.

- also depends also on what type of enlarger light source you use - point source and condensor producing more grain than the softer cold cathode and colour diffusion enlarger heads.

- type of developer certainly effects grain - for example my PMK pyro negs print with very little grain from TX 400 film on fibre paper but scan the neg and the grain behaves very differently and is very much enhanced on the Nikon Coolscan 5000 (and that's using Vuescan).

- lith prints can enhance grain - depends on dilition of developer and the paper type

Hope some of this is helpful.
 
agree with jlw, you're seeing grain aliasing, if using vuescan you can go under the filter menu and choose the filter for grain reduction, "light" works best though I have used med and heavy before. Noise ninja is a plug in for PS that works well too but you have to buy it ;)

Todd
 
If it IS grain aliasing, then in my experience it has occurred around 1800-2400 dpi (albeit with a different scanner). Scanning at higher resolution (like 4000 dpi) and then downsizing the image got rid of the problem. Yes, this is slower and a pain in the neck...
 
Woah.. thanks everyone :)

Finder: so.... less dense == more grain? Then what's this about people recommending thinner negs for scanning? Bah!

Mark: thanks, look at the other attached shot. Grain in the hills, but no grain in the sky. Sheesh.

JLW: I didn't know that scanning-twice technique worked with scanners :) I know with some of my older digital cameras, to battle noise, I'd take 5 or six shots of the same scene, and combine them in PS layers, effectivley reducing noise. Thanks for your time in answering the question "again". I do usually search, I was just so caught in the moment ;) I don't get these kinds of results on the flat bed, but the images do come out a bit softer. Ugh, decisions, decisions :) Doesn't the scanhancer doohickey help reduce grain aliasing? There isn't one for the CS V, though. Oh, well. But thanks for the article as well, very informative, and certainly feels like exactly what I'm experiencing.

Sparrow: I often get grain/noise in clouds with fuji reala shot at 80. Look in my gallery, the one with the wave eating the rock.

Simon: my combo is supposed to be fairly low grain, and I'm not printing in the dark room at this point. All scanned. Also, I've found that I have less grain in overexposed negs... :confused:

Todd: for some reason, I thought the grain filtering would not work with b&w.. probably false thinking on my part, where I was combinging the idea with ICE on b&w (in nikon scan, the two are together).

Sleepyhead: the attached images were all scanned at full res (4k dpi) and resized down using PS's bicubic smoother. Notice how their is visible grain in the sky of the broken dishwasher shot, whereas no grain at all in the other one.

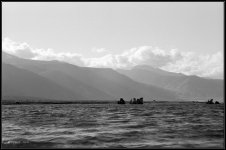
Thanks again for all your responses. I had been curious as to why, but guess there just isn't an easy solution now so I'll just keep deeling with it. Here's one last example.. notice the grain in the hills, but almost none in the sky or water.

Jano
 

Attachments

  • yb0001.jpg
    yb0001.jpg
    301.9 KB · Views: 0
About a year ago when I first started scanning negatives, I had the issue with grain aliasing when I would scan the Walgreens/Agfa 200 negatives at 1200 or 1600dpi. They looked grainier than Fuji 1600! Scanning at 3200 really cleared this up.

Another thing that I occasionally use which will really help reduce (more like totally eliminate) grain is the Neat Image plug-in for Photoshop. Although this is mainly intended to reduce digital noise, it does work wonders for a film scan where you want to reduce or eliminate the grain.
 
Jano, to expand on what jlw was saying: I've found the newer Tgrain films like TMax 100 and 400 and the Ilford Delta films show less aliasing than the more traditional films. I'm not sure where Neopan fits in here.
I have a scanner that does multi pass scanning (Minolta Scan Multi II). This takes care of the alignment problems of scanning your neg twice. For certain films I set it to scan up to eight passes, depending on the look I'm going for.
I have just finished shooting some Neopan 1600 so I'll post some images once I've done some scanning!
 
I have little problem with excessive grain when scanning with my LS-4000. One key I think (which is important for scanning in general) is to not try for that "final look" in your scans. Scanning should be to try and capture as much data as possible and not clip the highlights or shadows. This will result in a flat, blah initial scan file but that's what you want. Then you have room to work your darkroom "magic" in PS or whatever. Too often people tweak the scanning software too much and get a contrasty image which can look better but exacerbate the grain. From there it just gets worse when you tweak anything with curves or levels, etc. That said I still see grain but that's part of the deal with some films and film/developer combos. Just scanned some Tri-X that was developed in Rodinal. Hello grain! But it was a look I like sometimes. But Acros in Rodinal gives me little grain. Acros or Delta 100 in D-76 1-1 gives me gorgeous, smooth negs that still have the traditional B&W "bite" and look without looking too "digital" like the C-41 B&W can sometimes. Of course all of this is fine and dandy but is little help if you over or underexpose too much, both of which can cause excessive grain. B&W films have great latitude and you can get an "acceptable" scan or print from almost any neg unless it was something like 3-4 stops off, however films do have a "sweet spot" in which tone, grain and exposure all come together with proper development technique to give the best result. If not, why all the spot metering and zone system stress? Of course your "best result" will vary from others...
 
Dave, I will try vuescan's software multi-pass scanning. I've found I occasionally will get soft scans doing this, and I'm thinking it's either due to the fact that the scanner head isn't in the exact same place twice and/or maybe the heat from the light causes the film to warp? Whatever, I'll give it a shot :)

Rich: thanks for the detailed reply. I rarely do any tweaking in my scanner software, and my PS work is often limited to curves and dust spotting. Have you examined areas of sky on your shots with the acros/delta combos for grain? I'm talking like in that broken dishwasher shot, with a fairly "dark" sky (sun was behind me, high altitude, and 25 ZM make sort of a poliraized effect on the sky).

Funny, I just looked at the pics here on my flatscreen at work, and interestingly enough, there was considerable "grain" or aliasing visible in the shot with the light sky. My monitor at home didn't show it. *shrug*
 
Hello Jano,

I've done some experiments to reduce the aliasing, too. The results (with picture examples) are here - I didn't finish writing the comments yet, but I think looking at the examples will get you an idea of the amount of improvement I could achieve. In summary, 16x oversampling produced the best result, the light grain redux of Vuescan came close. The film was HP5+ in Rodinal, the scanner CS V at 4000.

You should scan in the highest scanner resolution and downsize later, too.

jlw's explanation is great, respect!

Neopan 1600 has a muuch finer grain (again, mine was in Rodinal 1+50) than HP5+, at least with the technique I use.
 
jano said:
Dave, I will try vuescan's software multi-pass scanning. I've found I occasionally will get soft scans doing this, and I'm thinking it's either due to the fact that the scanner head isn't in the exact same place twice and/or maybe the heat from the light causes the film to warp? Whatever, I'll give it a shot :)

Or a slight vibration whacked the negative by some 1/150mm? Do you use the FH-3 holder? It is incredibly easy for me to change the exact position of the frame while using this holder and the scanner in the 'lying' position.
 
Thank you fffftttk (for short.. haha -- edit, just saw "robert"). I use the 6-strip feeder, not sure which one that is.. I think the f-21? I'll review what you found and run some tests this weekend. Interesting about your comment with 400 speed and faster films, although mine is showing up in 100 speed films and slower (efke 25, for example, but I'm not totally sure that's a fully fine-grained film).

You put in "GEM" -- you mean the actual GEM in nikonscan, or vuescan's version?
 
Last edited:
jano said:
Thank you fffftttk (for short.. haha -- edit, just saw "robert"). I use the 6-strip feeder, not sure which one that is.. I think the f-21? I'll review what you found and run some tests this weekend. Interesting about your comment with 400 speed and faster films, although mine is showing up in 100 speed films and slower (efke 25, for example, but I'm not totally sure that's a fully fine-grained film).

You put in "GEM" -- you mean the actual GEM in nikonscan, or vuescan's version?

I meant Vuescan's! Actually I was to lazy to look it up in the Vuescan docu, might even be the Coolscan's GEM it triggers?

fftt.. :D

The motorized feeder sits much tighter in my scanner than the manual one which is said to keep the negs absolutely flat (but mine doesn't), so maybe it's not you hitting your keyboard on the same table as the scanner ;)

You're scanning at 4000 dpi?

Of course the higher you push the contrast (via curves) the more visible grain you'll get, too.

Just wild guesses.. (as always ;) )
 
I just searched the web: Vuescan's grain reduction doesn't seem to use Nikon's GEM (if that would be possible at all).. But the good news is: this thread made me finish the comparison page :)
 
Scanning negatives is complicated.

Here's what I've learned so far:

1. During a single scan, pixels-per-inch and grain topology determine the extent of aliasing artifacts. The scanner light-frequency range is also relevant but I'm guessing this is similar for most scanners.

2. Signal averaging (multi-scan passes) improves a digital image.

Any difference between scans that averages (or smoothes) emulsion grain and digitization artifacts (such as aliasing) also degrades resolution. For many images signal averaging may improve the grain and aliasing more than it degrades the resolution.

Signal averaging improves an image by 40% for two passes. Four passes can improve an image 2 X ,and 16 passes yields 4 X.

3. Any thing that irreversibly modifies the signal as it is digitized during a scan, degrades the data to some extent. The degradation can be trivial or serious depending on the circumstances.

Minimize scanner/driver image processing as much as possible.

Images processing such as curves and histogram manipulations, and other image enhancing algorithms (noise smoothing and filtering) should be done post data collection.

If (like me) you can not afford to use expensive post-data-collection software to reduce artifact levels in troublesome images, careful pre-scan adjustments using the scanner driver software may be useful.

4. Scan with the highest bit depth possible (usually 16 bits/channel) and do not scan directly to jpeg.

I happen to use the SilverFast scanner driver. This software (and others for all I know) can collect a RAW image in tif format. I think of this file as my digital negative.

I adjust these 16 bit/channel digital negatives in Adobe LightRoom and PS. The images are converted to 8 bits/channel and down-sized as needed.


willie
 
There are other threads on scanning on RFF, many of which are very good, but this is the best I've ever seen. Certainly for B&W scanning, it's invaluable. Thanks to all the contributors!

Of course, I still prefer wet printing! :D
 
Back
Top Bottom