Vito CLR shutter is lazy..

pvdhaar

Peter
Local time
5:26 AM
Joined
Dec 8, 2003
Messages
3,395
When a local camera shop closed down yesterday (after being in business for 68 years), there was a close-out sale where I managed to pick up some interesting stuff. Amongst it was a nice looking Voigtlander Vito CLR. Most of it works perfectly, including the light meter and rangefinder.

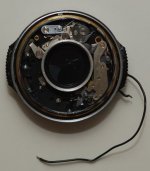
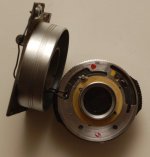
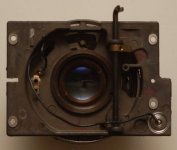
Caveat though is that the (Pronto LK) shutter probably hasn't been exercised for decades. It's slow. When I trip it a couple of times, it speeds up to the set value, but when it rests a couple of minutes it's slow again. Another problem is that at 1/15th, the shutter won't close at all. I guess I need to take it apart, clean it and reasseble.

Is there anyone out there who can give me some pointers on to take it apart in such a way that it can be put together again?
 
Pronto / Prontor shutters are relatively simple to CLA.
All you need is to take the sticky grease out by washing with ronsonol/naphta.

First exercise your shutter many many many times, that helps a lot. Voigtlanders were very well made and they used good quality stuff inside so they unstick quickly. While wathcing the Gouden Kooi shoot at 1/60 many times.
1/15 has a different setting so there must be something stuck in there.
Since you are in the NL I'll send you a PM to talk on the phone, maybe I can help you at home or you can come to my house and we do the CLA in one afternoon.
 
I was thinking of looking into the lazy shutter of my CL during winter. A Vito B with jammed shutter is waiting for me at the Post Office, so I would be interested in the mechanics of the shutter and how to get in. I can see a further CLR in my future too.
Dave...
 
titrisol said:
Pronto / Prontor shutters are relatively simple to CLA.
All you need is to take the sticky grease out by washing with ronsonol/naphta.

First exercise your shutter many many many times, that helps a lot. Voigtlanders were very well made and they used good quality stuff inside so they unstick quickly. While wathcing the Gouden Kooi shoot at 1/60 many times.
1/15 has a different setting so there must be something stuck in there.
Since you are in the NL I'll send you a PM to talk on the phone, maybe I can help you at home or you can come to my house and we do the CLA in one afternoon.
Hi Pablo, I spent an hour exercising the shutter already.. so I don't have to sit and watch a complete episode of Gouden Kooi.. Oh, and thanks for your PM!
fidget said:
I was thinking of looking into the lazy shutter of my CL during winter. A Vito B with jammed shutter is waiting for me at the Post Office, so I would be interested in the mechanics of the shutter and how to get in. I can see a further CLR in my future too.
Dave...
This remains my big question, how to get into the lens and access the shutter.. As soon as I find out, I'll keep you updated..
 
Last edited:
Generally there are 2 veyr small screws in the distances rirng that need to be taken apart, then take the front element out
then take the whole front plate out and you are in business.

Google for VITO CLR maintenance, I believe there are 1 or 2 e-stores that sell the full maintenance PDFs for about 10 Euro

Also this thread:
http://photo.net/bboard/q-and-a-fetch-msg?msg_id=00EUfl
 
Last edited:
Graig Camera http://www.craigcamera.com/lit_tuvw.htm
has:

#90229. CraigCamera Repair Reprint: Voigtlander Vito C/ Vito CL/ Vito CLR Cameras, c. 1959 50pp, fully illustrated. Reprint of the original Voigtlander factory service information on these cameras. Includes exploded views, dis-assembly and re-assemly information, and repair information. EX; scarce. 8-1/2x11", spiral bound. $15.00
 
Thanks for the info, $15 seems very reasonable, it could be a bargain!
I'll email and see if he can send to UK.
 
Short update..

I took the CLR apart, which was actually much easier than I anticipated. I removed the front of the lens until I could access the shutter mechanism, where I found two things wrong..

The first was that one tab was slightly bent, possibly because someone used too much force to use the self timer with the lens uncocked and set to B (which is a no-no according to the manual), or tried to change shutter speeds from 1/15 to 1/30 with an uncocked shutter (this is more or less blocked).
Bending the tab straight restored the self timer function, something I hadn't noticed not working originally.. Hooray!

The other is that there's another tab on the speed gear train that is moved progressively off center with faster shutter speeds. For speeds 1/500 to 1/30 this works. For 1/15th an B, this gear train is circumvented by a specific position of the gear train tab and the combined positions of two others. But there's so much wear on the 1/15th and B setting that it keeps a roller from turning free.. I guess that when it's put together again I'll just have to live with the 1/500-1/30 shutter speed range..

The original problem with the sticky blades hasn't been completely solved though, so I plan to remove the whole front plate from the body and try to access the shutter from behind as well.. I'll keep you informed..
 
Well, sort of..

The shutter remains sticky, so I'm going to give it a flush in dissolvent. I've now removed the complete front from the camera and taken the shutter assembly from it. It's now ready for a good soaking. I'm working slowly on this because I don't want to wreck something in the process.

I plan to take pictures when reassembling again.
 
Vito CLR shutter no longer lazy..

Vito CLR shutter no longer lazy..

Short update, I've given the disassembled Prontor (attachment 1) a dip 'n dunk in a dissolvent, and it immediately sprang back to life. All speeds now work, including 1/15 and B.

I've started reassembling, and have come as far as having the entire lens back together (attachment 2) and mounted on the mounting plate (attachment 3).

I've already tried putting the mounting plate on the body again, but there's a slight problem with a sticky ratchet in the film advance, which prevents the shutter button from being pressed..
 

Attachments

  • ProntorDipDunk.jpg
    ProntorDipDunk.jpg
    41.9 KB · Views: 0
  • ProntorAssembled.jpg
    ProntorAssembled.jpg
    28.5 KB · Views: 0
  • ProntorBoardMounted.jpg
    ProntorBoardMounted.jpg
    27.6 KB · Views: 0
Good to see that you are making progress. You make it sound quite easy.
Good luck with the release, please keep us posted.

Dave
 
fidget said:
Good to see that you are making progress. You make it sound quite easy.
Good luck with the release, please keep us posted.

Dave
Actually it's quite easy indeed; I've made photos of the complete shutter assembly procedure and placed them in a separate thread: http://www.rangefinderforum.com/forums/showthread.php?t=50473

I've now also got the release fixed. Problems there were due to an interlock that got gummed up..

The CLR is now up and running again. The only thing left to do now is check the RF horizontal alignment.. This should be relatively easy. The RF coupler ring and focus scale only go in exactly one way. It's just a matter of checking whether the note I made of how far the front lens cell goes in was right..
 
Did you check that focus at infinity is correct?
there is an easy way using 2 cameras, set the trouble one at infinity and the exposure in B
Take a piece of clear film (empty frames works fine) Scratch the film, or write in it horizontal lines, and tape it to where film is supposed to go.
With The other camera also set at infinity (SLRs are better) look through the lens of the problem camera and observe if the "marked film" is in focus. If it is not adjust the front element until it is. That is your infinity mark now.

Hope this makes sense, if not PM me and I'll email you a graphical description
 
titrisol said:
Did you check that focus at infinity is correct?
there is an easy way using 2 cameras, set the trouble one at infinity and the exposure in B
Take a piece of clear film (empty frames works fine) Scratch the film, or write in it horizontal lines, and tape it to where film is supposed to go.
With The other camera also set at infinity (SLRs are better) look through the lens of the problem camera and observe if the "marked film" is in focus. If it is not adjust the front element until it is. That is your infinity mark now.

Hope this makes sense, if not PM me and I'll email you a graphical description
Makes perfect sense! And what's more, it seems a lot easier than using a piece of transparancy paper taped to the film rails as a sort of ground glass.

Can't wait to try it out! Thanks!
 
titrisol said:
Did you check that focus at infinity is correct?
there is an easy way using 2 cameras, set the trouble one at infinity and the exposure in B
Take a piece of clear film (empty frames works fine) Scratch the film, or write in it horizontal lines, and tape it to where film is supposed to go.
With The other camera also set at infinity (SLRs are better) look through the lens of the problem camera and observe if the "marked film" is in focus. If it is not adjust the front element until it is. That is your infinity mark now.

Hope this makes sense, if not PM me and I'll email you a graphical description
Hi Pablo,

this worked like magic indeed. I stuck a slide on the film rails and looked through an SLR with a 90/2.8 set to infinity. With that I could see how a slight adjustment was all that was needed to get the slide sharp..

The end result now is that I've got a working Vito again! Even the light meter works, it's within 1/3 of a stop of the SLR..
 
Peter, I'm glad I could help.
Now shoot a roll of cheap film and have it developed to make sure everything is in order.
 
titrisol said:
Peter, I'm glad I could help.
Now shoot a roll of cheap film and have it developed to make sure everything is in order.
Well, before it got as far as that, I ran into something quite peculiar.

I exercised the shutter for a couple of days, and everything was fine. It ran like clock work. But when I picked the CLR up yesterday to load a half completed roll of film into it, the shutter was iffy again.. the 1/15 either would stick or would go at something like 1/125.. and B would remain open when tripped.

All that work for nothing.. I was already eying it over for parts to canibalise when when I realised I has put it in a cupboard each time with lens facing up. I've now turned it over, and kept it sitting on the lens for a day. And guess what? Shutter's coming back to life again.

I'll try again as soon as I've got another half roll of film ready to complete. Provided it still trips of course.. If not, it goes in the parts bin.
 
Don't give up just yet
there is still something gummed up

I had that happen in an old Seikosha shutter and took more than one dip in the ronsonol to fix
 
Back
Top Bottom