Twigs
Absolut Newbie
Hi there,
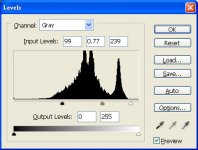
I have just started scanning with my newly acquired Epson 4490 flatbed with Vuescan. I noticed that the tones of the resulting images are clustered together, and after some tweaking in Level/Curve the tones become very coarse (see pic 1).
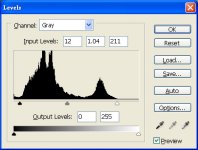
So I played around with the Curve Low and Curve High settings under the Color tab in Vuescan, and I was able to get a wider range of tones (see the improvement from pic 2 to pic 3).
I've been thinking and thinking about this, but all I got was just more and more questions... :bang:
1. True or False: When I adjust the crop box in Vuescan, if I include the very bright/dark area outside the frame, I jeopardize the picture quality (esp. the tonal range).
2. Is adjusting the Curve Low and Curve High settings the best way to extract the most out of the raw scan?
3. Do I have to do this for every frame I scan or is there an easier work-around?
4. Is this an inherent problem with low-cost scanners?
5. What if I shoot/develope for higher/lower contrast?
6. On a semi-related note, I usually overexpose my pictures (by half of a stop) and then reduce developement time (by 10%) to get more shadow details without blocking highlights, am I doing this correctly?
Thank a bunch!
I have just started scanning with my newly acquired Epson 4490 flatbed with Vuescan. I noticed that the tones of the resulting images are clustered together, and after some tweaking in Level/Curve the tones become very coarse (see pic 1).
So I played around with the Curve Low and Curve High settings under the Color tab in Vuescan, and I was able to get a wider range of tones (see the improvement from pic 2 to pic 3).
I've been thinking and thinking about this, but all I got was just more and more questions... :bang:
1. True or False: When I adjust the crop box in Vuescan, if I include the very bright/dark area outside the frame, I jeopardize the picture quality (esp. the tonal range).
2. Is adjusting the Curve Low and Curve High settings the best way to extract the most out of the raw scan?
3. Do I have to do this for every frame I scan or is there an easier work-around?
4. Is this an inherent problem with low-cost scanners?
5. What if I shoot/develope for higher/lower contrast?
6. On a semi-related note, I usually overexpose my pictures (by half of a stop) and then reduce developement time (by 10%) to get more shadow details without blocking highlights, am I doing this correctly?
Thank a bunch!