What am I doing wrong?

mickallen

Established
Local time
11:04 PM
Joined
Jan 23, 2009
Messages
57
Location
Sheffield, UK
I have just developed my third roll of film, my first attempts at developing which I am really enjoying. Most of the photographs you guys upload are really inspirational, much better compositionally than mine, which I am working on (only been taken photographs for 18 months, and only 2 months with film), the problem is I can't seem to get the results I want with regards to the quality of the processed images, they all seem to be flat too grey and lack contrast.

I know I can't expect miracles in the short time I have been using film, but any advice to help me along the road too improvement will be greatly appreciated.

I am not sure at what stage I am going wrong, capture, development, scanning or post processing.

I am using a Leica M6 with CV Nockton 1.4, using HP5+ developed in HC110 dilution B, I then scan the negatives on an Epson V700 single pass at 3200dpi 48 bit HDR, I then adjust the contrast, exposure and brightness in Lightroom.

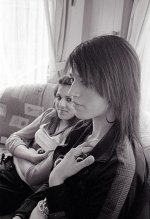
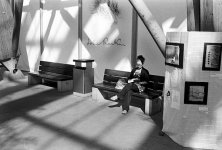
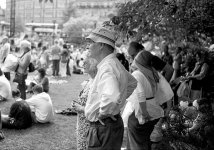
Below are a couple of examples:

p591705991-4.jpg


p514813054-4.jpg


p846407261-4.jpg
 
When I scan, in vuescan, I lock the black and white points. Then in LR, I typically only have to adjust the tone curve. I also remove that silly +5 blacks that lightroom puts in automatically. Rarely do I have to adjust exposure (because I use exposure lock in vuescan). And I never touch brightness.


So ... are you making tone curve adjustments at all? Drag down the darks and drag up the brights.
 
How do you feel you are with the original exposures? Are you just metering from a general viewpoint or trying to get heavy black shadows, good detail in the shadows whilst not burning out the highlights etc.

Post processing is very important both in the darkroom or on a computer but 'seeing' the shot as you want it before you release the shutter is even more important IMO.

My dev technique and knowledge is lacking compared to many here so I'll let others advise on that. Personally I see nothing intrinsically wrong with the scans you've shown unless you were hoping for a very different look.

Remember that your meter will try to make a scene 18% grey so you have to adjust for that, something that's easy with a DSLR but an M6 is fully manual so it's down to you to understand the lighting and how you want to depict it.
 
Thanks David,

No I don't touch the tone curve.

I forgot to mention I use silverfast which allows me to scan in the files as RAW TIFFS.

What do you mean by the +5 blacks that Lightroom puts in?
 
Simon,

You may be right I am using the M6 as I would my DSLR and just metering the scene generally without any thought for what I want my final output to look like, sounds really stupid as I am wrinting this, as I have read loads about the visualisation of a photograph before the actual shutter release.

Do you have any tips on how I might achieve better results, I like the photographs on here that have really deep blacks and white whites, mine all seem to look very grey and washed out.
 
To be honest the second photo looks great as it is to me. I can't speak about developing, as I get a shop to do it for me, but maybe just a bit of adjustment to levels and curves will get you a richer, more contrasty look if that's what you want.

Everything I shoot and scan in looks quite flat until I do that. Shooting under contrasty light also helps though that's rather dependant on what you take pictures of.

3467083264_f530f8ffdd.jpg


3350386484_c841911827.jpg
 
You simply have to learn a bit about post processing. The V700 to start with will give you very soft scans, so typically a double sharpening is needed to get something decent. Then if you like to increase the local contrast, to give the shot more bite, you should sharpen separately for this (set UM to something like 20 and radius to 60 instead of doing the usual 200,2). Then you should learn how to use the curves, also how to do separate curves adjustment for different sections of the image through masking. I think you would benefit from buying this book:http://www.amazon.com/Mastering-Digital-Black-Black-White/dp/1598633759. And BTW, I do not see anything particularly wrong about your images, they do not always HAVE to be more contrasty than this...
 
Historicist, Thanks for the post I like your shots although may be a little to dark for what I was looking for, but I understand what you mean and this is the kind of thing I am looking for.
 
Thanks David,

No I don't touch the tone curve.

I forgot to mention I use silverfast which allows me to scan in the files as RAW TIFFS.

What do you mean by the +5 blacks that Lightroom puts in?

Lightroom by default puts in +5 blacks adjustment. I was just grumbling about it really. It is up near the top in the development tab. I always undo that because it inevitably gives me some clipping in the shadows.

I would try working with the tone curve - start by making a slight S curve and just adjust for what looks best to your eye.

Remember, you can hold alt (or option) when you adjust your exposure, blacks, etc to see where the clipping is occurring. Usually I adjust (if I need to at all) to the point where just barely any shadows clip - and just barely any highlights clip. So hold alt / option while dragging your sliders around in the development tab! Super useful trick. EDIT: this should give you deep deep shadows and birght bright highlights. You may not always want that, but at a minimum, it makes for a nice starting point for further adjustments in lightroom.
 
Thanks mfogiel, I have had a look at the book it looks good, how much of it is about Post Processing? from the description it sounds like a lot of the book is devoted to the digital photography side.
 
mfogiel, I like your CAFFE' A MILANO from your 12 favourites on Flickr, that's the kind of contrast I am looking for.

Although from what I understand I won't be able to get the smoothness you have got with me using HP5+ as this is a grainier film, please correct me if I am wrong
 
i'd start with a three-step boost:

Step 1: levels - set black and white points (if you haven't already)
Step 2: micro contrast - USM 20%, 50 radius, 3-6 threshold (to taste)
Step 3: using curves or slider, up contrast (to taste)

be bold with one of the three files above, and then share it here when you've had a go.

chris is quite good at this - ask him nicely and maybe he'll adjust one of your files as an exercise 🙂
 
I don't have a problem with any of the scans. The first and third photos need some adjustment of levels to increase contrast, but the second looks OK to me.

A bit of post-process work in an image editor should be all that they need.
 
I messed around with your photos in Picasa. I used its "I'm feeling lucky" and sharpen function. I think it shows that your scans are fine. I naturally adjust levels, curves and USM on all my scans.

attachment.php


attachment.php


attachment.php
 

Attachments

  • p514813054-5.jpg
    p514813054-5.jpg
    42.8 KB · Views: 0
  • p591705991-5.jpg
    p591705991-5.jpg
    42 KB · Views: 0
  • p846407261-5.jpg
    p846407261-5.jpg
    55 KB · Views: 0
All sound advice regarding scanning and digitisation of your negs Mick.

If you're interested it may be worth seeing if you can get your hands on a copy of Carson Grave's book; The Zone System for 35mm photographers. I read it whilst at college and still have some of the notes I made knocking around. I had forgotten all about the book, the notes I made and how much I learned whilst reading it but I haven't forgotten the basic principles. I certainly don't tend to use it in the type of photography I do but the knowledge and understanding of exposure and how to achieve what I want in a short period of time is there because I read and experimented. At the time I pissed my tutor off no end as I was experimenting with a polaroid back and went through loads of them, now you can just use your Nikon digi in manual and see the results far more cheaply. I personally think digital cameras are a superb way to help learn about exposure so that in the end, when you crank the shutter speed up or down or adjust the aperture to the point where the nice little red dot or two little red arrows don't match up, you know exactly what the affect will be because you've read about it, done it and seen the results many times before.

BTW - I had a little scout around your zenfolio site, interesting ideas. I particularly like the pub project. I wondered if it might help the project to include images taken inside some pubs to show the warmth, community, laughter, fighting, drunkeness, loneliness etc etc that you find in pubs around the UK. Perhaps this would help to show the starkness around the boarded up empty pubs with their signs still declaring 'karaoke tonite.' ....just my personal thoughts.

Cheers
 
Back
Top Bottom