Jake Mongey
Well-known
Hey,
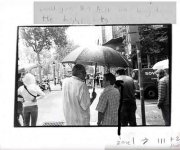
I have been trying to learn the zone system for a while now and i believe I have the most basic understanding and would like to check if im right. Ive evaluated the following print which was NOT shot with any zone system ideas and just given an average exposure and it has been annotated with what i would have done to get the tones I desired.
Is this the right idea:

The bottom annotation is about the exposure for the hair which fell on zone 1 and how I would want it on zone III hence I would add two stops to exposure.
Then because of the highlights blocking out I wrote up top it would need an N -1 development - however now I think of it i would maybe do an n - 2 development.
Is any of this correct if not could you explain how I would go about it?
I have been trying to learn the zone system for a while now and i believe I have the most basic understanding and would like to check if im right. Ive evaluated the following print which was NOT shot with any zone system ideas and just given an average exposure and it has been annotated with what i would have done to get the tones I desired.
Is this the right idea:
The bottom annotation is about the exposure for the hair which fell on zone 1 and how I would want it on zone III hence I would add two stops to exposure.
Then because of the highlights blocking out I wrote up top it would need an N -1 development - however now I think of it i would maybe do an n - 2 development.
Is any of this correct if not could you explain how I would go about it?
Attachments
BLKRCAT
75% Film
This is a darkroom print?
The highlights are already pretty toasted. Overexposure to compensate for the shadow detail would further overexpose the image.
I'm still learning the darkroom process in terms of printing but I would get those highlights under control before evaluating.
The highlights are already pretty toasted. Overexposure to compensate for the shadow detail would further overexpose the image.
I'm still learning the darkroom process in terms of printing but I would get those highlights under control before evaluating.
Jake Mongey
Well-known
This is a darkroom print?
The highlights are already pretty toasted. Overexposure to compensate for the shadow detail would further overexpose the image.
I'm still learning the darkroom process in terms of printing but I would get those highlights under control before evaluating.
I know its a print but I am going back and Imagining what i could have done when it was shot to get the best tones using the zone system and not blow the highlights
madNbad
Well-known
The best way to learn the zone system is to start out photographing subjects within a narrow tonal range. By practicing exposing and developing within a few stops of midrange to start will help you build the experience for subjects covering such a wide range as in your example. Adams wrote about "previsulization" and having an idea of what the final print would look like before exposure. Start with fairly monochromatic subjects like ivy or tree bark to learn how to capture the texture in the final print.
PKR
Veteran
The Zone System involves exposure (Zone placement) and then processing the exposed film for that exposure. It was designed to be used with sheet film. It can be used in part with roll film with some compromise. Get a copy of "The Zone System Manual" by Minor White. Adams' "The Negative" covers it but he's long winded I think.
BLKRCAT
75% Film
Your print isnt the best for evaluation. I believe it's too high contrast. There are hardly any shades of gray. Have you tried printing with a lesser grade to give a flatter print?
I would recommend evaluating your exposure from scans to start. If you are unsure about how you are exposing it's going to be more difficult to get a solid print.
For me I would put the subjects in the shade from the umbrella in zone 4. It's common for me in situations like this to expose sunny 11 +1 to make sure that the most detail is maintained in your shadows without exposing your highlights too much.
Jake Mongey
Well-known
Your print isnt the best for evaluation. I believe it's too high contrast. There are hardly any shades of gray. Have you tried printing with a lesser grade to give a flatter print?
I would recommend evaluating your exposure from scans to start. If you are unsure about how you are exposing it's going to be more difficult to get a solid print.
For me I would put the subjects in the shade from the umbrella in zone 4. It's common for me in situations like this to expose sunny 11 +1 to make sure that the most detail is maintained in your shadows without exposing your highlights too much.
Tomorrow i start working with the zone system and trying to shoot with it and i will be evaluating it at each stage. I know its a very difficult print and was actually a spare work print that i jotted down those ideas on once i suddenly started understanding it.
Ignoring the technical qualities of the print do my notes make sense? Just wanted to confirm my understanding was correct before i started potentially practicing it wrong and learning faulty technique. I have all 3 Adams books ive been studying in great detail over the last week to work with.
Also I am only considering the exposure and negative dev at this point in time
Cheers,
Jake
PKR
Veteran
Tomorrow i start working with the zone system and trying to shoot with it and i will be evaluating it at each stage. I know its a very difficult print and was actually a spare work print that i jotted down those ideas on once i suddenly started understanding it.
Ignoring the technical qualities of the print do my notes make sense? Just wanted to confirm my understanding was correct before i started potentially practicing it wrong and learning faulty technique. I have all 3 Adams books ive been studying in great detail over the last week to work with.
Also I am only considering the exposure and negative dev at this point in time
Cheers,
Jake
When a properly exposed and processed negative is made, all zones placed where you want them, printing on #2 paper is fairly easy In most cases. Some burning and dogging may be necessary. When in school, White's book was used because his approach was simple. We had a transmission densitometer in the lab that made checking negatives easy. You can do the same testing with test printing negatives.
BillBingham2
Registered User
The Zone System involves exposure (Zone placement) and then processing the exposed film for that exposure. It was designed to be used with sheet film. It can be used in part with roll film with some compromise. Get a copy of "The Zone System Manual" by Minor White. Adams' "The Negative" covers it but he's long winded I think.
+1
B2 (;->
BLKRCAT
75% Film
Ignoring the technical qualities of the print do my notes make sense?
Like I said, I wouldn't worry to much about fine details such as hair. My spot meter in the M5 doesn't allow for such precision. I would be metering basically the entire head. I would put whatever that reading is in zone 4, essentially underexpose it by one stop.
I think putting it in zone 3 would be a little underexposed for my preference. Remember, zone 3 can be described as "Average dark materials and low values showing adequate texture" Being that you want to retain detail in the hair and face I would put it in zone 4.
With film you have to make sure that you get the shadow detail you want. Highlights can be recovered, shadow detail not so much.
Jake Mongey
Well-known
Like I said, I wouldn't worry to much about fine details such as hair. My spot meter in the M5 doesn't allow for such precision. I would be metering basically the entire head. I would put whatever that reading is in zone 4, essentially underexpose it by one stop.
I think putting it in zone 3 would be a little underexposed for my preference. Remember, zone 3 can be described as "Average dark materials and low values showing adequate texture" Being that you want to retain detail in the hair and face I would put it in zone 4.
With film you have to make sure that you get the shadow detail you want. Highlights can be recovered, shadow detail not so much.
Okay, thanks ill have a play around tomorrow and see what i get
View Range
Well-known
I'll kind of state it differently. The zone system requires measuring the full dynamic range of the scene and exposing / processing the film to match that dynamic range. It is practical only with sheet film where every sheet is tailor-processed to control contrast for that dynamic range. It can be done with short length roll film where the subject in every shot has the same dynamic range. 35mm is not a good format for the zone system. But never say never.
Also I have not seen the zone system applied to street photography. How does the dynamic range get measured in the rapidly changing street scene. Ansel Adams made great use of the zone system for static landscapes and got to be such a master he could do landscapes with changing light situations.
The closest recommendation for 35mm was to underexpose slides and overexpose negatives. My greatest success has been to meter correctly and go with that.
PKR
Veteran
+1
B2 (;->
Hi Bill; When using the zone system with roll film I loaded 3 camera bodies with the same film. One body was for normal development, one for +1 and one for -1. That worked "sorta" well. I think it was easier in some instances to load a few film holders and pack the view camera and do it correctly. I tray developed my 4x5 sheet film. So. It was easy to be accurate. I also used a spot meter. I nailed zone 3, then 8 and then wrote a post it note on the holder re exposure and processing. I was being paid to do most of this stuff so it was a matter of delivering a print(s) that made the $$ happy. When I work with b&w film these days don't even pack a meter. I just guess. Any work stuff today is digital-smiggatel. I don't miss the darkroom, but do miss the silver prints, especially Agfa paper.
charjohncarter
Veteran
You can use zone system for different effects too. I use roll film and don't change my development time, but I do expose differently for the effect I want and use kind of a 'compensating' agitation to slightly hold back highlights. On this shot I wanted shadows on the church to be flooded with light so I exposed generously (and as I said I hold back on agitation). This was Arista EDU ultra a difficult film because of blue sensitivity, but I was able to get a little of the Southern California sunshine effect.
 Arista EDU ultra 100-HC-110h by John Carter, on Flickr
Arista EDU ultra 100-HC-110h by John Carter, on FlickrBobBill
Established
Never was much for complicated. Zone is simple; simple is hard to explain; Measure and expose for low light, print for shadows. In BW, gets to be instinctive.
Roger Hicks
Veteran
Dear Jake,
The Zone System is based in research done in the 1880s by Hurter and Driffield. In some ways it needlessly over-complicates their basic sensitometry; in others, it somewhat over-simplifies it. In its full glory it is far from simple.
The analysis/categorization of the Zones themselves, from pure paper-base white to maximum black, is a work of genius. The rest can safely be ignored if you understand the D/log E curve, also known as the H&D curve after (guess who) Hurter and Driffield. Until you understand the H&D curve, the Zone System is needlessly complicated, and once you understand it, everything except the zone analysis is simply unnecessary.
Cheers,
R.
Steve M.
Veteran
I assume you are using sheet film? Roll film does not require a zone system and it is not really appropriate. Real PITA to shoot because you would be using every single shot on the roll to make identical exposure calculations on, and I highly doubt that your subject matter and lighting would be consistently the same throughout the roll. For roll film, understanding your subject, lighting, chosen film, filter (if any) and developer choice, as well as how you were going to use that developer (straight or diluted, lots of inversions or few, etc) will determine your final neg. Then how you print the neg will determine the final print. All of which makes shooting a film like Tri-X w/ a wide exposure latitude, metering for your middle value, and printing on MCC 110 fiber in Dektol a simple and worry free way to get beautiful photos.
If you don't want blown highlights you have to stay within the exposure limitations of your film. In a scene like yours w/ the extreme tonal variations, something is going to have to be compromised. Either the sky gets blown out or the shadows get blocked up. That's just how it goes. The film's exposure latitude can only go so far, which is why a middle value is usually fine for most shots. In roll film, I will usually use the camera's spot meter to lock exposure on my subject and let the rest of the scene fall where it may. Same w/ a hand held meter. I look around for something nearby to meter (the palm of your hand is usually good if its in the same light ) that is the same value as my subject.
If you don't want blown highlights you have to stay within the exposure limitations of your film. In a scene like yours w/ the extreme tonal variations, something is going to have to be compromised. Either the sky gets blown out or the shadows get blocked up. That's just how it goes. The film's exposure latitude can only go so far, which is why a middle value is usually fine for most shots. In roll film, I will usually use the camera's spot meter to lock exposure on my subject and let the rest of the scene fall where it may. Same w/ a hand held meter. I look around for something nearby to meter (the palm of your hand is usually good if its in the same light ) that is the same value as my subject.
welshzorki
Established
Just found this thread. Jeez it's been years since i thought about the zone system. I mostly shoot digital for work so my cameras are set as flat as possible and i use a sony A7rii so i have massive dynamic range at my disposal. But for shooting black and white film correct me if i'm wrong here but zone sysyem or not, if you shoot say a 100iso film at a scene that has extreme sun blown highlights and deep dark shadows all you can do is try to find as close to the unblown highlights as possible without total shadow density then try to bring what you can back in the printing. Do people still print on multigrade??? Years ago i spent a month work experience at Manum in London and their darkroom technician taught me a lot about printing on multigrade. This is 25 years ago mind you.
welshzorki
Established
I assume you are using sheet film? Roll film does not require a zone system and it is not really appropriate. Real PITA to shoot because you would be using every single shot on the roll to make identical exposure calculations on, and I highly doubt that your subject matter and lighting would be consistently the same throughout the roll. For roll film, understanding your subject, lighting, chosen film, filter (if any) and developer choice, as well as how you were going to use that developer (straight or diluted, lots of inversions or few, etc) will determine your final neg. Then how you print the neg will determine the final print. All of which makes shooting a film like Tri-X w/ a wide exposure latitude, metering for your middle value, and printing on MCC 110 fiber in Dektol a simple and worry free way to get beautiful photos.
If you don't want blown highlights you have to stay within the exposure limitations of your film. In a scene like yours w/ the extreme tonal variations, something is going to have to be compromised. Either the sky gets blown out or the shadows get blocked up. That's just how it goes. The film's exposure latitude can only go so far, which is why a middle value is usually fine for most shots. In roll film, I will usually use the camera's spot meter to lock exposure on my subject and let the rest of the scene fall where it may. Same w/ a hand held meter. I look around for something nearby to meter (the palm of your hand is usually good if its in the same light ) that is the same value as my subject.
For a constantly changing scene spot metering is a good alternative to getting the average for the whole scene a Steve said. You could meter your guys hair which is a dark shadow, a spot meter will gove you an average reading based on that point which in theory would lift all other areas and blow a lot of the highlights. Knowing what your film can do is a key here, if you can take a reading of a dark area this will become your mid grey. So then you increase your exposure until you know that grey is on the verge of black density but still with enough detail to be useable, this will in turn bring down the highlighted areas as much as they can given the film you are using, thus giving you more range to work with when printing.
Hi,
I have just checked abebooks for the following :
'Better in Black and White' by Harry Fearn
They have 9 copies and I would humbly suggest that anyone interested in the subject, get a copy. The cheapest was £1.10 I think!
I think he was a very wonderful teacher and it is a great regret of mine that I never met him or signed up for one of his courses...too busy working is my pathetic excuse.
A beautiful essay on B and W printing.
Share:
-
This site uses cookies to help personalise content, tailor your experience and to keep you logged in if you register.
By continuing to use this site, you are consenting to our use of cookies.