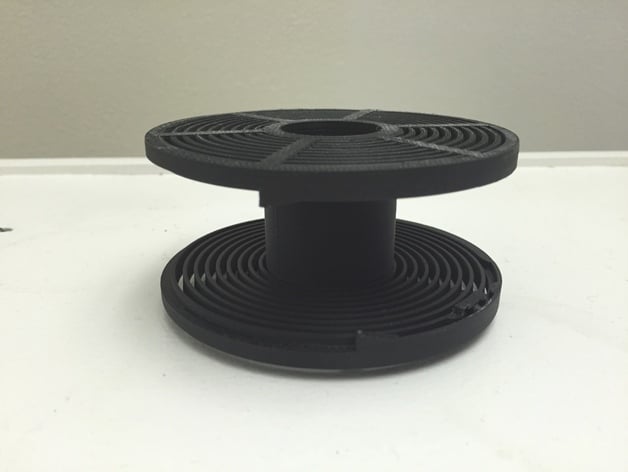
3D printed camera accessories...

First attempt at making a flange for a copal 0 shutter. I did not really give enough clearance for the retaining ring.
I am finally getting the hang of the basics with tinkercad.
View attachment 4854958
Tinkercad is pretty good to play around with for simpler shapes. It can be pretty great for some basic mods of other designs too.

For really precise measurements and such I tend to use Sketchup with some plug ins for most of what I do. There is a plugin called Curviloft which is phenomenal for doing things like lens cones. Give it the shape on one end and the shape on the other end and it lofts the middle.
I tried Sketchup but ashamedly could not get started. Will have to look for a good tutorial.
 
I tried Sketchup but ashamedly could not get started. Will have to look for a good tutorial.
Tutorials are pretty required for it. It is a bit weird and has some quirks and I am hardly an expect in it. The biggest thing for me was learning the push/pull tool. Draw a rectange or a circle and then use the push/pull tool to make it 3d.
 
Wind the film from the cartridge onto the developer spool.

First of all, I have to admit to my shame that it wasn't my idea, although I did think about such a tool.

I found the following tool in the Printables database.
Yes, that's what I wanted, what I had in mind but could not get a clear picture.
So I downloaded it and printed it out.
After a dry test, I found that the dimensions were a bit too tight, the mandrel was a bit stuck in the developer spool and the film cartridge couldn't be removed from the holder.

So I redesigned the tool a bit, gave it a little bit more slack, a little more space for the fingers, made a dry test and uploaded it as a remix.
Yesterday I did a live test in the dark bag.
The thing works better than expected.
Tool clicked into the developer spool.
Film cartridge clicked in.
Film threaded into the spool and - ratchet ratchet ratchet - the film is on the spool,
film cut - done.

The tool works at least on Paterson and AP spools, I have none other to try out.
 
Tool tray for loading the film cassette in the dark bag.

As I sometimes lost the invisible overview in the dark bag when loading the film cartridges;
where are the scissors? Where is the film spool? where is . . . the light switch?
So I drew and printed a small tool tray.
I'm not a "tidy" person, I just hate searching for things. Especially in the darkbag ;-)

The compartment for the scissors is in the middle.
At the front and back there is a compartment for a disassembled film cassette as well as the winding button and the template for cutting the end of the film.
The corners are well rounded so that no holes can be poked in the dark bag.
The compartments also have a radius on the inside so that the small parts can be easily removed and do not get stuck in a corner.
As after the third film at the latest the moisture in the dark bag is so high that the film becomes sticky, I made do with two compartments.
If the tray is too short, simply extend it in the slicer. My scissors have rounded tips (child-safe scissors) and the compartment is long enough for these.

Meanwhile dark-bag-tested.

And as always, suggestions for changes, improvements, etc. are gladly and gratefully received.
 
Because my Paterson coils are always flying around in the cabinet . . .
For two, three or four coils.
So simple and yet so useful. My first print job when I get back from holidays. My reels are all over the place.
 
Hello
Are you aware of instructions to print a spindle that can be used inside a Paterson tank for large format negatives. I am dealing with this problem when I use a reel for 13 X 18 negatives.
I posted a detailed explanation here (with photos)
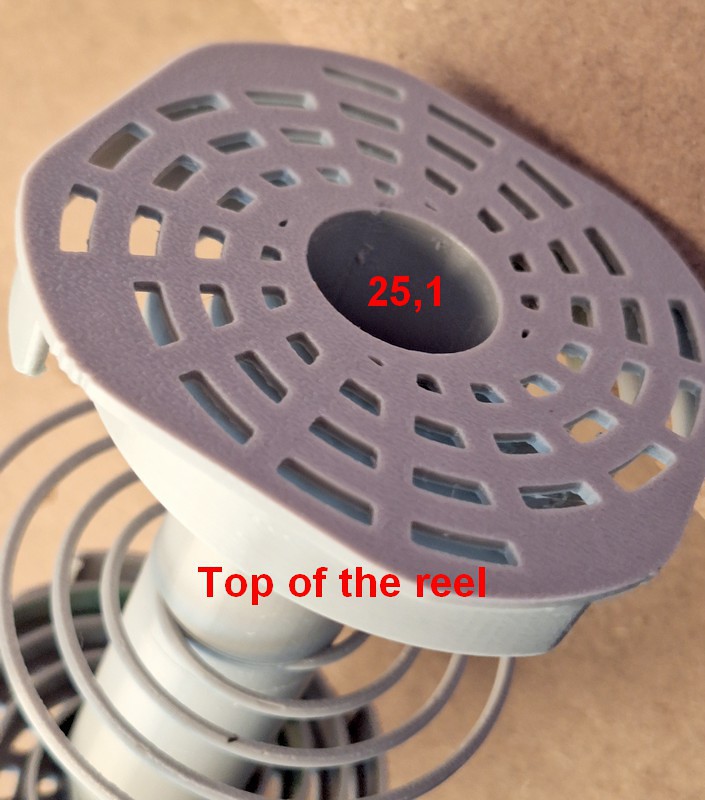
Maybe it already exists...It needs to be 13,5 cm long, max outer diameter 25,1 mm, inner diameter 22 mm
Regards
Joao
 
So simple and yet so useful. My first print job when I get back from holidays. My reels are all over the place.
Glad you can use my intellectual outpourings 🙂
Just updated with one for five reels, longer ones wont fit into my printer.

Now I either have to buy a larger printer or build a spindle that can be screwed together.
Then you could assemble a spindle of any length.
. . .
I'll keep that in mind in case I get bored again—which happens very rarely ;-)
Greetings to Paris!!
 
Hello
Are you aware of instructions to print a spindle that can be used inside a Paterson tank for large format negatives. I am dealing with this problem when I use a reel for 13 X 18 negatives.
I posted a detailed explanation here (with photos)
Maybe it already exists...It needs to be 13,5 cm long, max outer diameter 25,1 mm, inner diameter 22 mm
Regards
Joao
Good morning Joao!
I hope I understood you correctly.
You need this black tube that's inside the reel.
Not the reel itself, onto which you mount the film.
Here's the original Paterson tube/spindle.
DSCN7797 lo.JPG
Diameter: 25.3 mm
Wall thickness: 1.6 mm
Length without the base: 138.7 mm
Total length with base: 142 mm

But you need this tube
with an outer diameter of 25.1 mm and
a length of only 135 mm.
These 135 mm are the total length with the base (base height: 3.3 mm)?

I could draw that for you, but I would increase the wall thickness from 1.6 to 2 mm to make it a bit more stable.

I hope the Yashica still works ;-)
Greetings: Dieter
 
Thank you Dieter. I think the total lenght of the tube, base included, is 142 mm - but I will confirm tomorrow night, as I am currently not at home. Its diameter must not exceed 25,1 mm - the core of the spindle gets narrower at the top... The thickness of the wall is not relevant as long as the lower tube of the light-trap funnel fits inside. It will be great if you can draw instructions for printing.
The Yashica is working as it should. Unfortunately I let my son use it and he likes it too much. But I'll get it back soon.
Regards
Joao
 
Are there any thoughts about 3D print plastics and photo chemicals and colour processing heat. I would suppose that some plastics are better than others?
 
Thank you Dieter. I think the total lenght of the tube, base included, is 142 mm - but I will confirm tomorrow night, as I am currently not at home. Its diameter must not exceed 25,1 mm - the core of the spindle gets narrower at the top... The thickness of the wall is not relevant as long as the lower tube of the light-trap funnel fits inside. It will be great if you can draw instructions for printing.
The Yashica is working as it should. Unfortunately I let my son use it and he likes it too much. But I'll get it back soon.
Regards
Joao
Do not hurry!
Do you have access to a printer?
Because I can draw it and sent you a *.stl file, but I have no possibility to test if it fits in the correct way.
So you have to print it and try if it fits the way you want it.
Otherwise you tell me what measures I have to change and you make the next testprint.

Glad to hear, that the Yashica found another friend 🙂
Sadly I dont have a second one.

Greetings: Dieter
 
Are there any thoughts about 3D print plastics and photo chemicals and colour processing heat. I would suppose that some plastics are better than others?
There are a lot of plastic materials.
The most common and most cheap and most uncomplicated are PLA and PETG.
Both are solvent resistant to most all, also fuel, oil . . . .

Just try dissolving a PET bottle with solvent.
Try to fill a PET Bottle with hot water - yes, those bottles where you buy your drinks in - it will get soft and will shrink
PETG is nearly exactly the same stuff as which those PET-Bottles are made from.

PLA is not very UV-resistant, but PETG is.
PLA is temperature resistant up to ~ +60°C
PETG is temperature resistant up to ~+70°C
There are materials which are more resistant to higher temperatures (nylon), but they are more expensive and more complicated to print.

The biggest problem is to get the print of a bottle or tub watertight.
Not impossible but a little difficult.
 
Result of the last few hours of play:
Modular stacking mandrel for Paterson developing reels to prevent them from flying around in the cabinet.

DSCN7803 lo.JPG

The stacking mandrel can be assembled using segments of different lengths, making it as long or short as desired.
DSCN7807 lo.JPG

Consists of a base section, an end cap, and five tubes of different lengths, each for one, two, three, four, or five developing reels.

Of course, you can print each segment in a different color 😎
. . . .
I don't know if anyone will need it or can use it. Or even if it makes sense.
But that's not the point.
The point is that we had the idea and we did it.
Without regard for meaning or purpose, just so it exists.
Download here for free (of course)
Greetings from 🇦🇹 Dieter
 
The thing is that you can reload a wet tank but not a wet reel so having extra reels around is a necessary evil. It seems there may be enough space at the top for the holding ring too (so as you don’t lose it when using two reels in the basic tank).
 
The thing is that you can reload a wet tank but not a wet reel so having extra reels around is a necessary evil. It seems there may be enough space at the top for the holding ring too (so as you don’t lose it when using two reels in the basic tank).
First, the simpler problem, the spacer: the simplest and cheapest solution is to cut off the bottom of a film canister.
But it would of course be more elegant to have dedicated spacers that fit more precisely. I'll make a note of that right away.

And about the wet film reels, you're damn right. It's impossible to load film into wet reels.
Faced with this very problem many years ago, in the pre-3D printer era, I bought some extra reels, so this problem didn't arise for me.
And admittedly, I don't know if my current drawing skills are sufficient to draw such a complicated model.

I've found many film reels for all sorts of formats, but only one that fits 135 film. I don't know if it will fit the axis of your developing tank.
Someone has already taken the trouble to draw a reel.
You can download the file here (for free):
 
Hello
I confirm that the total lenght of the tube (Paterson spindle tube) is 14,2 cm. The diameter of the new tube should be 25 mm (maybe 24,9 mm is better, to play on the safe side). And yes, there is a guy living close to my house that prints - he printed my large format negatives reel.
If you can send the printable instructions for this narrow Paterson spindle, that would be great. But don't hurry, take your time.
Regards
Joao
 
Back
Top Bottom