You are using an out of date browser. It may not display this or other websites correctly.
You should upgrade or use an alternative browser.
You should upgrade or use an alternative browser.
3D printed camera accessories...
- Thread starter shawn
- Start date
- Latest activity Latest activity:
- Replies 121
- Views 18K
titrisol
Bottom Feeder
If anyone still has one of the old Vivitar VI enlargers, here is a lensboard and a filter holder as both are unobtanium!

 www.thingiverse.com
 www.thingiverse.com
Vivitar VI Lensboard by titrisol
Lensboard for the Vivitar VI and 356 enlarger .You'll need a retaining ring, and depending on the printing material, you might need to spray flat black paint once or twice to avoid translucency.4-5 top and bottom layers in black PLA+ worked fine to avoid translucencySanding of the holes is...
www.thingiverse.com
Vivitar VI - Filter holder by titrisol
Filter holder for 89x89mm (Ilford multicontrast) filter for the Vivitar VIv5 adds an extra mm to account for variation on filter sizea verison for Kodak Polycontrast 2 (90mm) filters also includedPrint with at least 5layers top and bottom for opacity.
www.thingiverse.com
Darinwc
Not left handed
I would really like a finger-grip cover for a double flash socket. But I am not sure how to go about designing one.
WoodallP
Pragmatist Barnack lover
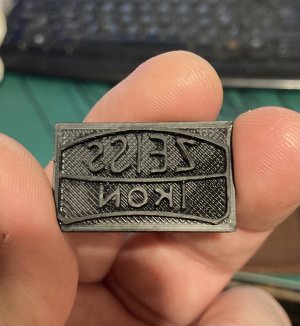
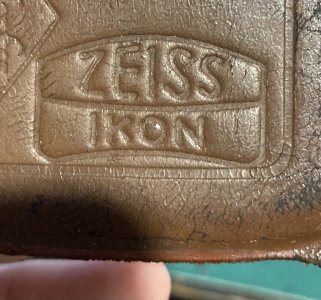
Not exactly an accessory but have just been playing with making 3D printed stamps to emboss leather. The front piece of leather on my Contax IIa case got lost so I’m looking at making a replacent. This is just a first try on a dead Agfa case.
Attachments
Alpsman
Well-known
Thank you for your experiment. My friend, a bookbinder, wanted to know if you can make such embossing tools for Leather with a 3D printer and if it works. Now I can at least give him hope.Not exactly an accessory but have just been playing with making 3D printed stamps to emboss leather. The front piece of leather on my Contax IIa case got lost so I’m looking at making a replacent. This is just a first try on a dead Agfa case.
WoodallP
Pragmatist Barnack lover
Hi,Thank you for your experiment. My friend, a bookbinder, wanted to know if you can make such embossing tools for Leather with a 3D printer and if it works. Now I can at least give him hope.
Small lettering is out of the question though as I had to thicken up the lines a bit as the first attempt didn't 3D print well. The lines of the letters here are about 0.6mm thick and the logo is about 32mm across. I used ABS as it was what I had in the printer at the time but I suppose PLA would do. Once printed I sanded the block lightly before embossing to remove the 3D printing artifacts. I actually used a bookbinding press to apply the pressure so your friend is half way there.
shawn
Veteran
If you re using ABS you can also vapor smooth with acetone or even brush it on lightly for more smoothing. An ABS slurry in acetone is great for chemically welding ABS pieces together, it is very strong.
Alpsman
Well-known
Thank you for your valuable tips regarding size, line thickness and aftercare!! &!Hi,
Small lettering is out of the question though as I had to thicken up the lines a bit as the first attempt didn't 3D print well. The lines of the letters here are about 0.6mm thick and the logo is about 32mm across. I used ABS as it was what I had in the printer at the time but I suppose PLA would do. Once printed I sanded the block lightly before embossing to remove the 3D printing artifacts. I actually used a bookbinding press to apply the pressure so your friend is half way there.
shawn
Veteran

This is an adapter to add a Nikon DK-17M viewfinder magnifier to a Panasonic S1/S1R.

It uses this aftermarket eyepiece. The adapter is just glued onto that and the DK-17M is a tight friction fit into the adapter. It holds securely without anything extra so you can remove the DK-17M if desired and the entire eyepiece mounts to the S1R the normal way.
Attachments
maddoc
... likes film again.
That one modified for a screw mount Leica would be awesome. The Nikon AR-1 doesn’t fit, I testedSoft Release Button similar to the AR-1
I'm actually fed up with these soft release buttons. It was simply the challenge of drawing and printing one. They are not necessarily rare but expensive.
I haven't tested how stable the soft shutter release is if ya drop the camera to the ground, but it works. You might want to print with a more stable material than PLA. Fumble the stamp through the bottom part and glue it to the top part with a small drop of superglue. Due to the fine thread, print with as low a layer as possible.
View attachment 4850844
Alpsman
Well-known
I don't have a Leica. Not even a screw mount Leica.That one modified for a screw mount Leica would be awesome. The Nikon AR-1 doesn’t fit, I tested
The easiest thing would be to have a Leica handy so I can draw the model accordingly.
What I have is a Nikon cable release with the union nut. I don't know if it fits a Leica.
The thread should be the same. As far as I can see from pictures, there is very little space between the thread and the collar around the release on the Leica.
The wall thickness of the Nikon cable release is only 1 MM, minus the thread depth, which leaves about 0.5mm of wall thickness. That's very very little for a 3D print. It could easily break under a slight lateral load. Then you have the piece of plastic deep inside the Leica release and it's difficult or even impossible to get it out again.
This means:
Can you tell me the inner diameter of the collar around the release? I'd like to make the wall as thick as possible.
Do you have a 3D printer yourself and can you print it and test it?
I would/could redraw the model and send you the *.stl file, then you can try out whether it fits and whether it works.
maddoc
... likes film again.
The Nikon AR-1 physically fits the screw mount Leica (same thread) but the distance is too short. It means while screwing it on, it will immediately release the shutter and keep it pressed down. What I need is basically a longer version or I need to modify one of the AR-1 that I have.I don't have a Leica. Not even a screw mount Leica.
The easiest thing would be to have a Leica handy so I can draw the model accordingly.
What I have is a Nikon cable release with the union nut. I don't know if it fits a Leica.
The thread should be the same. As far as I can see from pictures, there is very little space between the thread and the collar around the release on the Leica.
The wall thickness of the Nikon cable release is only 1 MM, minus the thread depth, which leaves about 0.5mm of wall thickness. That's very very little for a 3D print. It could easily break under a slight lateral load. Then you have the piece of plastic deep inside the Leica release and it's difficult or even impossible to get it out again.
This means:
Can you tell me the inner diameter of the collar around the release? I'd like to make the wall as thick as possible.
Do you have a 3D printer yourself and can you print it and test it?
I would/could redraw the model and send you the *.stl file, then you can try out whether it fits and whether it works.
I don’t have a 3D printer, would use the company in Kyoto again.
Alpsman
Well-known
How much longer is longer ;-)The Nikon AR-1 physically fits the screw mount Leica (same thread) but the distance is too short. It means while screwing it on, it will immediately release the shutter and keep it pressed down. What I need is basically a longer version or I need to modify one of the AR-1 that I have.
I don’t have a 3D printer, would use the company in Kyoto again.
If you can work with the freecad software, or know someone who can work with freecad, then I will send you the file and you can modify it yourself. That would be the easiest solution.
Otherwise it could be an endless try and error.
The Freecad software is freeware. But having software is one thing, being able to work with it is a completely different matter.
Darinwc
Not left handed
Not sure if this was posted yet but here is a meter cover and a separate accessory shoe mount for a Canon 7.
The cover printed well enough with no supports.
The accessory shoe needed supports so looks a little rough. It fits very well but I'm not sure how durable it will be. Also the shoe itself is a little wide so a finder may wiggle a bit.

The cover printed well enough with no supports.
The accessory shoe needed supports so looks a little rough. It fits very well but I'm not sure how durable it will be. Also the shoe itself is a little wide so a finder may wiggle a bit.
DGS
Newbie
I purchased a 3D printed quick-load-style spool for my M2/M3, and it works great, plus makes loading much easier. The web site is www.cameractive.com.Does anybody have a design for the Leica M3 take up spool?
Alpsman
Well-known
Just found this reloadable 35mm film cassette.
 www.thingiverse.com
Now we need a brave volunteer to try it out.
www.thingiverse.com
Now we need a brave volunteer to try it out.
I would like to point out that black filament does not necessarily have to be light-tight!! This means that you should print with as many layers and perimeters as possible and perhaps wrap some black adhesive tape around it.
I take no responsibility, of course ;-)
reloadable 35mm film can by DRGlenn
To the manual reviewer I applied to have this as a learning tool in hopes that it would cut down on some of the costs involved with bulk loading your own film ultimately film photography is an expensive Hobby it's my hope that this gets More film photography students and teachers aware of the...
www.thingiverse.com
I would like to point out that black filament does not necessarily have to be light-tight!! This means that you should print with as many layers and perimeters as possible and perhaps wrap some black adhesive tape around it.
I take no responsibility, of course ;-)
titrisol
Bottom Feeder
I tried something similar for Karat casettes and you need at least 5 perimeters and good sanding to avoid scratching
I ended up spray painting mine with flat black 3 or 4 times and still not good enough
I guess a SLA printer would produce a smoother casette
 www.thingiverse.com
I ended up spray painting mine with flat black 3 or 4 times and still not good enough
I guess a SLA printer would produce a smoother casette
Agfa Rapid Film canister Iso100/iso200/Iso400 by alexsilver
Dieses Design ist noch nicht fertig. Der Film läßt sich weiterhin nur schwer einführen.Die Einzelteile sollten in jedem Fall einzeln gedruckt werden, um Stringing zu vermeiden. Das innere Teil (Spirale) kann einfach eingesetzt werden und muß nicht verklebt werden. Beim Einführen des Film nimmt...
www.thingiverse.com
Alpsman
Well-known
Just as an example:
Prusament PLA Gravity Grey was the most light tight material I printed. More light tight than black or blue or . . .
Jayo PLA+ gives a smoother surface than Prusament PLA.
It seems to be a try and error game.
Prusament PLA Gravity Grey was the most light tight material I printed. More light tight than black or blue or . . .
Jayo PLA+ gives a smoother surface than Prusament PLA.
It seems to be a try and error game.
Darinwc
Not left handed
First attempt at making a flange for a copal 0 shutter. I did not really give enough clearance for the retaining ring.
I am finally getting the hang of the basics with tinkercad.

I am finally getting the hang of the basics with tinkercad.
shawn
Veteran
https://www.thingiverse.com/thing:5786850I would like to point out that black filament does not necessarily have to be light-tight!! This means that you should print with as many layers and perimeters as possible and perhaps wrap some black adhesive tape around it.
I take no responsibility, of course ;-)
I print cameras. In PLA either Hatchbox black or eSun PLA+ black is opaque at about .3-.4mm. For ABS it is about the same. eSun ABS+ prints with a beautifully smooth finish it has terrible layer adhesion so I stick with Hatchbox.
I haven't tried it but Atomic filament claims to be opaque too, even some of their PETG. I think they even say after 1 layer.
I tried Paramount black ABS and it wasn't opaque even at like 1.5mm.
Similar threads
- Replies
- 4
- Views
- 1K
- Replies
- 0
- Views
- 305
- Replies
- 3
- Views
- 413