B-9
Devin Bro
I recently purchased a Bronica ETRsi and all the jazz this summer, to get back to shooting MF, its a joy to use and alot more usable tha the Kiev and Mamiya 645's ive used in the past. It really got me thinking about a lighter rig with a bigger image. Having built a 4X5 view camera a year ago, i am confident i can build a P&S style 6X7 camera
I first wanted a 6X12 but after much thought, that may be a project for a bigger budget down the road. I opted for the more universal 6X7 format.
I have set a budget of 200$ for myself to build this camera.
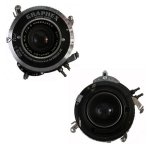
My first task was to find a suitable lens to cover 2X3 and be of a "Normal" focal length for 6X7 so a 90mm fit the bill nicely, I purchased a Wollensak 90mm f6.8 WA lens in a Graphex Bipole shutter. The speeds of 1sec and 1/2 sec are off but the price easily allows a CLA in the future.
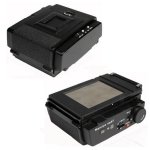
Next i set my sights on a good film back, i had been looking into the Mamiya Press 6X7/6X9 rollfilm backs, but the prices seemed high. I kept searching until i found a Mamiya 120/220 Power back for the RB (Mini-graflok) mount. I then found a Mamiya Rotating back adaptor to use as my mount, and allows the rotating feature! Awsome! This allows me to mount the film back without needing to modify or figure out how to trip the darkslide catch.
another great feature of this film back is not only being a multi format back but also being motorized! One click of a buttom and it will advance for me, this will def. speed things up in some situations and i can imagine prove to be a worthy feature.
Now it was time to put it all together, and fill in the gaps.
The effective focal length of my 90m lens was just a tad shorter than 90mm and allowed little room to fit a big camera body "box" so i opted instead to make a Frame to mount the adaptor to along with a lens cone and 2 removable grips.
I knew that I wanted to use wood as a medium, i have little tools and experience with fabricating metal. I also knew that a frame as small as I wanted would be far from structural. I thew idea's of brass support in and out of my head for the past week. I have no decided that i can make this frame as small and light as the back will allow wile still using wood, by simply wraping the finished frame in a fibreglass jacket!
Ive made alot of custom skateboards and longboards in highschool and was familiar with using glass in the construction. So it seemed an obvious solution to my strength problem, wile keeping everything at a reasonable weight.
After I solved that problem, i focused in on the Lens cone.
I knew i wanted a circular cone shape that i would hack the top and bottom off to make flat, this was more style than function and would allow a bubble level.
My goal was to keep as much as i could, removable and replaceable.
The grips will be carved from Maple and will have a small metal support bracket to allow a better, tighter mount to the camera. I also plan to make another "Arial" style batch of grips for using a Polaroid back.
So far im still waiting on some odd's and ends, to get deeper into the construction.
Ive attached a photo of the lens and back.
If anyone has some good information on DIY helical focusing mounts i would love to hear it! Ive got a helical from a Olympus 50/1.8 that ive stripped down, and will fit the Wollensak nicely. Not to make sure it will work correctly?
Stay tuned for more photo's! I will be posting alot more closer to Christmas when i expect to have the camera finished.
Photo's from sellers (I dont have a usable digital camera to easily upload photo's of my progress, have to wait for the negs to get developed lol)
I first wanted a 6X12 but after much thought, that may be a project for a bigger budget down the road. I opted for the more universal 6X7 format.
I have set a budget of 200$ for myself to build this camera.
My first task was to find a suitable lens to cover 2X3 and be of a "Normal" focal length for 6X7 so a 90mm fit the bill nicely, I purchased a Wollensak 90mm f6.8 WA lens in a Graphex Bipole shutter. The speeds of 1sec and 1/2 sec are off but the price easily allows a CLA in the future.
Next i set my sights on a good film back, i had been looking into the Mamiya Press 6X7/6X9 rollfilm backs, but the prices seemed high. I kept searching until i found a Mamiya 120/220 Power back for the RB (Mini-graflok) mount. I then found a Mamiya Rotating back adaptor to use as my mount, and allows the rotating feature! Awsome! This allows me to mount the film back without needing to modify or figure out how to trip the darkslide catch.
another great feature of this film back is not only being a multi format back but also being motorized! One click of a buttom and it will advance for me, this will def. speed things up in some situations and i can imagine prove to be a worthy feature.
Now it was time to put it all together, and fill in the gaps.
The effective focal length of my 90m lens was just a tad shorter than 90mm and allowed little room to fit a big camera body "box" so i opted instead to make a Frame to mount the adaptor to along with a lens cone and 2 removable grips.
I knew that I wanted to use wood as a medium, i have little tools and experience with fabricating metal. I also knew that a frame as small as I wanted would be far from structural. I thew idea's of brass support in and out of my head for the past week. I have no decided that i can make this frame as small and light as the back will allow wile still using wood, by simply wraping the finished frame in a fibreglass jacket!
Ive made alot of custom skateboards and longboards in highschool and was familiar with using glass in the construction. So it seemed an obvious solution to my strength problem, wile keeping everything at a reasonable weight.
After I solved that problem, i focused in on the Lens cone.
I knew i wanted a circular cone shape that i would hack the top and bottom off to make flat, this was more style than function and would allow a bubble level.
My goal was to keep as much as i could, removable and replaceable.
The grips will be carved from Maple and will have a small metal support bracket to allow a better, tighter mount to the camera. I also plan to make another "Arial" style batch of grips for using a Polaroid back.
So far im still waiting on some odd's and ends, to get deeper into the construction.
Ive attached a photo of the lens and back.
If anyone has some good information on DIY helical focusing mounts i would love to hear it! Ive got a helical from a Olympus 50/1.8 that ive stripped down, and will fit the Wollensak nicely. Not to make sure it will work correctly?
Stay tuned for more photo's! I will be posting alot more closer to Christmas when i expect to have the camera finished.
Photo's from sellers (I dont have a usable digital camera to easily upload photo's of my progress, have to wait for the negs to get developed lol)