VinceC
Veteran
Someone sent me a PM asking for a quick photo of how I set up a bounce flash, which I've described ina couple of threads. I can't figure out how to PM a photo, so I'm just posting some shots here.
I know flash is considered awkward for RF photography, but it can be an effective tool to keep in a spare pocket of your camera bag. You can also carry a tiny one in a jacket pocket at formal events. I mainly use it to neutralize crummy light.
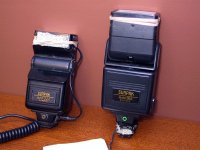
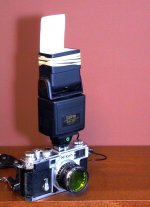
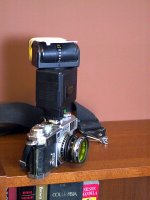
My standard setup is pictured. A Sunpak 383, which is still sold new for about $80. Two or three rubber bands along the rim to hold either a business card or a larger sheet of paper. I stick the business card up as a reflector to fill under people's eyes. It isn't as large as it should be but it's so handy because I just leave it rubber-banded to the flash, so it's always there. Ideally you should fold a full-size sheet of letter paper in half. That's how I took the pictures of the flash setup.
I really like the Sunpak 383 because it's extremely flexible for fast work. It bounces against a ceiling. It also swivels, so that you can take verticle shots bounced against the ceiling, or you can bounce it against a wall. Bouncing against a wall is really ideal, because it gives the most natural light. But you have a better chance of getting even illumination from a ceiling.
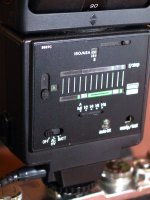
The Sunpak 383 has three auto settings. At ISO 400, the auto settings are f/4, f/8 and f/16. Again, this is ideal. When bouncing and using negative film, I always open up a stop lower than the auto setting ... so I set the flash to f/4 and the camera lens to f/2.8 (although my 28mm lens is 3.5 wide open, so I use that). The f/16 auto setting allows me to shoot daylight fill. I put a two-stop neutral density filter on the lens (because my flash sync is 60) and I set the lens at 22 and the flash at 16 and fire away. The Sunpak 383 also has manual settings from full power down to 1/16th power.
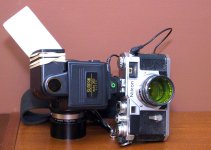
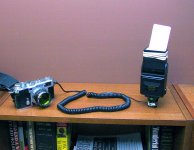
I also like to carry a long cord for the flash. That allows me to use smaller non-swivel flashes if I'm traveling light (can't bounce from behind you but can at least shoot verticles) and also allows a little more natural look by bouncing with the flash at arm's length. The long cord also acts as a backup in case the flash connector cable fails (they always do when least need it to).
Shooting by available light is always best. But when faced with available darkness, or horrible backlight, a simple flash setup like this can be a lifesaver.
I know flash is considered awkward for RF photography, but it can be an effective tool to keep in a spare pocket of your camera bag. You can also carry a tiny one in a jacket pocket at formal events. I mainly use it to neutralize crummy light.
My standard setup is pictured. A Sunpak 383, which is still sold new for about $80. Two or three rubber bands along the rim to hold either a business card or a larger sheet of paper. I stick the business card up as a reflector to fill under people's eyes. It isn't as large as it should be but it's so handy because I just leave it rubber-banded to the flash, so it's always there. Ideally you should fold a full-size sheet of letter paper in half. That's how I took the pictures of the flash setup.
I really like the Sunpak 383 because it's extremely flexible for fast work. It bounces against a ceiling. It also swivels, so that you can take verticle shots bounced against the ceiling, or you can bounce it against a wall. Bouncing against a wall is really ideal, because it gives the most natural light. But you have a better chance of getting even illumination from a ceiling.
The Sunpak 383 has three auto settings. At ISO 400, the auto settings are f/4, f/8 and f/16. Again, this is ideal. When bouncing and using negative film, I always open up a stop lower than the auto setting ... so I set the flash to f/4 and the camera lens to f/2.8 (although my 28mm lens is 3.5 wide open, so I use that). The f/16 auto setting allows me to shoot daylight fill. I put a two-stop neutral density filter on the lens (because my flash sync is 60) and I set the lens at 22 and the flash at 16 and fire away. The Sunpak 383 also has manual settings from full power down to 1/16th power.
I also like to carry a long cord for the flash. That allows me to use smaller non-swivel flashes if I'm traveling light (can't bounce from behind you but can at least shoot verticles) and also allows a little more natural look by bouncing with the flash at arm's length. The long cord also acts as a backup in case the flash connector cable fails (they always do when least need it to).
Shooting by available light is always best. But when faced with available darkness, or horrible backlight, a simple flash setup like this can be a lifesaver.
Attachments
Last edited: