Bronica S-Series Tilt/Shift Bellows &Their Discontents
Ingenious and affordable,but no substitute for a modern view camera
By Jason Schneider
From its inception in 1959, ingenuity and innovation have been the hallmarks of Zenza Bronica. The very first Zenza Bronica Z, which was rapidly succeeded by the nearly identical DeLuxe or model D in 1960, were the first 2-1/4 SLRs with an instant-return mirror, a focal plane shutter with a top speed of 1/1250 sec, a telescoping tube focusing system in lieu of a conventional rotary helical, long exposures up to 10 seconds, film magazines that could be conveniently mounted or unmounted at any point in the roll, and convenient film loading that does not require a starting point alignment. In other words, a world of convenience the better selling Hasselblad 500 series could not offer. These early cameras were brilliant, exquisitely made cameras that are now collector’s prizes, but they were quite expensive, prone to mechanical problems, and difficult to repair. From the start Bronica was in a game of one upmanship with the much better selling Hasselblad system. Any Bronica advantage became a “hey, look at how Bronica is better than Hasselblad” to the perspective 6x6 SLR buyer.
In 1961 Bronica unveiled the Bronica S is a pared-down, more reliable, less costly model loosely based on the DeLuxe that used different magazines and accessories but retained the same distinctive focusing system and bayonet lens mount. A short time later they brought out the nicely made Bronica Model 1 bellows unit. It provided a 60-214mm extension along with horizontal and vertical shift adjustments with the bellows extended, allowing limited correction for perspective distortion, a capability not offered by its leading competitors, Hasselblad, and (after 1966) Rollei. The first Bronica bellows unit allowed mounting all interior bayonet mount Nikkor lenses then available—the 50mm f/3.5 wide-angle, 75mm f/2.8 normal, and 135mm f/3.5 and 200mm f/4 telephotos—and most of the subsequent Nikkor and Zenzanon lenses that eventually rounded out the line.
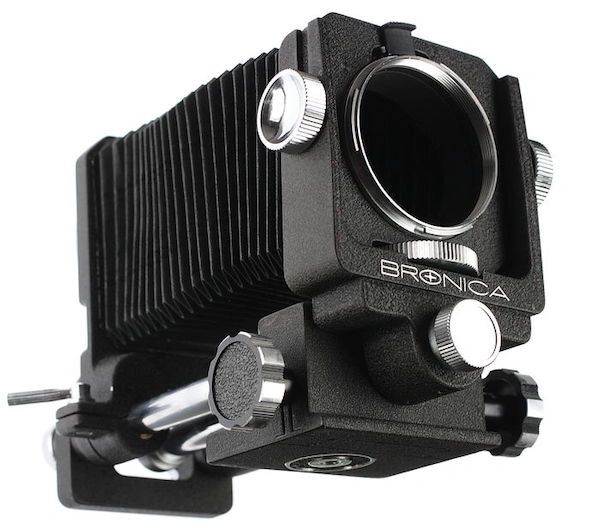
Original Bronica S bellows aka Model I designed for the Bronica S, has more limited shift and swing adjustments than the Model II.
The original Bronica Bellows S is still useful for close-up photography in the un-shifted position, and its front lens standard can be shifted vertically and horizontally by means of 2 massive, knurled locking screws, and swung laterally at the midpoint using the bottom locking knob —so long as the bellows is fully or partially extended. With an extension ring it can also be used with the Bronica S2, S2A, EC, an EC-TL, so if you can snag one at a good price make sure to have the adapter available. However, the most flexible (pun intended) bellows for your vintage Bronica is definitely the later Bronica Bellows Model II.
The engineers at Bronica evidently weren’t fully satisfied with the Bronica Bellows S (aka Model I) so, around the same time they unveiled the new improved helical focusing Bronica S2 in 1965, they brought forth its replacement, the Bronica Bellows II, with a bayonet flange on rear standard that accommodates the Bronica S2, S2A, C, CII, EC, and EC-TL bodies once the hefty separate helicoid focusing mount is removed. The lens head units without the focusing helical can now mount directly on the standard where they lock into position with a spring-loaded lever and can be set to maximum or working aperture with a spring-loaded aperture lever. One exception is the Nikkor 105mm f/3.5 leaf shutter lens which is mounted via its own external bayonet.
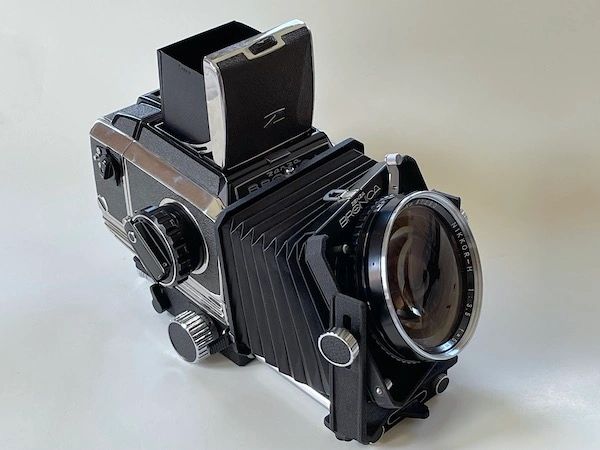
Bronica Bellows II, shown on Bronica S2 with 50mm f/3.5 H. Nikkor wide-angle provide much wider range of swing/tilt movements.
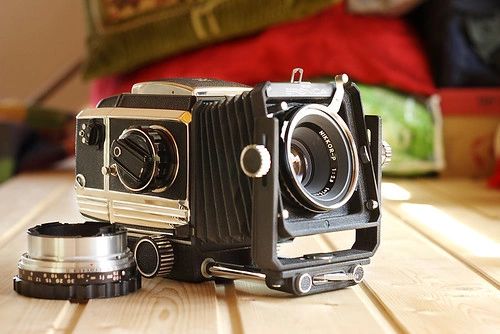
Bronica Tilt/Shift Bellows II on Bronica S2 with 75mm f/2.8 Nikkor-P. Note focusing helical has been removed to mount camera and lens.
The chief advantage if the Bronica Bellows II is that it offers a significantly greater range of adjustments than its predecessor while also beating bettering the Hasselblad 500 bellows system at every shift and tilt. The front standard can not only be shifted horizontally and vertically and laterally like the Bellow S, it can also be tilted and swung and then locked in any position. These actions let you shift the plane of optimum focus to suit a particular subject so you can, in practical terms, increase the depth of field and capture a sharp image without stopping the lens down as much or at all—just like a view camera. The unit itself consists of 3 parts—a tripod plate for affixing the camera via its tripod socket, with dual knurled fine-focusing knobs on the left and right sides, a lockable toothed rail that mates with the internal gears controlled by the focusing knobs and supports the front standard, and a square leather bellows that connects front and rear standards.
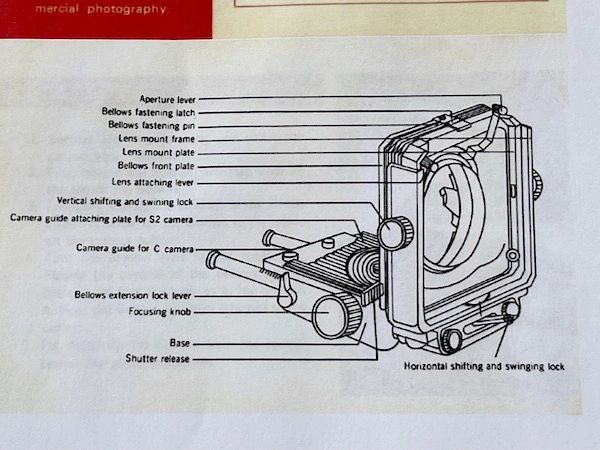
Diagram lifted from Bronica Bellows II instruction manual shows most of its key components clearly labeled.
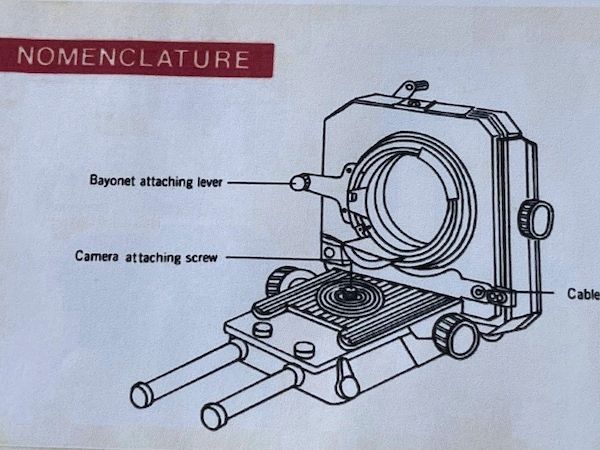
Diagram of rear view of Bronica Bellows II from the manual shows mount that accepts S2- and EC-series Bronicas with focusing helical removed.
Based on the research of Theodor Scheimpflug, there are 3 distinct planes that determine image sharpness—the object plane, the picture plane, and the lens plane. When these planes are parallel to one another, picture sharpness isoptimized, but when photographing a 3-dimensional object, sharpfocus across the frame is attained only when all 3 planes intersect each other along common lines. View camera users understood this long before Scheimpflug quantified his observations and have compensated by using the swing and tilt movements of their cameras’ adjustable front and back standards. Similar but more limited adjustments are possible with the Bronica Bellows II, but since the bellows must be extended to take full advantage of these movements they’re limited to close-up photography. Also, since the Bellows II doesn’t provide auto diaphragm action, the unit incorporates an aperture lever that opens the lens to maximum aperture when you push it clockwise and hold it against spring tensionand returns the lens to its working (set) aperture when you let it go. The good news: The Bronica bellows II allows most lenses to focus to infinity! This is a huge convenience which again, Hasselblad could not boast about.

Closeup of 10 Kronor coin shot at f/4 with no swings or tilts used.
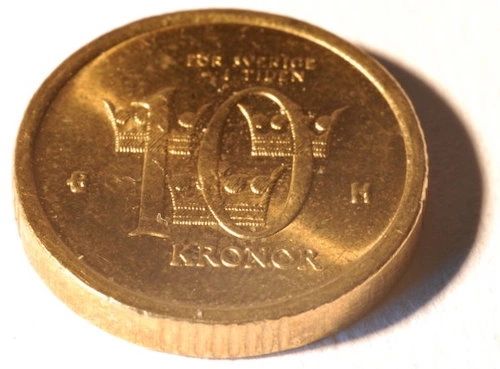
Closeup of 10 Kronor coin shot at f/16 with no swings or tilts used. Better, but still slightly soft in top area.
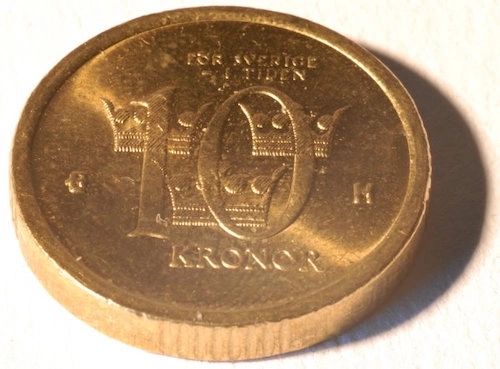
Closeup of 10 Kronor coin shot at f/4 with swings and tilts set to match subject plane is critically sharp overall.
There was a Bronica Bellows III, but this is a compact bellows unit is optimized for portability and lacks any shift/swing/tilt adjustments. It extends only 6.8 cm and was designed primarily to shorten the minimum focusing distances of lenses up to 200mm (such as the 200mm f/4 Nikkor) after the focusing helical has been removed. Its design is also different than the Bronica Bellows I or II—one rotating knob is used for focusing and the other one serves as a focus lock. Also, the aperture lever opens the lens for focusing, but to close it down to working aperture you must press on a small chrome knob, a function that can be controlled by a cable release. Unsurprisingly Bronica came out with its first double cable release at the same time the compact bellows made its debut. It’s worth noting that Bronica offered an alternative to their bellows for close-up shooters—a comprehensive set of close-up rings (CA, CB, CC, and CD) that could be used individually or in combination with Bronica lenses ranging from 50mm to 200mm. The CA ring even has a lever for aperture adjustment and can achieve a magnification factor of 1.08x when used with the normal 75mm lens.
Considering its mechanical complexity actually using the Bronica Bellows II is pretty straightforward and intuitive, and fortunately there’s a comprehensive (and occasionally hilarious) illustrated manual readily available online by going to: https://www.dirapon.be/images/collection/Bronica/Bronica S2 Bellows attachment Model 2 (réduit).pdf While no good for infinity work, the Bellows II offered tilts and swings for close ups like coins or jewelry which again, the fabulous Swede could not accomplish at that time with the Hasselblad 500 series.
Basically all you have to do to attach it is remove the lens unit, complete with its large diameter focusing helical, from the Bronica S2, S2A, EC, or EC-TL camera body, attach the body to the base of the bellows unit by screwing the camera attaching screw into the tripod socket, making sure the bellows is completely collapsed and camera is properly aligned on the rubberized base of the platform, turn the bayonet attaching lever clockwise to its topmost position, release the bellows fastening latch and bring the bellows backward until it mates evenly with the camera’s (large) bayonet mount and lock the bellows to the camera body by turning the bayonet attaching lever counter-clockwise as far as it can go (roughly the 9 o-clock position) to lock it in place. Finally, detach the lens unit from its helical, set the helical aside and mount the lens into the bayonet mount flange on the front standard by turning it clockwise as far as it will go. The lens locks in place and can be released via the spring-loaded lens attaching lever near the top left of the front standard, and the aperture lever near the top, righthand corner of the front standard is used to hold the lens at lens at maximum aperture (and when changing f/stops) and it springs back to the selected aperture position when finger pressure is released. There’s also a clever shutter release bar inboard of the bottom of the rear standard that lets you release the shutter to take the picture by pulling back on a small, striated tab, and it’s threaded to accept a standard tapered shutter release cable. Brilliant!
I’ve gone into this level of detail because the Bellows II manual is written in “Advanced Japanese English” which can be a bit confusing at times—here’s a classic example from the section entitled Vertical and Horizontal Shifting and Swinging:
“These extraordinary positions of the lens resulting in destroying the centering or perpendicularity of the optical axis to the film plane are used for correcting the converged or diverged lines in the picture.”
In truth, the shifting, tilting, and swinging controls of the Bellows II are intuitive and straightforward for anyone who’s ever used a view camera. Vertical shifting and swinging are enabled by unlocking two milled knobs on the sides of the front standard and simply lifting the front lens panel upward or pivoting it fore and aft, and then locking it in place at the settings you want. The horizontal lever at the bottom of the front standard unlocks the horizontal shift and side-to- side swing movements when it’s moved to the left and lock them at the set position when you move it all the way to the right. In short, unlock the settings, set the bellows to the position you want, and lock them in place. Easy peasy.
Warning: do not buy a used Bronica Bellows II without a money-back guarantee or return privileges because the bottom locking system occasionally breaks and can’t be fixed without cannibalizing parts. Also, when shooting high magnification closeups use a heavy-duty tripod and a cable release to fire the shutter. Better yet, do all this and use a Bronica EC or EC-TL body which has a convenient mirror lockup (!) and a 2-piece mirror which tends to vibrate less than the hulking one-piece mirror in the Bronica S2 and S2A.
I’ll have lots more to say on medium format bellows units, Bronica and otherwise, the late great Rollei SL66, and the ingenious (and pricey) Hasselblad Flexbody and Arcbody in my next magnum opus. Stay tuned.
Ingenious and affordable,but no substitute for a modern view camera
By Jason Schneider
From its inception in 1959, ingenuity and innovation have been the hallmarks of Zenza Bronica. The very first Zenza Bronica Z, which was rapidly succeeded by the nearly identical DeLuxe or model D in 1960, were the first 2-1/4 SLRs with an instant-return mirror, a focal plane shutter with a top speed of 1/1250 sec, a telescoping tube focusing system in lieu of a conventional rotary helical, long exposures up to 10 seconds, film magazines that could be conveniently mounted or unmounted at any point in the roll, and convenient film loading that does not require a starting point alignment. In other words, a world of convenience the better selling Hasselblad 500 series could not offer. These early cameras were brilliant, exquisitely made cameras that are now collector’s prizes, but they were quite expensive, prone to mechanical problems, and difficult to repair. From the start Bronica was in a game of one upmanship with the much better selling Hasselblad system. Any Bronica advantage became a “hey, look at how Bronica is better than Hasselblad” to the perspective 6x6 SLR buyer.
In 1961 Bronica unveiled the Bronica S is a pared-down, more reliable, less costly model loosely based on the DeLuxe that used different magazines and accessories but retained the same distinctive focusing system and bayonet lens mount. A short time later they brought out the nicely made Bronica Model 1 bellows unit. It provided a 60-214mm extension along with horizontal and vertical shift adjustments with the bellows extended, allowing limited correction for perspective distortion, a capability not offered by its leading competitors, Hasselblad, and (after 1966) Rollei. The first Bronica bellows unit allowed mounting all interior bayonet mount Nikkor lenses then available—the 50mm f/3.5 wide-angle, 75mm f/2.8 normal, and 135mm f/3.5 and 200mm f/4 telephotos—and most of the subsequent Nikkor and Zenzanon lenses that eventually rounded out the line.
Original Bronica S bellows aka Model I designed for the Bronica S, has more limited shift and swing adjustments than the Model II.
The original Bronica Bellows S is still useful for close-up photography in the un-shifted position, and its front lens standard can be shifted vertically and horizontally by means of 2 massive, knurled locking screws, and swung laterally at the midpoint using the bottom locking knob —so long as the bellows is fully or partially extended. With an extension ring it can also be used with the Bronica S2, S2A, EC, an EC-TL, so if you can snag one at a good price make sure to have the adapter available. However, the most flexible (pun intended) bellows for your vintage Bronica is definitely the later Bronica Bellows Model II.
The engineers at Bronica evidently weren’t fully satisfied with the Bronica Bellows S (aka Model I) so, around the same time they unveiled the new improved helical focusing Bronica S2 in 1965, they brought forth its replacement, the Bronica Bellows II, with a bayonet flange on rear standard that accommodates the Bronica S2, S2A, C, CII, EC, and EC-TL bodies once the hefty separate helicoid focusing mount is removed. The lens head units without the focusing helical can now mount directly on the standard where they lock into position with a spring-loaded lever and can be set to maximum or working aperture with a spring-loaded aperture lever. One exception is the Nikkor 105mm f/3.5 leaf shutter lens which is mounted via its own external bayonet.
Bronica Bellows II, shown on Bronica S2 with 50mm f/3.5 H. Nikkor wide-angle provide much wider range of swing/tilt movements.
Bronica Tilt/Shift Bellows II on Bronica S2 with 75mm f/2.8 Nikkor-P. Note focusing helical has been removed to mount camera and lens.
The chief advantage if the Bronica Bellows II is that it offers a significantly greater range of adjustments than its predecessor while also beating bettering the Hasselblad 500 bellows system at every shift and tilt. The front standard can not only be shifted horizontally and vertically and laterally like the Bellow S, it can also be tilted and swung and then locked in any position. These actions let you shift the plane of optimum focus to suit a particular subject so you can, in practical terms, increase the depth of field and capture a sharp image without stopping the lens down as much or at all—just like a view camera. The unit itself consists of 3 parts—a tripod plate for affixing the camera via its tripod socket, with dual knurled fine-focusing knobs on the left and right sides, a lockable toothed rail that mates with the internal gears controlled by the focusing knobs and supports the front standard, and a square leather bellows that connects front and rear standards.
Diagram lifted from Bronica Bellows II instruction manual shows most of its key components clearly labeled.
Diagram of rear view of Bronica Bellows II from the manual shows mount that accepts S2- and EC-series Bronicas with focusing helical removed.
Based on the research of Theodor Scheimpflug, there are 3 distinct planes that determine image sharpness—the object plane, the picture plane, and the lens plane. When these planes are parallel to one another, picture sharpness isoptimized, but when photographing a 3-dimensional object, sharpfocus across the frame is attained only when all 3 planes intersect each other along common lines. View camera users understood this long before Scheimpflug quantified his observations and have compensated by using the swing and tilt movements of their cameras’ adjustable front and back standards. Similar but more limited adjustments are possible with the Bronica Bellows II, but since the bellows must be extended to take full advantage of these movements they’re limited to close-up photography. Also, since the Bellows II doesn’t provide auto diaphragm action, the unit incorporates an aperture lever that opens the lens to maximum aperture when you push it clockwise and hold it against spring tensionand returns the lens to its working (set) aperture when you let it go. The good news: The Bronica bellows II allows most lenses to focus to infinity! This is a huge convenience which again, Hasselblad could not boast about.
Closeup of 10 Kronor coin shot at f/4 with no swings or tilts used.
Closeup of 10 Kronor coin shot at f/16 with no swings or tilts used. Better, but still slightly soft in top area.
Closeup of 10 Kronor coin shot at f/4 with swings and tilts set to match subject plane is critically sharp overall.
There was a Bronica Bellows III, but this is a compact bellows unit is optimized for portability and lacks any shift/swing/tilt adjustments. It extends only 6.8 cm and was designed primarily to shorten the minimum focusing distances of lenses up to 200mm (such as the 200mm f/4 Nikkor) after the focusing helical has been removed. Its design is also different than the Bronica Bellows I or II—one rotating knob is used for focusing and the other one serves as a focus lock. Also, the aperture lever opens the lens for focusing, but to close it down to working aperture you must press on a small chrome knob, a function that can be controlled by a cable release. Unsurprisingly Bronica came out with its first double cable release at the same time the compact bellows made its debut. It’s worth noting that Bronica offered an alternative to their bellows for close-up shooters—a comprehensive set of close-up rings (CA, CB, CC, and CD) that could be used individually or in combination with Bronica lenses ranging from 50mm to 200mm. The CA ring even has a lever for aperture adjustment and can achieve a magnification factor of 1.08x when used with the normal 75mm lens.
Considering its mechanical complexity actually using the Bronica Bellows II is pretty straightforward and intuitive, and fortunately there’s a comprehensive (and occasionally hilarious) illustrated manual readily available online by going to: https://www.dirapon.be/images/collection/Bronica/Bronica S2 Bellows attachment Model 2 (réduit).pdf While no good for infinity work, the Bellows II offered tilts and swings for close ups like coins or jewelry which again, the fabulous Swede could not accomplish at that time with the Hasselblad 500 series.
Basically all you have to do to attach it is remove the lens unit, complete with its large diameter focusing helical, from the Bronica S2, S2A, EC, or EC-TL camera body, attach the body to the base of the bellows unit by screwing the camera attaching screw into the tripod socket, making sure the bellows is completely collapsed and camera is properly aligned on the rubberized base of the platform, turn the bayonet attaching lever clockwise to its topmost position, release the bellows fastening latch and bring the bellows backward until it mates evenly with the camera’s (large) bayonet mount and lock the bellows to the camera body by turning the bayonet attaching lever counter-clockwise as far as it can go (roughly the 9 o-clock position) to lock it in place. Finally, detach the lens unit from its helical, set the helical aside and mount the lens into the bayonet mount flange on the front standard by turning it clockwise as far as it will go. The lens locks in place and can be released via the spring-loaded lens attaching lever near the top left of the front standard, and the aperture lever near the top, righthand corner of the front standard is used to hold the lens at lens at maximum aperture (and when changing f/stops) and it springs back to the selected aperture position when finger pressure is released. There’s also a clever shutter release bar inboard of the bottom of the rear standard that lets you release the shutter to take the picture by pulling back on a small, striated tab, and it’s threaded to accept a standard tapered shutter release cable. Brilliant!
I’ve gone into this level of detail because the Bellows II manual is written in “Advanced Japanese English” which can be a bit confusing at times—here’s a classic example from the section entitled Vertical and Horizontal Shifting and Swinging:
“These extraordinary positions of the lens resulting in destroying the centering or perpendicularity of the optical axis to the film plane are used for correcting the converged or diverged lines in the picture.”
In truth, the shifting, tilting, and swinging controls of the Bellows II are intuitive and straightforward for anyone who’s ever used a view camera. Vertical shifting and swinging are enabled by unlocking two milled knobs on the sides of the front standard and simply lifting the front lens panel upward or pivoting it fore and aft, and then locking it in place at the settings you want. The horizontal lever at the bottom of the front standard unlocks the horizontal shift and side-to- side swing movements when it’s moved to the left and lock them at the set position when you move it all the way to the right. In short, unlock the settings, set the bellows to the position you want, and lock them in place. Easy peasy.
Warning: do not buy a used Bronica Bellows II without a money-back guarantee or return privileges because the bottom locking system occasionally breaks and can’t be fixed without cannibalizing parts. Also, when shooting high magnification closeups use a heavy-duty tripod and a cable release to fire the shutter. Better yet, do all this and use a Bronica EC or EC-TL body which has a convenient mirror lockup (!) and a 2-piece mirror which tends to vibrate less than the hulking one-piece mirror in the Bronica S2 and S2A.
I’ll have lots more to say on medium format bellows units, Bronica and otherwise, the late great Rollei SL66, and the ingenious (and pricey) Hasselblad Flexbody and Arcbody in my next magnum opus. Stay tuned.