stompyq
Well-known
I have nothing to contribute but would just like to thank the OP for this post. Probably the most interesting thread on RFF at the moment (YMMW ofc)
What is fun about the results posted is that it reminds me of the film tests in camera magazines before the advent of the internet. Ya know, when we got all our info from those things that could give us paper cuts..
They'd test the latest batch of equivalent films from Kodak , Fuji, Agfa etc and print the same scene shot on each film. And we'd bask in the glory of their differences! It seems the same thing applies here, the correct result is the one you like the most.
It is very simple:
1) dcraw.exe -v -w -H 0 -o 0 -q 3 -4 -T test.arw
2) in Photoshop apply logarithmic curve
3) levels (white and black point manually) plus red gamma for balance
4) add saturation (I've used channel mixer and my own saturation presets)
my plugin is step 2+3 and saves AMP Photoshop curve for automation
I'm using OLED display which is wide gamut device so I've added saturation for sRGB screens.
On OLED it looks very well, dynamic range nicely compressed from negative.
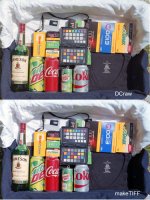
a. dcraw with these parameters gives a linear tiff file. It has a different color balance than MakeTiff, but I think it's the same idea.
b. I got better results when I do "Levels... Auto" on this linear file to set black/white points by channel, before the inversion curve. Does this sound right?
c. "apply log curve" -- can you point us to a suitable log curve? I don't think it's the gamma-to-log that you gave me previously, or am I mistaken?
d. You've got a nice conversion, skillfully done. You're better at using channel mixer than I am.
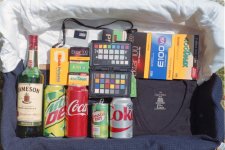
great success of "Auto Color+Auto Tone" with this picture is because of the full range of tones&colors, with pure blacks and whites...
sRGB has given me more accurate colors throughout most devices and prints. Somehow, aRGB1998 has given me skewed colors (mostly muted, cooler colors) whenever I've exported from various software.
C. Gamma-log is if you have normal jpegs from camera, difference between log and gamma 2,2 (Windows). C-log.amp is Photoshop log curve originally programmed by Timo Autiokari in Finland 17 years ago ...
Intresting is case with tungsten or led/ccfl light. Then color grading soft would help but I haven't learned e.g. Davinci Resolve yet ;-)
great success of "Auto Color+Auto Tone" with this picture is because of the full range of tones&colors, with pure blacks and whites, plus a gretag-macbeth in the center. Try it with more tricky scans and only dedicated SilverFast/ColorPerfect gonna deliver nice auto results. I've done recently some test between flatbed/PacificImage+SF/PacificImage RAW and results are best when it takes time to fine tune them.