Camera-Scan Challenge for Color-Neg, as Automatic as Possible

This is interesting, thanks for posting this question

This is interesting, thanks for posting this question

We've had several threads about "scanning" with a camera, processing in post. Here's the challenge:

As automatic as possible camera-scanning approach for color-negative. I want to camera-scan my near infinite inventory of color negatives shot over the years, so it has to be as simple, fast, and automatic as possible.

Good color, achieved largely with auto settings, not with lots of manual work.

Not about resolution. I'm convinced camera-scans can produce plenty of resolution. 24MPx is plenty for my uses. And, you can always stitch for more pixels, so this is about color, not resolution.

Not Camera-scan vs. Real Scanners -- Please don't comment here about how one should use a real scanner. I know, they do great, this is about how to do camera-scan with good results most efficiently.

A Challenge, and a Prize -- To make this interesting, I'll give-away a good SLR film camera, ready to use, to the contributor who helps me the most. Minolta or Olympus, your choice. Maybe other possibilies TBD.

Game plan -- Here's what I want to do:
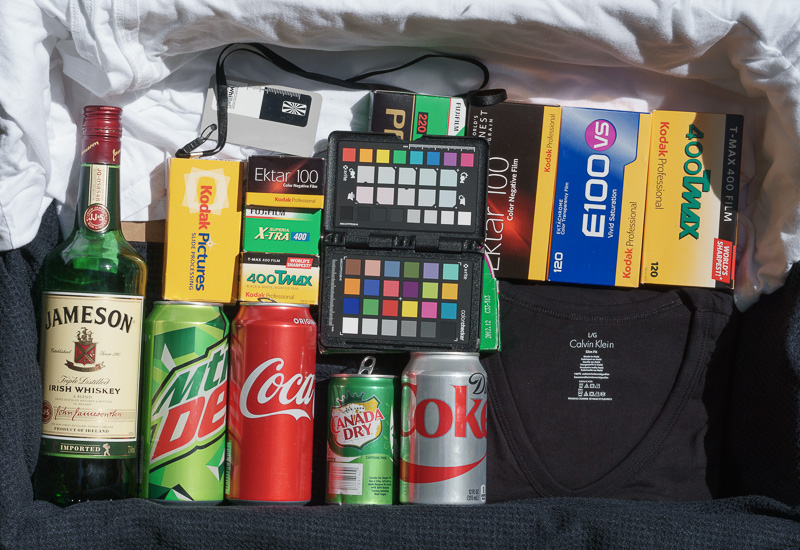
- I'll post a test shot, a test box of known colors, shot on color-neg film, then a RAW capture from the negative. We'll start with Fuji 200. I have a lot of negatives on this film stock.
- You process the camera-scan file, describe your nearly-automatic steps, and show the result.
- I'll post what I already know.
- We'll discuss the best approach for this application: nearly-automatic processing of camera-scans to get pretty good color images.
- Then I'll apply the best technique on a real image, maybe a tougher conversion, to see how we have done. You're invited to do the same on one of your images.

Here we go.

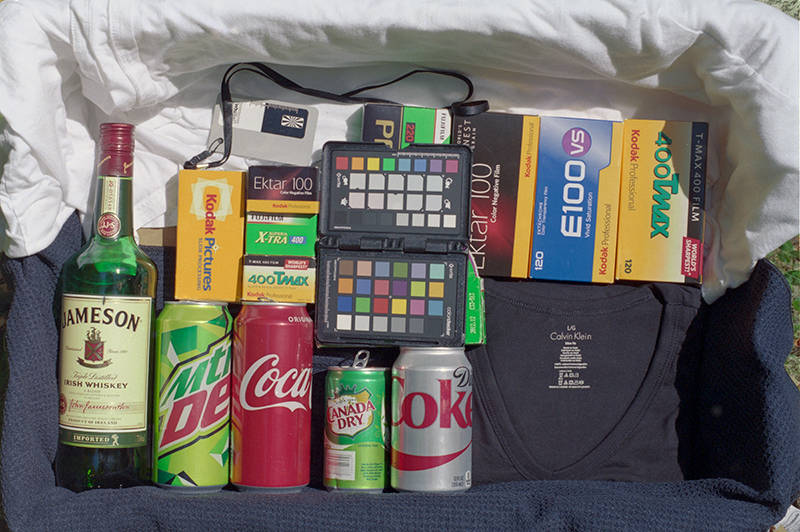
This is my test-box, shot with a good digital camera in direct sunlight (October in NH). A color checker, some known saturated colors, very bright white, very dark black (espec. in the shadow). A good gray reference.

171004-TestBox-SonyA6000-CameraNeutral-DSC6261-Scr.jpg


That's a Sony A6000 shot, processed in Lightroom, preset = Camera Neutral. To me, this is a bit over-saturated, extra punchy, vs. the original box. That's the way vendors think we like our photos.

Dear Colonel,

I'm learning a great deal here so I appreciate all the responses.

That said, 4 mixers and bottle of Jameson?

I want to party with you! :D

Keep the answers coming people!

Regards,

Tim Murphy

Harrisburg, PA :)
 
That said, 4 mixers and bottle of Jameson?

I want to party with you! :D

Keep the answers coming people!

And a box of E100VS??!! I want you to adopt me!


Anyway, here's how I would do it if I owned a digital camera:

1. MakeTiff (part of Colorperfect for demosaicing RAW digital files and keeping them linear)


2. a) ColorPerfect (inverting, there was no manipulation involved that would require anyone to have colour vision, only observing numbers to tell me that I'm not clipping any highlights/shadows; next shot could then be inverted with zero intervention);
b) AutoColor in PS (I woudn't normally do this, but since you asked for as much automation...)

This would then be my starting point for further processing (same as you would need for digital RAW files), you could easily apply predefined actions or profiles in post-processing tools...


3. Lightroom (processed to RFF DSLR scanner's taste; we need some CONTRAST and SATURATION and weird colour cast (sorry I didn't add the last one) :D)


@meloV8, that's excellent. Kodak golds and Coke reds are very good. Fuji greens still a little off.

MakeTiff is the Color Perfect processor, right? I haven't used Silverfast; did you choose any options? Tell Silverfast it was Fuji200?

I believe good color/tonality requires some non-linear manipulation. I suspect that SilverFast and VueScan have this built-in. There's also ColorPerfect.

MakeTiff feeding one of these programs may be a good recipe for automatic processing of camera-scans.
 
I have been using a Photoshop action that Luminous Landscape posted a fair amount of time ago comparing various methods for scanning negatives. Its one click of a button, looks pretty good to me!

@jkjod, I believe that's the Curves... Option-Auto I mentioned in #4 above.

Yes, it's gets into the ballpark, and can be a base for manual adjustment. Blacks, whites are OK. But, I think it leaves the mid-tones too hot.
 
I clicked on one of my presets in LR, then exported to NikFX Color Pro and clicked on another preset with ProContrast, then reimported to LR and adjusted 'Blacks' under Tone.

Thanks, @Huss. That's getting closer. Fuji greens are about right.

And, thanks again for the original pointer to Curves... Option-Auto.
 
Your best bet would be to profile the film at the time you shot it, but that is out the window. Your next best bet would be to do a correction on one frame of the film in Photoshop then automate the correction to the rest of the roll. That of course will get you close, but it won't be perfect...

That's right, I want to process 40 years of color negatives, so I don't have color checkers in any of the source negatives.

I could make a profile now for Fuji200 and apply that to all my Fuji negatives. Or apply it to ALL negatives, might get into the ball park. But, my history of shots is in all kinds of lighting. PRJ, do you have any experience of doing this with film shot in varying conditions? Sunny, beach, cloudy, flash? And, maybe some indoors.

This was put into Lightroom to invert it and get the colors close without clipping. You can easily apply the steps to the whole roll. Then it was output to Photoshop, converted to LAB and split in two, highlights and shadows. They were each worked on individually with levels layers with eyedropper points on the target you included. This is as good as you will get as far as color accuracy is concerned.

I get it; you've done more manual work than I want to. But, if I can package as a preset or action, that would help. I worry that, if this were possible, we would have seen a lot of people offering their preset. Instead, everyone who's writing about color-neg conversion is proposing one or another form of auto.

There are color film terms used in the mini-lab machines, different for each film. And, color film choices in VueScan (some work well, some not).

If you need the color numbers for your target let me know.

Yes, I have those. Google finds a couple of sources.
 
1. MakeTiff (part of Colorperfect for demosaicing RAW digital files and keeping them linear)

2. a) ColorPerfect (inverting, there was no manipulation involved that would require anyone to have colour vision, only observing numbers to tell me that I'm not clipping any highlights/shadows; next shot could then be inverted with zero intervention);
b) AutoColor in PS (I woudn't normally do this, but since you asked for as much automation...)

This would then be my starting point for further processing (same as you would need for digital RAW files)

Yes, that's what I'm looking for, take the camera-scan shot, note the original film type, mention the film type to the software. Run the automatic process. Then black/white point, brightness, contrast, maybe click a neutral gray. That's the kind of almost-automatic process I'm seeking.

Your image right out of Color Perfect looks like a good base for such manual adjustments. Greens, golds are good. Coke red isn't right, but maybe just +Sat would fix it. Thanks!

Color Perfect has the most annoying interface, but the automatic options do pretty well.
 
Yes, that's what I'm looking for, take the camera-scan shot, note the original film type, mention the film type to the software. Run the automatic process. Then black/white point, brightness, contract, maybe click a neutral gray. That's the kind of almost-automatic process I'm seeking.

Your image right out of Color Perfect looks like a good base for such manual adjustments. Greens, golds are good. Coke red isn't right, but maybe just +Sat would fix it. Thanks!

Color Perfect has the most annoying interface, but the automatic options do pretty well.

I think the key is, as so often, the first step. If you don't start with demosaicing the raw file to a non-inverted linear file, I think you will fight colour casts and neon colours left and right as you can see in the above examples (except meloV8 who, unsurprisingly, started with maketiff).

Here is an example of "no-hands" process:

1. MakeTiff (I believe that there are other tools for demosaicing from raw to linear (RawTherapee?)) - resulting file was already posted

2. Invert (I challenged my friend much smarter than me that we should come up with a process that would simulate colour darkroom; smart people are really lazy so he made shortcuts and just simulated perfect darkroom (taking the guesswork about the colour pack, exposure time out of the process...)) - this is the inverted file (no user input neded):


For example you can also feed MakeTiff output to Vuescan and let it invert (Color Balance = Auto levels):


Resulting files are almost indistinguishable (Vuescan got lucky on this one ;)). That is your ideal flat file that has all the information captured from the negative and colour integrity preserved.

Yes, it's dull. Add a little contrast and saturation (three sliders in Lightroom +25 contrast, +25 vibrance, +25 saturation) and you are here:


(note the Kodak yellows are actually yellow and not a shade of sick green, reds are not purple, greens are not totally over the top)

You can run it through PS AutoColor (it will probably help getting more consistent WB):


This "all auto" example looks good to me, but I'd like to see more DSLR scans processed properly and scanner vs. DSLR side-by-side comparison.
 
1. MakeTiff (I believe that there are other tools for demosaicing from raw to linear (RawTherapee?)) - resulting file was already posted

2. Invert (I challenged my friend much smarter than me that we should come up with a process that would simulate colour darkroom; smart people are really lazy so he made shortcuts and just simulated perfect darkroom (taking the guesswork about the colour pack, exposure time out of the process...))

@brbo, now you have my curiosity... Can you share any about this magic inversion process from your wizard friend?

For example you can also feed MakeTiff output to Vuescan and let it invert (Color Balance = Auto levels)

Yes, I can duplicate that. Vuescan... Input = file. Color negative. 48bit RGB. Color... GENERIC COLOR NEGATIVE (or Fuji 200 works just as well). Color Balance = Auto Levels. I have the bring the brightness down a bit, then I have just what you posted.

Color Balance = Manual, click on the gray card works too.

This looks like a pretty workable solution. I don't mind adjusting black, white, brightness, saturation, just as I do with most digital captures.

MakeTiff -> ColorPerfect works well too. I don't have Silverfast to try that.

So far, it sounds like a route might be:
- Feed the camera-scan RAW capture to MakeTiff
- Then feed this to VueScan, Silverfast, or ColorPerfect, 16bit tiff output.
- Final adjustments in Lightroom or PS, either manually or "Auto",
- Save as jpg, bring that into Lightroom.
- Delete both the large tiff files.
- Keep the RAW as my "digital negative".

These are better than a straight "Invert" because they've thought about how to process the color from a color negative capture; they're doing a better job than the linear inversion.

Any more?
 
1. PhotoshopCC
2. Color Convert to sRGB
3. Colorperfect [User B&W preset, Gamma Linear, Blks Clips 0 @1stop - Wht Clips 255 @.25stop, Grey Pt on Card]
4. Gamma drop 0.5-ish

BTW, pretty good cam-scan from A7. I've experimented a bit with it but couldn't justify the timely process of taking the photos.

 
@meloV8, that's excellent. Kodak golds and Coke reds are very good. Fuji greens still a little off.

MakeTiff is the Color Perfect processor, right? I haven't used Silverfast; did you choose any options? Tell Silverfast it was Fuji200?

I believe good color/tonality requires some non-linear manipulation. I suspect that SilverFast and VueScan have this built-in. There's also ColorPerfect.

MakeTiff feeding one of these programs may be a good recipe for automatic processing of camera-scans.


Yes, MakeTiff from Color Perfect. In Silverfast i make own film profile, based on xrite gray points. Vuescan does not have Silverfast color negative editing capabilities.

Download Silverfast HDR demo and try :)
 
@brbo, now you have my curiosity... Can you share any about this magic inversion process from your wizard friend?

He said he's got no problems releasing the code to public. From reading the code I can see that he's obviously got some gui somewhere (but that's probably just for his use).

I'll try to get him here to write a few words about the process and insert some additional comments to the code...
 
He said he's got no problems releasing the code to public. From reading the code I can see that he's obviously got some gui somewhere (but that's probably just for his use).

I'll try to get him here to write a few words about the process and insert some additional comments to the code...

Yes, would love to have a description. Code is up to your friend, but a description would be interesting.
 
Thanks @DKimg.

Do you prefer that route to ColorPerfect? vs using MakeTiff?

In short, I prefer colorperfect with the route I take with my scans.

Maybe I've used maketiff a handful of time. But, To be honest, I usually try to maximize scan quality as much as possible before I use colorperfect. Plus I try to not assign a color profile unless I'm absolutely sure I have a color target preset created.

Plus, I wouldn't change a file from 8 to 16 bit unless it was being converted to black and white image.
 
In short, I prefer colorperfect with the route I take with my scans.

Plus, I wouldn't change a file from 8 to 16 bit unless it was being converted to black and white image.

Thanks.

BTW, I'm not talking about changing from 8 to 16 bit. I start with 16bit and keep it until ready for a final rendering to jpg.
 
BTW, pretty good cam-scan from A7. I've experimented a bit with it but couldn't justify the timely process of taking the photos.

I'm getting excellent cam-scan captures, more about the setup, lens, etc. in other threads. For something really radical, I think we'll soon be getting good cam-scans with our smart phones (w/macro lens, of course).
 
1. PhotoshopCC
2. Color Convert to sRGB
3. Colorperfect [User B&W preset, Gamma Linear, Blks Clips 0 @1stop - Wht Clips 255 @.25stop, Grey Pt on Card]
4. Gamma drop 0.5-ish

Trying DKimg's approach:
1. Open RAW in Photoshop CC 2018, 16 bit, Adobe RGB
2. (Don't understand converting at this point to sRGB. Didn't do it.)
3. ColorPerfect [FilmFuji Superia 100, Blk Clip @ 1stop, Wht clip 250 @0.25 stop, Grey pt on card]
4. Back in PS, auto-Contrast, Tone, Color
5. Export as sRGB, 800 pixels, embed profile, for display here

Results: Pretty good. Kodak yellow looks good. Coke red is a little purple. Fuji green a little hot. But, could work. Maybe a touch of dehaze or clarity in LR would do the job. Testing in LR, I would also +Sat for Red.

YMMV, and may be a matter of preference, but I think I prefer the result using MakeTiff to go to ColorPerfect.

Notes:
- I first did the CameraRaw conversion at 8bit. Color Perfect objects violently to processing an 8bit image. Use 16bit.
- The combination Auto-Contrast, Tone, Color seems to be the same as Curves... Option-Auto, with the settings in #4 above. I did both in this processing and I cannot see any difference.

171004-TestBox-Fuji200-SonyNoFilter-DSC9558-PS-CP-Auto-Scr.jpg


This is all auto. If I lower the brightness a bit, it's very close to @DKimg's post.
 
Back
Top Bottom