Camera "Scanning" -- Use Di-Chro Head to undo Color Mask?

One thing you can do is while in LiveView, before you take the 'scan' of the negative, is manually adjust the white balance in camera. You would obviously shift it to the blue/cyan end of the temperature scale until you feel that it has compensated for the orange film base.
Then take the 'scan' and process from there on.

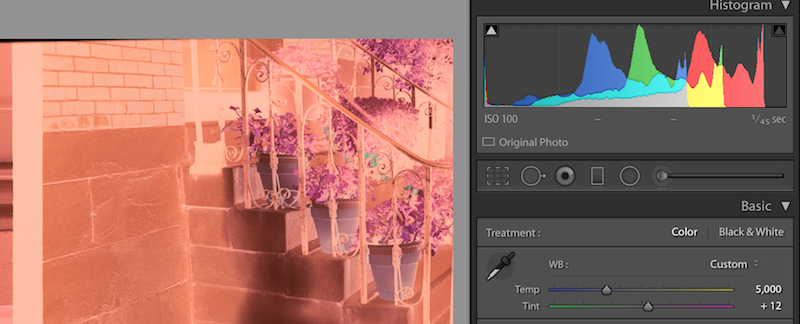
Hi Huss -- Thanks for this note. If I'm doing a camera-scan, I'll shoot RAW, and pick the WB at the time of RAW conversion in LR or PS/ACR.

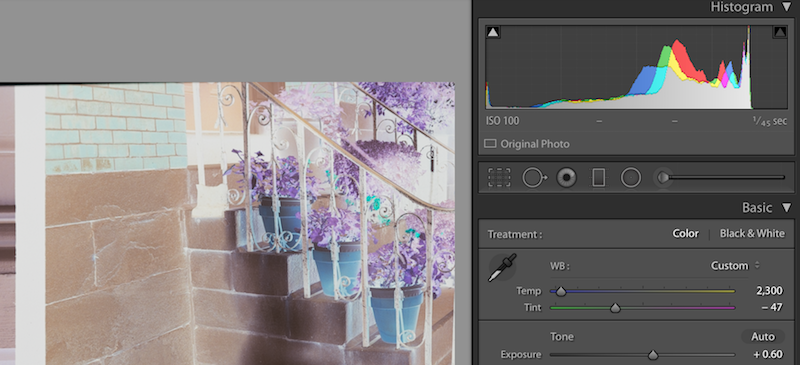
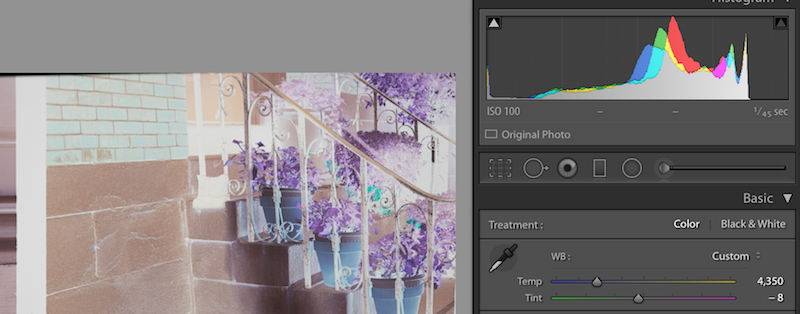
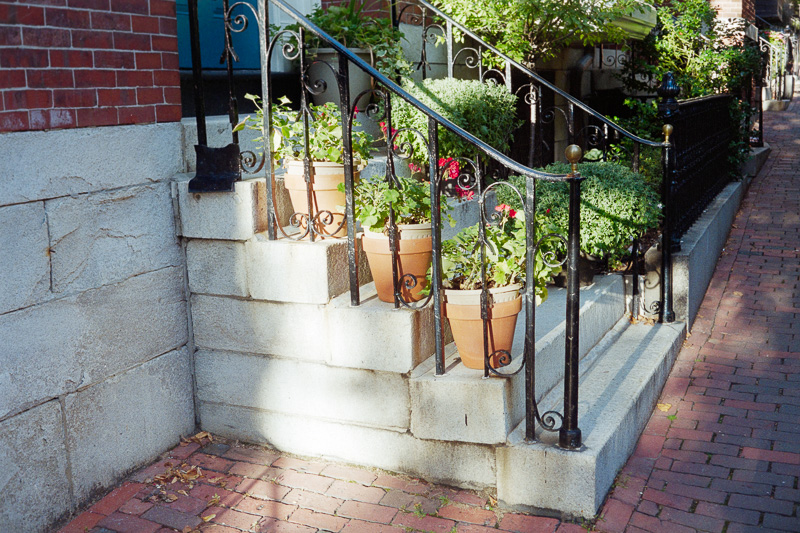
With my Cyan/Magenta illumination, I get a clean WB on the unexposed film at 4350K with very little tint (-7 in LR).
 
Godfrey - you must understand color science basics. Is Curve/Levels complicated just two steps?

Here is inversion curve from gamma 2,2 image into log space so you can apply in any Adobe application and set black/white point. Two steps only.

https://drive.google.com/open?id=0ByP8kkW_h00uWUxsend6LTl2eGc

I'm pretty well educated in color theory/science, but I'm unfamiliar with the jargon you are using. What does it mean to apply an "inversion curve from gamma 2.2 into log space", for instance? What's an "inversion curve" ... specifically? I presume some form of transform but don't know what measures you're referring to or what your inverting. Etc. I've never heard these expressions in any of my color science/theory books or courses. I don't quite understand your question "Is Curve/Levels complicated just two steps?" either .. sounds to me like that should be two sentences or needs some punctuation.

Please explain. Thx
G
 
He told you exactly what he was doing, Godfrey. Why do you keep acting like he didn't? Just trolling?

My workflow is very simple. First you debayer your RAW image from digital camera which is linear to luminance (dark on screen). Then you apply LOG curve because this is how film store luminance so then image is linear to image recorded on negative. Then you do simple inversion and set black point (orange mask removal) and white point using levels.
 
This is completely irrelevant if you are capturing raw files. White balance is set in the raw conversion. Raw converters simply use the setting that the camera embeds in EXIF to get something representative of the scene.

G

If it was irrelevant you would not have the ability to set WB in RAW in camera.
Of course you can then edit WB any way you want in your PP program, but this step gives you an option to view 'corrected' WB before you shoot and adjust it there, or shoot and adjust it later.

It's just another option.
 
Hey, friends and fellow shooters --

My aim in starting this thread is to understand what's going on. I have learned that the orange mask is not uniform; it's strongest in unexposed areas of the color negative and weakest where the negative is darkest. I cannot tell yet if this makes a difference.

My original question was much more limited: Is there an advantage in using Cyan/Magenta illumination vs. white light when doing the camera-scan? It seemed intuitive to me, but I'm still not sure I've seen a difference. Will do a comparison soon.

Again, I'll say that the options in PS Curves "Auto" seem like a breakthrough to me.

I suggest that tuning the light color so it neutralizes the orange mask is the breakthrough, that makes the simple 'auto' curves work. People have been inverting and running auto color since time immemorial, but Your result above is much better than what I've seen out of such a process. More data is needed, though, I agree.
 
If it was irrelevant you would not have the ability to set WB in RAW in camera.
Of course you can then edit WB any way you want in your PP program, but this step gives you an option to view 'corrected' WB before you shoot and adjust it there, or shoot and adjust it later.

It's just another option.

Sure, but know that you've not actually changing the capture at all, you're just changing how the camera displays it and telling the raw converter a number to use in its default processing. I don't see much point to that. I don't need to filter the mask out while I shoot, I take it out afterwards when I do the inversion and color balancing.

I don't know how many people can look at WB 'corrected' inverse color and know what they're going to get when the turn it into a positive.

G
 
My apologies, but I don't understand your question. I don't pick a neutral point in ColorPerfect.

In any event, whenever I pick a neutral point that does give OK colour. I've just chosen not to edit colour too much in CP because I prefer to do as much of my editing as possible in one piece of software.

br
Philip

In your workflow that pick neutral point in CP step. That's where the entire thing falls apart since everything changes depending on where you pick as a neutral point. It works for some images very well. for others, it fails spectacularly. Sorry. I've done what your doing and it doesn't work
 
brbo's color is super clean though, Godfrey, you stopped before you got to that point, with the massive cyan cast still there.

Exactly. For all the cross-criticism of each other's workflows in this thread, the best, and most neutral version so far is brbo's. Other people telling him that he's doing it 'wrong' (ironically I've accused him of saying this to other members in the past), in view of his vastly superior result that discussion seems essentially moot to me.

FWIW that workflow is almost exactly what I do in CP (apart from adjusting saturation and gamma). Nowadays I spend about 10 seconds in ColorPerfect: if the WB isn't correct, I adjust it by clicking a neutral area. If no neutral area is available I use the Ring CC interface to fine-tune the color parameters by eye. When I was using Vuescan I'd also need to adjust the Highlight and BP Tails a bit, but with Silverfast I can even skip those settings totally.

When you simply begin to understand the very unique interface, ColorPerfect is fast, consistent and usually very, very good.
 
My apologies, but I don't understand your question. I don't pick a neutral point in ColorPerfect.

In any event, whenever I pick a neutral point that does give OK colour. I've just chosen not to edit colour too much in CP because I prefer to do as much of my editing as possible in one piece of software.

br
Philip


I think stompyq referred to your post mistakenly assuming brbo's workflow was yours, Philip.

btw while I can theoretically agree with the general philosophy of keeping all your transforms of an image in one program, my workflow now includes pretty much a bit of everything: linear negative scan in SilverFast --> import to Photoline --> transform in ColorPerfect (and Save-As to keep the original negative intact) --> Photoshop for dust spotting --> Nik Viveza2 for some very slight and subtle local tweaks --> export yet another smaller version with Save-As to keep the big 16bit TIFF --> import to Lightroom to do some last tweaks and curves --> Blurb book output.

This probably sounds like a lot of work, but I do stuff in batches, and most of it is very fast and semi-automated with Actions and custom keyboard shortcuts. The best thing is that (esp since I switched to SilverFast) the whole process is much more consistent.
 
All can be done in Photoshop or similar app in two or three simple steps using proper curves/histogram or scopes. No matter if image is linear on non-linear.
 
All can be done in Photoshop or similar app in two or three simple steps using proper curves/histogram or scopes. No matter if image is linear on non-linear.

Jack thanks for the posts and especially for the link. So if I get this straight the most important thing is to get a linear gamma conversion of the raw file? Is that correct? Is there a way to do it other than cmd line software like dcraw?
 
Linear (gamma 1) is nice but increase storage. Scanners via VueScan delivers such files
Once I get RAW image from you I will propose easy and fast solution in ACR. I have done gallery with drumscanned negatives using my plugin - google jzagaja flickr.
 
Linear (gamma 1) is nice but increase storage. Scanners via VueScan delivers such files
Once I get RAW image from you I will propose easy and fast solution in ACR. I have done gallery with drumscanned negatives using my plugin - google jzagaja flickr.

I"scan" using a Nikon D610 and macro lens. I gave up using scanners long ago.
 
Why is getting a linear gamma so important?

It's easy to get a linear gamma from a scanner, or by using a raw converter that allows you to set the base correction curve. But what advantage does it give you? You only have to apply a gamma curve again in order to properly place the values where you need them to be for proper display.

G
 
Friends, I'm going to look at the illumination, using the DiChro head to illuminate the color neg with Cyan/Magenta light. I am interested in the "linear" question and Jack's approach, and I'm going to send Jack one of my raw files.
 
First the illumination.

Here's the camera scan of image and unexposed film, flash illumination, 5000k, no filter. The orange we are used to seeing. Note the histogram: Red is in a good area, green/blue will require more severe adjustment. If we believe ETTR, we would want the g/b histograms to be further to the right.

170612-DiChro-WhLightFlash-5000k-Histogram-Scr.png


Here's the same image, correcting the unexposed film to neutral color, using the Lightroom ("LR") eyedropper. Notice the degree of correction needed to get neutral (2300K and a tint change of 47).

170612-DiChro-WhLightFlash-ExpAdj-Histogram-Scr.png


And, finally, here's the camera-scan using +50 Cyan and +15 Magenta filters ("CMFilter"), again with flash, correcting color with LR eyedropper, as with previous image. Note this balances at 4350K with a small tint (-8). That's what I was seeking. All histograms in a good position.

170612-DiChro-CMLightFlash-Histogram-Scr.png
 
Next, I do "Edit in... Photoshop" for each of these. I use the Action set in Huss's article, linked in #2 way above. All automatic, no manual adjustment except as noted above. Here are the automatic results:

With No Filter:

170612-3-DiChro-WhLightFlash-PSActions.jpg


With the CMFilter:

170612-7-DiChro-CMFilter-PSActions.jpg


Some differences in color casts, and neither is a finished product. The question is, with reasonable touch-up, which will be more free of unwanted residual casts?
 
Back
Top Bottom