Constructing the definitive DSLR scanning setup. Communal effort!

Off to look for dead enlargers - any brands work better than others for this?
Personally, I prefer my setup with the Lab equipment. I believe it is much sturdier than an enlarger. It will also, in most cases, take up less space.

Check the industrial section on eBay, then dig down to
Electrical & Test Equipment -> Test, Measurement & Inspection

The rod and clamp I am using is currently available:
http://www.ebay.com/itm/Newport-14-...292306?hash=item4193211212:g:Q90AAOSw-7RVEtgL

This will require a bit of DIY work, since you need to find a way to attach the camera to the clamp. I simply used an aluminum plate (which you can find on eBay or at a hardware store), about 4 x 2 x 1/4 inch, drilled some holes into it and mounted the clamp on one side, and a tripod mount on the other. It's incredibly sturdy, and heavy as hell... with the camera it weighs just over 25 pounds. This will help you with any vibration problems, which is critical, since you may not be able to shoot with a shutter speed higher than 1/15 or so.

My rod is mounted to a "bread board table", which is another aluminum plate, which has pre-drilled and tapped holes. The rod simply screws into any hole on the table. These are also available on eBay, it takes a bit of hunting to find one for a good price though. To start with, you could also just use a sturdy wooden board, or a big fat cutting board or something like that.

After that is set up, all you would need is a light table. Mine is probably too complicated ☺ A simple small light pad should do the trick as well.

If you want to take it a step further, search for an "X-Y Table", also on eBay, there are often used ones for good prices available. With that, you can mount your light pad onto the X-Y table and take several shots of your negative and stitch it together with a software, like the free "Image Composite Editor" that I use (assuming 6x6 or bigger, for 35mm you would need more than 1:1 magnification).

It's a bit of work, a lot of experimentation, but a lot of fun and you will be surprised by the possibilities...
 
Dr Tebi, your build is inspirational!

I am about to start working on an initial set up and have a Pentax K1 and 100 macro lens due, together with an LPL C6700 and copy adaptor also due shortly.

I'm still thinking through light source and have various ideas, as well as tables for stitching film over 35mm.

Mike
 
I called up the company that makes the LightPad to find out more about their LEDs.

Specs for reference:

Artograph LightPad (as of 7/2016)
  • 3500 lumens
  • 6000-6500K
  • 80 CRI
Honestly, 80 CRI is fair at best. I'm contacting MFGs all over to find out their LED specs. I'll report back here when I find out more.

One of the reasons I'm thinking about the light source - I am currently wondering the the LPL colour head will be adaptable.
 
Dr Tebi, your build is inspirational!

I am about to start working on an initial set up and have a Pentax K1 and 100 macro lens due, together with an LPL C6700 and copy adaptor also due shortly.

I'm still thinking through light source and have various ideas, as well as tables for stitching film over 35mm.

Mike
I am glad I could inspire you to build your own setup ☺.

I have also thought about using a color head, it might be an interesting experiment to say the least. I think that especially for slides, it makes sense to try an incandescent light source or halogen, after all, that is what slides were intended for... and should produce the intended colors.

As for an X-Y table, they are a bit hard to find, at least the ones that move more than 1" in either direction. An alternative would be a drill-press X-Y table, but it seems a bit overkill.

Keep us updated about your project!
 
my simple, improvised set up:


slide digitizing set up ( simple, improvized )
by andreas, on Flickr

Sony A7, Macro Takumar 4/50, the early preset version that goes to 1:1, a 'spacer' cardboard tube and a Cokin filer holder that I adapted to hold slides.
( the cardboard tube, a toilet paper roll ;) exactly 'mounts' around the outer rims of both the lens and the step down ring on the Coking filer holder )
as lightsource I use the window with it's opaque screen seen in the background, if night time the blank, white monitor of my notebook
I like the simplicity. And, hmm, that's a giant toilet paper roll I have to say!

Using natural light as a light source should definitely give you great CRI.

Can we see some sample images?
 
I like the simplicity. And, hmm, that's a giant toilet paper roll I have to say!

Using natural light as a light source should definitely give you great CRI.

Can we see some sample images?

haha, you are right, I made a mistake, it's not a toilet paper but a thicker tube. I had used one in combination with this one for an earlier set up.
I built this set up only yesterday, only have used the daylight / screened window for lightsource yet ( had used the monitor with a similar set up I had contructed for a Konica Minolta A2 + close up lens )
11 'scans' that I did yesterday using the seen set up can be seen at my flickr stream, see following the photo of the set up.
Most slides used had not been of very good quality, this one may be the best technically and therefore best represent the quality of the scanning


Untitled
by andreas, on Flickr

this one's alright too:

accident
by andreas, on Flickr
 
Looks very good! I especially like the "'accident" picture. Perfectly even lighting. Makes me wonder if I should redesign my setup... we've got plenty of sun here.

It looks like you haven't done any post-processing on these yet? I really like LightZone, give it a try. The relighting module works wonders for slide images, and I also like the High-Pass filter a lot for sharpening.

If you have been taking slides since the 80s, you have a lot of work ahead of you now :)
 
thank you Dr.Tebi, I shall check out the LightZone, it's a free photo editor, right?
unfortunately I have very little old photos, just a few cassettes with slides from the 80s, though I also must have, somewhere, old B&W negatives that I had developed myself. All taken with Minolta XG-1 and 2.8/28 and 1.4/50 lenses.
most of my photography has been digital starting 2007

Yes, LightZone is free. You just have to register in order to download. It is an open source program now. There are also a bunch of tutorials on YouTube, which will help to understand the concept, which, in my opinion, is really brilliant, and makes work fast and fun.
 
I called up the company that makes the LightPad to find out more about their LEDs.

Specs for reference:

Artograph LightPad (as of 7/2016)
  • 3500 lumens
  • 6000-6500K
  • 80 CRI

Honestly, 80 CRI is fair at best. I'm contacting MFGs all over to find out their LED specs. I'll report back here when I find out more.

Meh. The results speak for themselves.
 
One of the reasons I'm thinking about the light source - I am currently wondering the the LPL colour head will be adaptable.

Guys, you're overthinking this. You're letting the theory blind you to the reality.

I'm all for better equipment, and I'm by no means married to the Lightpad. That having been said, the Lightpad demonstrably *works* and produces excellent results.

If there are other options in the same price range that are theoretically better, then by all means. But given the quality of output I (and others) have been able to achieve, I'm not sure there's a whole lot to gain.

Have you compared results from different light sources? I don't want to be harsh, but saying that you are getting great results does not prove that you couldn't get better results from a better CRI source... you will need to do some comparisons and judge from those results.
 
Have you compared results from different light sources? I don't want to be harsh, but saying that you are getting great results does not prove that you couldn't get better results from a better CRI source... you will need to do some comparisons and judge from those results.

That's a fair point, and as I say, it's entirely possible that with another light source, things would improve.

That having been said, I've directly compared my results to both a 9000ED, an Imacon X1, and a Heidelberg drum scanner, and the D800/macro/LightPad holds its own.

I suspect there may be gains to be had, but with quickly diminishing returns.
Well there you go, you have proven your point ☺

Yet I would like to challenge you to try a "black body" light source, just for comparison purposes.

What I noticed were much warmer, more pleasant colors (I am talking about slides). It would be very useful to also compare with a good slide projector... which I usually find the nicest. My thinking is, after all, slides were made to be projected with slide projectors, at least so I believe...

Indeed. ;)

I'm not in a hurry to find a new light source, TBH.
 
New scanning setup coming soon

New scanning setup coming soon

Hello,

I just wanted to revive this thread due to some updates I have made, and will make in the next few days.

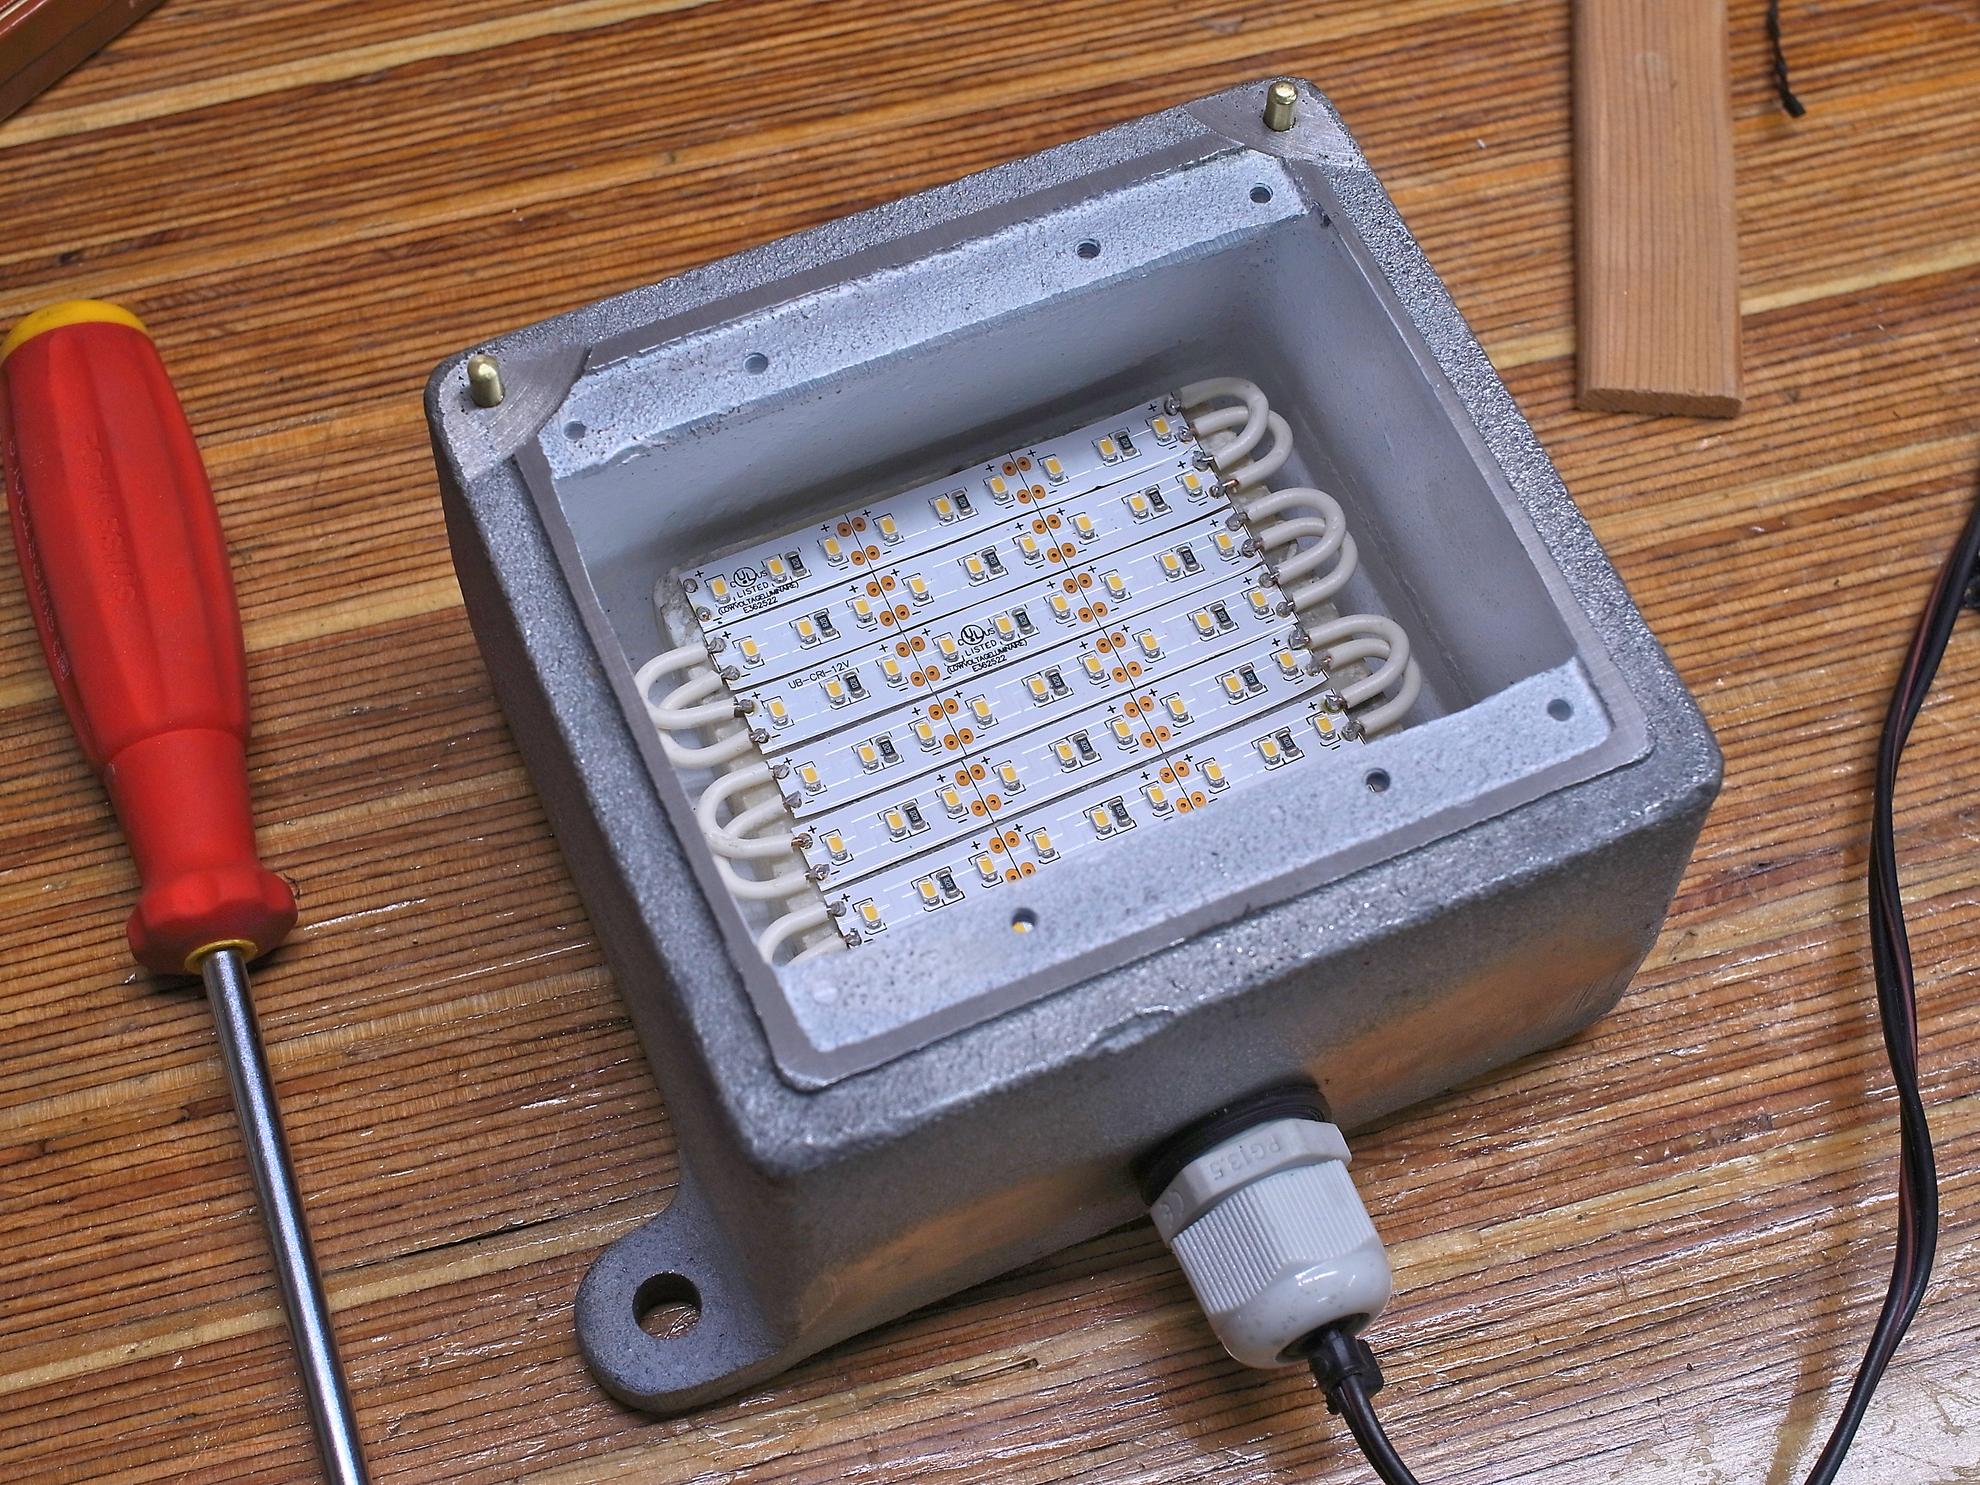
The first update I have already made is to the lightbox. I have, for now, abandoned my "black-body" halogen light box, and built a new one with "High-CRI" LED lights. I was having too much trouble getting even light distribution with the halogen lightbox.

The LEDs I bought are YUJILEDS, and are supposed to provide up to 97 CRI:
https://store.yujiintl.com/products/bc-series-ribbon-120led-2835

I have arranged these within an old exterior junction box, which is made from cast iron. It has a great weight to it, and the perfect size. I painted it plain white on the inside and placed a square piece covered with LEDs into it. It is powered by an old ATX power supply.

new-lightbox.jpg


This new light source works absolutely great. I can shoot at f/9 with a shutter speed of about 125. I will post some pictures soon of results.

My upcoming update is a new camera. I will replace the Nikon D810 with a Sony A7R II.

The main reason for changing the camera is, that I just don't like using the D810 for the occasional digital shooting (other than copying slides or negatives). It's a pain to change settings (many, like ISO for example, cannot be saved in user settings). Thus it has just been sitting there as a slide copier... a bit of a waste. I can see myself using the A7R II for digital shootouts, filming etc. much more.

A mirror-less camera will also allow me to try different lenses of many kinds, with adapters. I have a nice collection of old Mamiya Sekor-E lenses, that I would love to put to use.

In terms of scanning slides and negatives, I see the following main advantages: about six more megapixels, images stabilization, less weight. Although my setup is very rigid, the connection between camera and tripod mount does have a bit of play up and down. A lighter camera should put less strain on the mount and hopefully result in easier adjustments and focusing.

The lens I am planning to use with this setup is a Carl-Zeiss Makro-Planar-S 60mm. This lens was made for macro photography and can go to 1:1 magnification, perfect for 35mm film.

I will keep you posted of my results!

Please post any of your newest setups, changes to your existing ones etc., There is always something new to discover ☺.
 
My current setup:

  • Leica M-D + Summicron-M 50mm + BEOON copy stand
  • Small color-balanced LED light box (about 5x7 inches in size)
  • 1/4" thick piece of glass the size of the light box
  • 2 strips of 300gsm paper
  • Black construction paper
  • Artist's Tape

Handles 35mm to 6x9 negative strips with the M-D.

  1. tape the light box onto my work table.
  2. carefully clean the light box's diffusing surface (ANR proven)
  3. tape two strips of 300gsm paper down on the light box at the right width to allow a film strip of the chosen film to move between them.
  4. tape black construction paper over the rest of the light box diffusing surface
  5. tape the glass to the light box
  6. slide a strip of negatives into the channel made by the paper strips sandwiched between light box and glass, and center a negative on the light box
  7. fit lens to the BEOON
  8. using the BEOON magnifying focus tool, focus and align the BEOON to the negative. Mark the edge of the frame on the glass with a bit of tape so you can slide negatives through the channel and align them accurately.
  9. tape the BEOON to the glass carefully, without moving it or changing the focus
  10. fit Leica M-D body and cable release
  11. stop lens down to f/11, set ISO to 200 and exposure on auto

Now you have a jig and copy camera setup which is stable and negatives in strips can be fed through the channel, exposures made one after the other. Makes 16 Mpixel square scans of 6x6 and 24 Mpixel scans of 35mm.

Hint: Darken the room when making exposures to eliminate extraneous flare and light reflections. A construction paper tunnel surrounding the lens and negative stage is also helpful for this.​

Of course, I can substitute any other TTL viewing camera and lens, and any other nice, rigid, small copy stand to do the same thing. The BEOON simply makes it very easy to use a Leica M body, since I have one, and is delightfully compact and easy to store when the kit is not in use. The Summicron-M 50mm lens, although not specifically designed as a macro lens, produces amazingly good results when put to use this way ... as does a Color Skopar 50mm f/2.5 as well.

For example, I can also use a Leica CL body with an M-mount adapter on it, and set the capture to about 1:2 magnification for 35mm. However, with that format, I need about 1:3.5 magnification for 6x6 which is out of range of the BEOON. That's when a Novoflex Magic Studio Macro-Repro Stand and a bellows mount for a lens becomes a lot more flexible to use. It's not cheap, but it is similarly very precise, strong, and rigid, and packs down small enough to store away easily when not in use.
 
Back
Top Bottom