Help with Converted 0.95 50mm, please

gdi

Veteran
Local time
2:51 AM
Joined
Nov 26, 2006
Messages
2,632
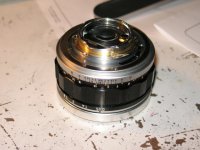
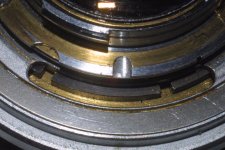
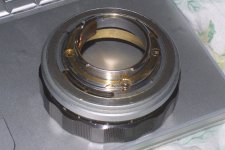
I am converting a 0.95 and need to know how far down to trim the rear element shroud. It would seem to make sense to just trim the little tabs off and it should not foul a M8 or RD-1. But I want to be sure.

Would someone with a converted lens mind taking some shots of the rear with the lens focused at infinty (all the way out). It would really help!

Thanks!
 
I trimmed the 3 tabs flush, to the high part of the aluminum (not the low part near the focus actuator).
robert
 

Attachments

  • 061207_2037_30.jpg
    061207_2037_30.jpg
    143.4 KB · Views: 0
Thanks Neelin! That's what I thought.

How did you trim it? I have a friend with a laser cutter, but I am thinking of just using a hand hacksaw (sounds bad, eh?)
 
johnastovall said:
Rather than ruin a fine lens possibly, sent it a someone who does this conversion all the time.


No thanks, I've seen how some "experts" do it! :eek:

There's really not a chance of ruining the lens, I only need to trim the shroud and then tap a few screw holes. The lens focuses perfectly and I won't be doing any grinding that is often seen.

Do you have good shots of yours you could post John?

Thanks
 
gdi said:
No thanks, I've seen how some "experts" do it! :eek:

There's really not a chance of ruining the lens, I only need to trim the shroud and then tap a few screw holes. The lens focuses perfectly and I won't be doing any grinding that is often seen.

Do you have good shots of yours you could post John?

Thanks

Some of the best right here
 
johnastovall said:
Rather than ruin a fine lens possibly, sent it a someone who does this conversion all the time.
No need to get ANYWHERE near something that could be damaged. If you turn the nut below this slot, the complete optics section drops out (no chances of mis-alignment on reassembly, because it's all a complete optical unit) and leaves you with only easily cleanable aluminum parts. I still covered the slots with tape and plastic anywhere where I was not working.

I used a dremel abrasive cut-off blade & drilled & tapped

Here's my .95 shot http://www.pbase.com/neelin/image/71860262. With 50+ year old eyes, I find the near static shots are the only ones (& those dreamy fog shots from John) I can manage. I find focusing in really low light problematic for candid people shots. YMMV

robert
 

Attachments

  • IMG_6022a.JPG
    IMG_6022a.JPG
    115.5 KB · Views: 0
  • IMG_6038a.JPG
    IMG_6038a.JPG
    94.4 KB · Views: 0
Last edited:
neelin said:
No need to get ANYWHERE near something that could be damaged. If you turn the nut below this slot, the complete optics section drops out (no chances of mis-alignment on reassembly, because it's all a complete optical unit) and leaves you with only easily cleanable aluminum parts. I still covered the slots with tape and plastic anywhere where I was not working.

I used a dremel abrasive cut-off blade & drilled & tapped

Here's my .95 shot http://www.pbase.com/neelin/image/71860262. With 50+ year old eyes, I find the near static shots are the only ones (& those dreamy fog shots from John) I can manage. I find focusing in really low light problematic for candid people shots. YMMV

robert

Robert - you're the man!

I bought a diamond dremel cutoff wheel but I just decided to give it a shot with the fine tooth small hacksaw first. The metal is very soft and about 5 minutes worth of work. I used a very small boattail hobby file to finish it off. It looks fine.

I was looking at your screws and it looks like you used about a size 4 or M3? I have seen a 2-56 that seem like they would fit the adapter without overlapping the sides, but I haven't found that tiny size tap yet. I may drop this off at a machinist just to be safe - there isn't much metal in the adapters...

Thanks again!
 
Well my test shots look good! I have the mount temporarily attached, so I tried it on the Digital RF.

Note - just test shots (both at 0.95) , but they prove focus is on and that the conversion seems to be a very straightforward thing...


First...
M-Mount095-3.jpg


A relative of the Lens..

M-Mount095-1.jpg
 
Last edited:
I found this after I did my conversion. If you're a tool freak, you be sorry you saw this whole new "dimension" in tools, because just when you thought you had everything....

http://www.micro-tools.com/store/home.aspx

I used the smallest NON camera size screw available at a "regular fastener" specialty supply place, but it could have been smaller. I think the second photo's I sent were Don Largo's from photo.net. He helped me lots with questions on my conversion. If the machinist is an easy option for you it may be worth it. It is extremely difficult to countersink the screw right next to the side of the M-Adaptor without scuffing the **** out of it. Mine is scuffed. It's also a deep c/s in an extremely thin mounting flange. I would HIGHLY recommend a drill press.

robert
 
Last edited:
Thanks Robert I am thinking of putting about six small screws in the mount. I think the best size is about a 2.

They should fit on the shoulder of the adapter and leave some metal all around and require less countersinking, plus they seems pretty close to the size of my Summicron mounting screws. I do have a drillpress so I may still give it a shot myself.

thanks!
 
Back
Top Bottom