The curtains operate with their curtain ribbons overlapping and some shafts and drums loosely coupled. This tends to cause them to become synchronised to each other unless there is a large enough mismatch in spring tension. The different shutter speeds are obtained by setting different gaps between the curtains (done on the speed selector), which move at the same rate for every speed, therefore if one speed is correct, then the others will be too.
{The exception to this is 25th (or 30th), the flash sync speed and all slower speeds. The first curtain has made it all the way across the frame before the second is released, so it is possible that their speeds are different, but not enough to effect the overall exposure}
There are two elements to checking and adjusting the curtain spring tensions:
Adjusting one or the other so they travel across the aperture with a constant gap, (synchronised) and:
Adjusting both by a similar amount to regulate their rate of travel across the frame, to give an even exposure.
The following checks use a CRT monitor or TV as a means of “seeing” a sample of the path of the curtains. If we have a suitable shutter speed and screen refresh rate ( the rate at which the screen picture is built up from the top to the bottom, horizontal line by line), we will see stripes when looking through the operating curtains. What we see will vary according to the refresh rate of the screen and the shutter speed selected. A faster refresh rate will make the stripes for a given shutter speed appear more vertical. It's better to run slower as this shows up the movement of the curtains more clearly. Most fast screens can be turned down for these tests, look in monitor properties and choose a low rate which your monitor will support.
My screen was set to 60Hz for these tests, a lower rate would be even better. Alternatively, try your CRT TV, it may be quite suitable. A suitable rate is indicated when the strip you see is clearly leaning to the right.
Curtain synchronisation.
In this section we aim to check and adjust as necessary to ensure that the pair of curtains travel across the film frame aperture with a constant gap between them.
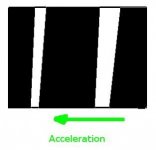
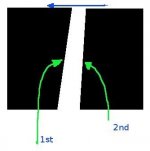
Hold the camera upright and level, again with the lens and back off, looking through the frame at a bright, relatively plain screen. Arrange your view to see most of the screen “square on” as viewing at an angle will cause distortions in what is seen. Release the shutter at various speeds between 1000th and 125th. You should see something like that shown in the images below.
Note how the width of the strip doubles as the next slower speed is used. Fire the shutter at 250th several times. You should see one or more bright stripes from the top to the bottom of the frame, slightly sloping from the right to the left. Each time the shutter is fired the stripe might be seen in a different position.
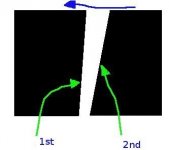
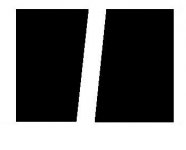
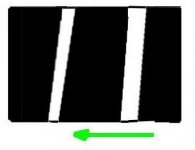
For the moment, concentrate on a stripe which occurs near the centre of the frame. Get an idea of it's shape. It should be fairly straight sided, tilted to the right and could have non-parallel sides like Image 2 or 3 below. The leading edge of the stripe (the left side, remember that this runs right to left) shows the track of the edge of the leading curtain, the trailing edge is the path of the second curtain.
Our aim here is to get the sides of the stripe to be parallel.
If the stripe is wider at the top than the bottom (image 2), then the second curtain is catching up to the first and so either the first curtain tension is too low or the second is too high. (extreme cases of this can lead to “capping” where the second curtain actually closes on the first before their travel is completed, although this is usually due to impediments to free movement).
Similarly, if the strip is narrower at the top (image 3) then the first curtain is pulling away from the second, indicating either an over-tensioned first or an under-tensioned second curtain. (Try this at some other speeds, you should see a similar shape to the stripe, although the slower speeds give wider stripes and the differences become more difficult to see).
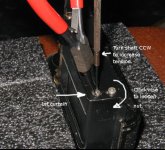
You could adjust one of the curtains now if you have a feel for which one you want to re-tension, or you could read through the next section of the curtain checks, which may help you to choose which curtain to adjust. Either way it's better that the curtains are in sync before adjustments are made to regulate the speed of the curtains as a pair.
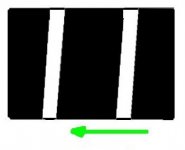
When running correctly, we should see one or more stripes that are similar to that in the last image below where the important feature is its parallel sides.