Just got my Imarect Finder...how do I use it?

comp_wiz101

Compulsive Tinkerer
Local time
11:25 PM
Joined
Dec 3, 2005
Messages
329
As the title may suggest, I just got my HB imarect copy from Popflash photo, and I was wonder exactly how it worked... it's mostly the lines. I take it that I match up the long lines with the long lines, and short lines with the short... but what about the 85mm? Do I match it up with the short, or the long?

btw, it looks great on the Zorkis :)
 
Sorry, I have no idea, but I would love to see a photo of the imarect on the zorki 3:cool:
I need a 35mm finder or a multifinder for my zorki 3m. Is Popflash selling them or it was only that one (I can not find it in his web).
 
There is no dial/markings on the outside that correspond to the focal length you are using?
 
Yes, there are focal length markings, but some have long lines and some have short leading to the numbers. The setting ring has two lines next to each other - one long and one short.

Popflash had it up in the RFF classifieds, and it did not last long up there. I don't know if they have any more but I bet if you e-mail them they'd be happy to check.
 
Maybe they are for infrared photography?
I am saying this because the Imarect should have a close-up and distant lever. If not, then one line is for close distnace and one for long distance.


Raid
 
I would suggest the following: some of the marks lead up to an inscripted number, such as the 85mm mark; the mark before the 85 is for the 73/75 focal length; the one following the 85 is for 90mm. The others appear to be self-explanatory. The long index mark on the rotating part is for normal shooting, while the shorter index is for closeups. Use the cam beneath the finder to adjust for parallax.

Jim N.
 
Here's the picture we've all been waiting for.... the Zorki 3 with an Imarect copy!
P.S....is my "studio" lighting improving at all?
 

Attachments

  • ZorkiWFinder.jpg
    ZorkiWFinder.jpg
    163.9 KB · Views: 0
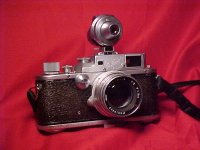
The fixed ring just behind the "snout" has focal lengths marked on it. The rotating knurled ring behind it has two lines marked on it, one shorter than the other. The long one should be set against the focal length in use for far distances (30 ft. and over), the short one should be used for near distances (6 ft. and under). The recommendation that a point between the two lines should be used for distances betwen 6 ft. and 30 ft. is not so practical, since there is little space. You will see that this ring changes field size slightly. Many people, to be on the safe side, always use the short line.

To adjust for parallax, you use the control just below the eye-piece. Move it to the right for infinity, to the left for closest focus. You will see that when it is exactly in the middle, it is set to a shade under 7 ft. For much of the time I leave it there, just tilting the camera upwards a little when photographing something closer and tilting it downwards when dealing with something farther away. To benefit from the precision of which the finder is capable, specially with longer lenses, it is best to use the markings.

I have spoken of the VIOOH I have. These things were not completely standardised, and variations are possible. The principles remain the same.
 
Thanks.... In a fit of boredom at 12 in the morning, I found the instructions and took the finder apart and cleaned it. Much better!
I have heard complaints on occasion about the tele settings being useless on the finder, but I like it... it gives you a good idea what the proportions will be like when you print it.
 
comp_wiz101 said:
Here's the picture we've all been waiting for.... the Zorki 3 with an Imarect copy!
P.S....is my "studio" lighting improving at all?

Thank you for the picture. It looks cool with the zorki3 :cool:
 
Thanks. I used an ancient Sony Mavica "floppy disk" camera with a "soft box" made from holding a sheet of paper in front fo a halogen bulb in a desk lamp.
 
Back
Top Bottom