Lighting food

Stephanie Brim said:
I'm trying to figure out how to take the best photos of my food for showing on my website. I'm not quite sure how to light them. I pretty much have to use the bright kitchen lights and I'm actually pondering shooting in black and white to avoid problems, but part of my food is the color and presentation. Does anyone have any advice for this?

I do a lot of food shooting in my work as a graphic designer for a very large food company (which I won't name because I'd have to get the lawyers involved.) Most of it is nothing fancy, just trying to show the food in an appetizing way.

The most important thing for lighting food is to bring out the texture, and a really easy setup for doing this is to use rear diagonal lighting. To make this setup, you get a fairly large translucent diffuser (white plexiglass, frosted mylar on a frame, or even tracing paper or chiffon fabric) and slant it over your shooting area from the back at a 45-degree angle. You position a light above and behind this diffuser so it shines down and forward; this causes soft light to fall on the food from the back.

You can vary the amount of front light vs. back light by moving the food plate toward or away from the camera. The farther back (toward the light) you push it, the more front light and the less texture you get, because light is falling on the food from the front/upper edge. The farther forward (away from the light) you push it, the more backlight and more texture you get.

For some foods with strong texture, you may want to pull the plate so far forward that the front face of the food begins to look too dark. An easy way to fix this is to use one or two silver fill cards near the camera. (The silver-backed cardboard lids that come on institutional frozen food trays make GREAT fill cards!) Position them to bounce light back toward the front face of the food. The fill cards also help make shiny or reflective foods look "livelier" -- reflective surfaces only look bright if they have something to reflect, so position your cards so you pick up bright reflections where you want them.

You can light this back-diagonal setup with almost any light source you want, but I strongly recommend an electronic flash unit. Tungsten lights will put off enough heat that the food will go "off" very quickly. Color-correct fluorescents won't have this problem, but they don't put out much light; you'll have trouble balancing them with the surrounding light in the room.

Natural light is very nice IF you can get it to be when and where you want it! Actually, a lot of the "natural window lit"-looking shots you see in food magazines were actually lit with a diffusion setup like the one described above; if a window is shown, it may be just a prop or may have been Photoshopped in! (Don't laugh, I had to Photoshop an entire backyard into a studio-lit "picnic" setup just a couple of weeks ago!) If you do want to simulate a more naturalistic-looking window-type light with the sort of setup described above, try moving it around to one side rather than having it come straight from the back. You'll probably need to bounce a little fill into the opposite side to keep it from getting too dark.

If you get the hang of using this basic setup and then want to play with something a bit more "stylish," an easy addition is a small hard light you can move around to highlight areas and pick out textures. This can be a small electronic flash unit or even a tungsten light, if you don't get it too close. Putting a warming gel over it is a nice effect.

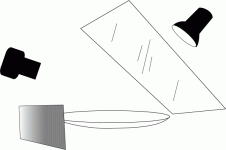
I'm attaching several things here. The first is a diagram showing roughly how to build this back-diagonal light setup. The diagram shows roughly a side view, but with a slight perspective; if it's confusing, let me know and I'll try to explain further. You can see the camera at left, the diagonal diffuser with light above it at the right, and a fill card in the lower left corner.

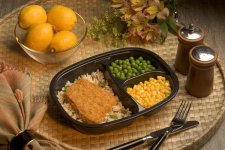
The other attachments are some simple food photos I shot with setups similar to this. The sushi photo was absolutely nothing except the back diagonal. The plastic tray shot (which proves that propping is half the battle!) had basic back diagonal lighting, but I supplemented it with the small hard light at the front with an amber gel over it, to add a little warmth to the food in the tray.

They're nothing you'd see on the cover of 'Bon Appetit' (I've done shots like that, but it takes all day and you probably don't have that much time!) so I'm trying to stick to something simple that you can actually USE around your kitchen!
 

Attachments

  • lighting.gif
    lighting.gif
    9.3 KB · Views: 0
  • 051786_02_five_rolls.jpg
    051786_02_five_rolls.jpg
    283.5 KB · Views: 0
  • 051411-03 fish.jpg
    051411-03 fish.jpg
    101.5 KB · Views: 0
PS -- Yes, I have a professional stylist to get the food looking nice. Her key bit of advice is always to work with the food at as close to room temperature as possible. The reason for that is that if the food is much warmer or colder than room temperature, it will change from moment to moment as you're trying to get set up and shoot the photos! If you keep it at room temperature, it's at thermal equilibrium and will keep the same appearance longer.

Another tip: If you're working with moist foods, cover up the food with plastic wrap or a large bowl if you're going to be working on the photo setup for a while, or if you need to leave for a few minutes. The covering will keep it from drying out as quickly.
 
Oh, and one other thing: I'm only doing this for my personal food blog, not for a client or anything. I'm looking more for a decently quick setup than an elaborate one because the photos will have to be taken as soon as the food is plated (and before it goes to my family). 🙂

And yeah, I'm buying a couple sets of different plates to make things interesting. I want things to look good, but I *am* cooking *for* people, not just for the photos.
 
There will be two types of shots. One type, the rangefinder shots, will be those of my family enjoying the food. The other shots, the actual food shots, will be done with an SLR on a tripod to show off the plating of the food and to illustrate the recipe that will be posted on my blog. So yeah, lots of work.
 
remrf said:
ywenz said:
Day light works great.. here are some shots of food that was layed out on our dinner table. No diffusion of any sorts were done... just the light from the window..


While I will energetically agree with you about the superbly brilliant color and overall lighting of the shots only the third in my opinion works as an appealing display of the food. The very narrow dof does not work well with food. In the 1st shot the dof comes down on the subject like a wall. Did you use a close up lens? I've never had a lens with such narrow dof even at full aperture. On a tripod the same beautiful light could be had with better definition of the whole subject. The second shot is to my eye unappealing for the same reason. In the third shot you have the subject in a line that keeps most of it in focus which is a better display of the food and looks inviting.

U're right. The DOF is too narrow in the 1st two. The examples were more of a display of the light that can be found around the house. I used a cheap Canon EF 50mm f/1.8 lens for all these shots. The body was a Canon D30 DSLR, all were done hand-held..
 
Wow JLW, fascinating and informative. Anybody who can make a TV dinner look that appetizing knows food photography.
As always, a willingness by advanced members to freely share hard-won knowledge with the less experienced crowd is a primary reason this forum remains easily the best in the world.
 
ywenz said:
U're right. The DOF is too narrow in the 1st two.
p.s. I'm not picking on what you said Ywenz, just using your quote for context. (Your new avatar scares the heck out of me).

The use of very narrow DOF in food is a very annoying trend that has been favored (meaning "used frequently") over the past decade. I HATE it... makes me queazy. [EDIT: but yours is VERY nice in a trendy sort of way 🙂] Flip through foodie mags like Saveur or Gourmet and you'll see it over and over and over again. (The more technique-oriented food magazines don't seem to use shallow DOF so much.) I generally love the food photography of Christopher Hersheimer but sometimes I'd like to whack her upside the head and tell her to stop down!

The narrow DOF has also crept into portaiture and landscape photography also. I started a thread on QT Luong's LFforum a few month as ago on this topic. Many replied that shallow DOF in portraits is an inherent part of a trend to use old, slow lenses (the Petzval and Rapid Rectilinear mafia) while retaining some semblence of reasonable shutter speeds.
 
Last edited:
Stephanie Brim said:
And yeah, I'm buying a couple sets of different plates to make things interesting. I want things to look good, but I *am* cooking *for* people, not just for the photos.
You may end up a bit frustrated if you try to do both at the same time. They are very different efforts.
 
BrianShaw said:
The use of very narrow DOF in food is a very annoying trend that has been favored (meaning "used frequently") over the past decade. I HATE it... makes me queazy. [EDIT: but yours is VERY nice in a trendy sort of way 🙂] Flip through foodie mags like Saveur or Gourmet and you'll see it over and over and over again. (The more technique-oriented food magazines don't seem to use shallow DOF so much.) I generally love the food photography of Christopher Hersheimer but sometimes I'd like to whack her upside the head and tell her to stop down!

I liked the effect when it first appeared, but I agree that by now it's overdone (the fate of most innovations that rely on a technical trick.)

For those who want to use it, though, a note: Most of the time, when you see this effect in a professional shot, it's not created by using a wide aperture -- it's created by using front lens movements the "wrong" way.

Large-format cameras are provided with front-standard swings and tilts to let the photographer reorient the plane of best focus to give the best distribution of sharpness across the subject; a tilt/shift lens will do the same thing on a 35mm or digital SLR. (The two food photos I attached to my earlier post were shot with a Canon D60 DSLR and a 90mm tilt/shift lens.)

For example, if you've got a plate of food on a table and are photographing it with a camera angled downward, the normal plane of best focus would be parallel to the film plane. This means it would "slice through" the plate, giving only a narrow band of focus.

By tilting the top of the lens forward, you can cause the plane of best focus to tilt forward also, so it covers more of the surface of the food on the plate. (In theory, if you tilt the lens so that the film plane, the subject plane, and the lens plane all intersect along one line, the plane of best focus will lie completely along the subject plane; this is sometimes called the "Scheimpflug Effect.")

Using lens tilt to fine-tune the plane of best focus is important in food photography, since you're usually shooting at close distances, and stopping the lens down to its sharpest aperture probably won't provide enough DOF to cover the entire food surface.

However, you also can use the effect in reverse -- tilting the plane of best focus AWAY from the main plane of the subject, so that they intersect only in a narrow zone. This zone will be sharp, while areas away from it will go out of focus quickly. This can be a nice way of concentrating emphasis on one feature of the subject, although (as others and I have said already) it's easy to overuse it and turn it into a meaningless gimmick.

There are some conveniences to defocusing this way rather than relying on a wide aperture: it gives you more control over where and how the focus falls away, and you can get narrow-DOF effects even when shooting at moderate to small apertures (such as may be necessary in bright sunlight or with high-powered studio flash equipment.)


Of course, none of this is relevant to rangefinder photography... unless you're using a Speed Graphic or other RF-equipped press camera, and even then you won't be focusing via the rangefinder when you're doing your "anti-Scheimpflug" shots!
 
Coincidentally, www.strobist.blogspot.com just did an assignment on shooting food. I've learned a lot from those pages. If it's not on the front page by the time you read this, check the "On Assignment" page.
 
Interesting article (and site) but I'd have to say the photo is pretty crummy. If I had assigned it, that would be the last time I used that photographer to shoot food.

Of course, apparently he works for a newspaper, so he doesn't have to worry about that!
 
Back
Top Bottom