FrankS
Registered User
Thank you for this, Chris!
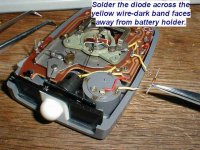
So to recap, there are 2 dodes in series, with the black stripe ends towards the battery?
EDIT: this recap is incorrect. See Chris' explanation below.
So to recap, there are 2 dodes in series, with the black stripe ends towards the battery?
EDIT: this recap is incorrect. See Chris' explanation below.
Last edited: