My First 120 B&W Photos

the.ronin

Established
Local time
8:15 AM
Joined
Feb 19, 2013
Messages
112
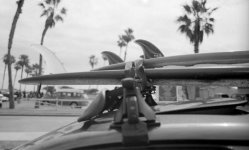
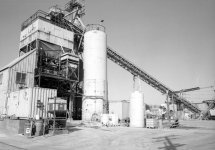
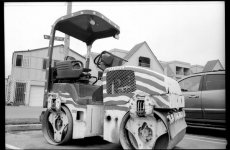
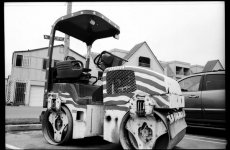
I've now had a chance to really get into this Fuji GSW 690II. By way of background, this is my first foray into film having jumped right into DSLR.

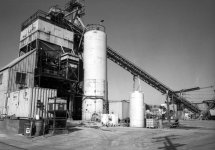
First impressions were ... ack so washed out! Second impressions were ... ack still washed out! LOL ... needless to say, I have a lot of learning to do as far as taking properly exposed, crisp pictuers with this camera. The photos I've attached have been touched up to darken the exposure. Most were taken with 100 ISO Ilford or Arcos (might have been an Ilford HP 400 that slipped in here too).

Two issues that I'm starting to see:

1) The GSW 690II seems to overexpose its shots. I use a Sekonic L-208 light meter (using both reflective and incident as appropriate) and I've recently taken down the shutter settings from say f16 / 30 to f16 / 60. My shots are getting better exposure but still leaning towards overexposed in my opinion.

2) I'm having trouble getting crisp, focused shots even at higher f stops. I do wear glasses but my eyesite is not so bad. I do take crisp shots on my DSLR. I have not been using a tripod to take my shots but I figure with the larger lens, do I still need to rely on a tripod as much?

As an aside, I am developing the film myself. I'm using Ilford standard developer for 12 minutes with 4x upside down agitation method at the start of each minute. At least 10 sec of stop bath (2x agitation) and then at least 3 minutes of fixer at the same agitation method as developing. I'm using a cleaning agent to do the final 20x rinse.

As far as developing positives, I am just scanning the negatives with an Epson v600 using the adapter trays that came with it. I do get very impatient and scan as soon as the film is dry but still very curly. I try to flatten as much as possible but there is a lot of curl still when I scan. I do have an inquiry into BetterScanning for their 120 adapters. I use VueScan set to transparency mode, b&w negatives, 3200 DPI, light ICE, export to TIF.

I do notice that when printed on 8.5x11, the detail is pretty awesome. But when viewed on screen, not as spectacular.

If anything but for peace of mind, I was thinking abotu sending this camera in to eitehr Fuji directly or one of their designated repair centers to have a look at the focus / viewfinder calibration and shutter speed in particular. Has anyone done this, and do you think it would be worth it?

Any opinions or feedback greatly appreciated!
 

Attachments

  • hisandhers.jpg
    hisandhers.jpg
    27.3 KB · Views: 0
  • industrialgrunge.jpg
    industrialgrunge.jpg
    42.5 KB · Views: 0
  • eagleone.jpg
    eagleone.jpg
    40.7 KB · Views: 0
Cool you're getting into film! That's pretty awesome.

In my experience, I've come to the conclusion that I'm terrible at scanning. Making prints from silver halide paper.. now that's were the beauty lies.

You might not be getting sharp scans because your film might not be completely flat. Maybe your scanning sucks too. What does your scanning workflow look like?
 
Thanks ZF1 and Peter Jones for the encouragement! It means a lot to a beginner like myself.

You might not be getting sharp scans because your film might not be completely flat. Maybe your scanning sucks too. What does your scanning workflow look like?

Thanks, ibcrewin. My scanning workflow is pretty hands off mostly because I want to do minimal post production but also because I only know basic techniques of unsharpen mask and levels / correction.

So once dry, I cut up the 120 film into pairs. I'll fit each pair into the v600 120 adapter and yes, it is still curled. Although the adapter has the edges of the film, once laid on the flatbed, I'd bet it is still curving and touching the flatbed glass (per instructions, I am placing it face down on the scanner).

I am using VueScan scanning under transparency mode, B&W film negatives, 3200DPI, with light ICE. No other corrections and exported to TIF. From there I may do some editing in Photoshop or Elements.
 
From what I've read here the ICE only works for color film. Maybe that's messing your scans up. Also, the curled film is a problem, your film plane for scanning isn't flat. You're not going to get sharp scans like that. What might help is putting toothpicks between the frames when you close it down on the holder. It helps flatten the arc of the film.
 
I use a Canon flatbed, and like your scanner "shiny side down" allows curly negs to touch the glass, resulting in Newton rings 🙁

I've found putting the negs in the holder upside down (compared to how Canon reckon) works fine, curling away from the glass, flipping the image later - You may be able to get an aftermarket neg holder which should keep the negatives much flatter. Not sure if your scanner can have its focus tweaked but I'd guess not.
 
To combat curling i just roll the film the opposite way of the curl and leave it in a canister for about a half hour-2 hours and it usually takes the curl out of most films.
 
To combat curling i just roll the film the opposite way of the curl and leave it in a canister for about a half hour-2 hours and it usually takes the curl out of most films.

I do the same with 35mm, but 120 tends to curl along its length - my flatbed seems to have a reasonable depth of field but I'd prefer flat.
 
Patience is needed. You should flatten your negatives before trying to scan. I have found that putting them in a film holder inside a notebook for a couple or three days helps. Others like to use large books. Makes scanning life more fun. Now if I just get on to the rest of proper scanning. 😛
 
technically speaking the images are flat and need some contrast help to make them sing...you need to work these images burning and dodging to get them where they need to be in my opinion...
 
Everyone, thanks so much for your responses! What I'm consistently hearing is the curl problem. And, yes, as Peter_Jones suggested the 120 curls along its width.

I do keep all of my negatives in protective sleeves inside a notebook. After just a day or so in the notebook, they are pretty flat. I will try and re-scan a couple that have been sitting a while and see if there's a noticeable difference.

I'm still waiting to hear back from BetterScanning but it sounds like their adapter with ANR glass might be useful for me (although some searching suggests it's up in the air as to whether it really makes your photos more crisp which is why I've hesitated).

Thank you ibcrewin for the advice on ICE. I will also try to rescan without ICE separately to see what what straighter negatives look like then also B&W without ICE. I'm not quite envisioning the use of toothpicks but I get your idea of strengthening up the film to keep it straight.

technically speaking the images are flat and need some contrast help to make them sing...you need to work these images burning and dodging to get them where they need to be in my opinion...
Yes!! This is what I mean. Unfortunately though, I am not using a darkroom to develop the negatives into positives - just a scanner than software to do post production. Is that what you were referring to? To do some burning and didging in post?
 
Sorry forgot the big question - so then it sounds like my camera might not need a look over as far as its focus and shutter?

Or at least wait until I've tried some flatter scans and possible even the adapter from BetterScanning before I send the camera to a repair center?
 
Everyone, thanks so much for your responses! What I'm consistently hearing is the curl problem. And, yes, as Peter_Jones suggested the 120 curls along its width.

I do keep all of my negatives in protective sleeves inside a notebook. After just a day or so in the notebook, they are pretty flat. I will try and re-scan a couple that have been sitting a while and see if there's a noticeable difference.

I'm still waiting to hear back from BetterScanning but it sounds like their adapter with ANR glass might be useful for me (although some searching suggests it's up in the air as to whether it really makes your photos more crisp which is why I've hesitated).

Thank you ibcrewin for the advice on ICE. I will also try to rescan without ICE separately to see what what straighter negatives look like then also B&W without ICE. I'm not quite envisioning the use of toothpicks but I get your idea of strengthening up the film to keep it straight.


Yes!! This is what I mean. Unfortunately though, I am not using a darkroom to develop the negatives into positives - just a scanner than software to do post production. Is that what you were referring to? To do some burning and didging in post?

Yes, post really simple curve adjustment and some dodging and burning wherever needed...I pulled these 2 and made a quick adjustment..
 

Attachments

  • eagleone-1.jpg
    eagleone-1.jpg
    116.1 KB · Views: 0
  • industrialgrunge.jpg
    industrialgrunge.jpg
    126.5 KB · Views: 0
Hello
Glad to see you're trying film.I too have the epson v600 scanner.Very good scans can be had for a pittance. If there's a glass shop around,get a thin,clear piece that will easily fit into the scanner and simply lay it down on top of the negative,perfectly flat,no strange artifacts,just easy. Set the scanner to normal and then trace out the negative with your mouse. PLEASE,don't spend any money until you try this!
Regards,Peter
 
Whoa marko, thanks for the examples!!! Yes, there is more depth more character it seems with your versions. Before I waste your time with stupid questions, I will be researching into these curve adjustments particularly dodging and burning.

Moto-Uno, believe you me, I'd much spend a few bucks on scrap glass if I can. Can you elaborate though? Or is it as straightfoward as you describe: lay negative directly on flatbed, lay glass over negative, close scanner lid, scan like I would scan a photo (not as a negative) and convert to positive in the scanner software or photoshop?
 
Things to consider...

Things to consider...

I have a serious habit to be verbose on these posts, so I am going to try to make a few points in a few words. I am a long time user of the big Fuji rangefinders.

Everything you mentioned can be traced to about three things I see in your posts.

1. What do you know about the accuracy of your shutter speed. No matter how good your light meter is, it's worthless if your shutter speeds are off.

2. Do you know how well your rangefinder is calibrated to your lens cam. There is a cam on the back of the lens. You can put a properly cut piece of ground glass on the film rails with the back of the camera open. Mark off some distances that match measurements on the distance scale on the lens. Focus the camera with a loupe on the ground glass (rough side toward the lens), and then see if the rangefinder registers I generally use trees in a thicket that measure the distances on the scale. If you focus on the items at those distances, the rangefinder needs to show focus at those points by the patches being coincident. This is how I check my rangefinder.

In my case, any more, when I get a new Fuji, I call Frank Marshman on the East Coast and ask him if I can send him another Fuji for checkout and adjustment. I just called him this week to send another G690bl and lens. I got one back from him about 6 months ago, all adjusted, but the slow speeds on the lens were too far out for him to adjust and correct.

20-30 year old equipment, right, and we don't know it's history. Yes, I'd encourage you to have it checked out, since your experience is not consistent with a good, well adjusted clean example.

Last, scanning... PITA and I don't do it any more. I've had three supposedly capable Epson flatbeds. Too frustrating for me. Others can do it better for money. I will either have prints made from negs or transparencies by a good lab, or I will have a pro lab scan the images, especially medium format.

I may suggest that these processed film images do NOT have to be digitized to be usable. People still print from enlargements and wet processes.

Try it once, AFTER you check out the camera and have it serviced.

Good luck. Your selection of the Fuji GSW690 II should create images to be proud of. I don't shoot the wide versions. Too much stuff in the frame once you see how big it is. I have had the 65mm lenses (3) but always end up selling them. Too wide for me. Never been happy with wide images.

Well OK. that got long too. Sorry bout that.
 
"The.ronin," Yep thats pretty much it,except if you are scanning a negative,use the professional settings and set the film setting to (say B&W,if it's a b&W negative),scan at what ever resolution you want (400dpi is about the max you can use on a 6x9 and be able to post it here) and then when its previewing is done,at the top let of the window that comes up,click on normal;after that ,outline the negative with your mouse and scan. That took longer to explain than it does to do it.I'm quite pleased now with my V600 after this simple improvement .
Regards,Peter
 
Whoa marko, thanks for the examples!!! Yes, there is more depth more character it seems with your versions. Before I waste your time with stupid questions, I will be researching into these curve adjustments particularly dodging and burning.

Moto-Uno, believe you me, I'd much spend a few bucks on scrap glass if I can. Can you elaborate though? Or is it as straightfoward as you describe: lay negative directly on flatbed, lay glass over negative, close scanner lid, scan like I would scan a photo (not as a negative) and convert to positive in the scanner software or photoshop?

Sure thing. There are no stupid questions to me....Feel free to ask and I'll do my best to explain...Another tip would be during pre-scan I would make sure that your tones are all there and that there is no clipping. When you bring the image in Photoshop to you start tweaking the with adjustment layers...

Marko
 
Have you put the negs on a flat translucent surface like a light box, and looked at them magnified through a loupe? That will allow you to see if the focus is perfect.

With a little experience and practice you will also be able to assess whether the negative density is within normal range, i.e. not over- or under-exposed.

Don't forget you can make contact proof prints as well - you will need a glass sheet to hold the negs flat against the paper on a flat surface in a darkroom/blacked-out laundry/closet; safelight; developing trays and chemicals. I scan my bw negs and post process in Lightroom, however, I understand there is a difference between prints from the same neg using a scanned and digitised workflow to an inkjet printer, compared to using a traditional wet workflow.

I find putting my 120 negs in protective sleeves and leaving in a heavy book overnight gets rid of any longitudinal curl.

As mentioned above, when scanning set the black and highlight clipping points at either end of the histogram in your scanner software; I set the midpoint a 1.00. With 120 film I don't use scanner USM (unsharp masking) as I find that introduces artefacts - YMMV.

Most post processing software gives you a lot of control over tonality, provided you get the scan right in the first place.
 
Back
Top Bottom