You can "colorize" a grayscale photo by checking a checkbox in the Hue/Saturation panel. This is good for creating tint effects, but it doesn't really look like a color image -- instead it looks like a toned b&w photo (differing amounts of the same color all over.)
You also can apply a duotone, tritone, or quadtone effect. These let you tint the highlights one color and the shadows a different color (plus a third and fourth color for tritones and quadtones.) You can edit the curves that control how much color is applied to get various effects. Again, though, it doesn't really look like a natural-color image.
If you want to create a naturalistic look from a grayscale photo, you'll need to select and apply appropriate colors by hand, using the brush tools. A good way to do this is to create new layers on which to apply the colors; that way, your original grayscale image is protected, and you can use several layers to keep the colors separated so you don't mess up an area you like. It's almost exactly like hand-coloring a print using photo oils, and requires the same artistic knack.
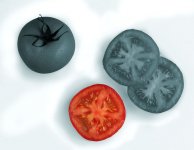
To create the effect you mentioned of one color object within a grayscale photo, the only practical way is to start with a color image. An easy way to proceed from there is to select the object you want to keep in color, invert the selection, then create a new hue/saturation layer that affects the rest of the image. Lower the saturation in this layer to zero, which will remove all color and leave the grayscale values behind. Tip: The selection you made originally is saved as a mask, which is visible as an icon in your adjustment layer. If you click on this mask icon, you can paint with a brush to add or subtract from the mask. This lets you add more color areas to the image, soften the transition between color and non-color, etc. I think it's easier than adding a separate layer for the grayscale image, keeps the file size smaller, and has just as much editing flexibility.
I'm attaching a lame but quick example. I agree with those who have said this effect is overworked, but sometimes when you need to create a quick illustrative or graphic effect it's handy to have these tricks available.