Setting up a scanning rig with a D3300

anarchitect

Newbie
Local time
6:49 AM
Joined
Mar 7, 2019
Messages
3
Hi guys,

For a while I've been roaming the internet to find DSLR scanning guides and it's hard for me to understand exactly what I need. As I've seen some really knowledgeable people and posts on this forum I was hoping to find exactly the help I need here.
Right now I'd like to digitize my film archive, as well as scan any new rolls I shoot. Most of it is color negatives.
I own a Nikon D3300 with no macro lens. From what I understand I might face some trouble converting color negs because the orange mask causes clipping in the RGB channels. Is that correct? How do you deal with that? Adjust tones and curves per picture? Compensate when shooting? (EDIT: I just read this post and I gather from it that the consensus is that orange clipping isn't that much of a problem.)

For gear I'm considering buying a Nikkor Micro 55/2.8. I've never done any macro photography. If I understand correctly I'll need to stitch pictures of medium format (6x4,5) together to get a decent resolution (suitable for printing, say, 10x12" prints). Is that correct, and how would you recommend doing it?

If I'm not mistaken the lens will reach a magnification ratio of 1:2, which would mean that one 35mm negative will match my APS-C sensor, so I think that would be convenient to get 24 mpx scans. Please correct me if I'm wrong. Would I need any macro tubes to make this work?

Now the best deal for this lens I've found is 100 euros. I realized the other day that perhaps I could also purchase a Mamiya-to-Nikon adapter to use my Mamiya 80/1.9 as a lens. I have some extension tubes for my Mamiya (never used, came with the camera) and because the sensor is so much smaller than the lens is built for, I thought perhaps I won't be troubled by the reduced corner sharpness of non-macro lenses. Is this a bad idea? Or should I just try both and compare the methods?

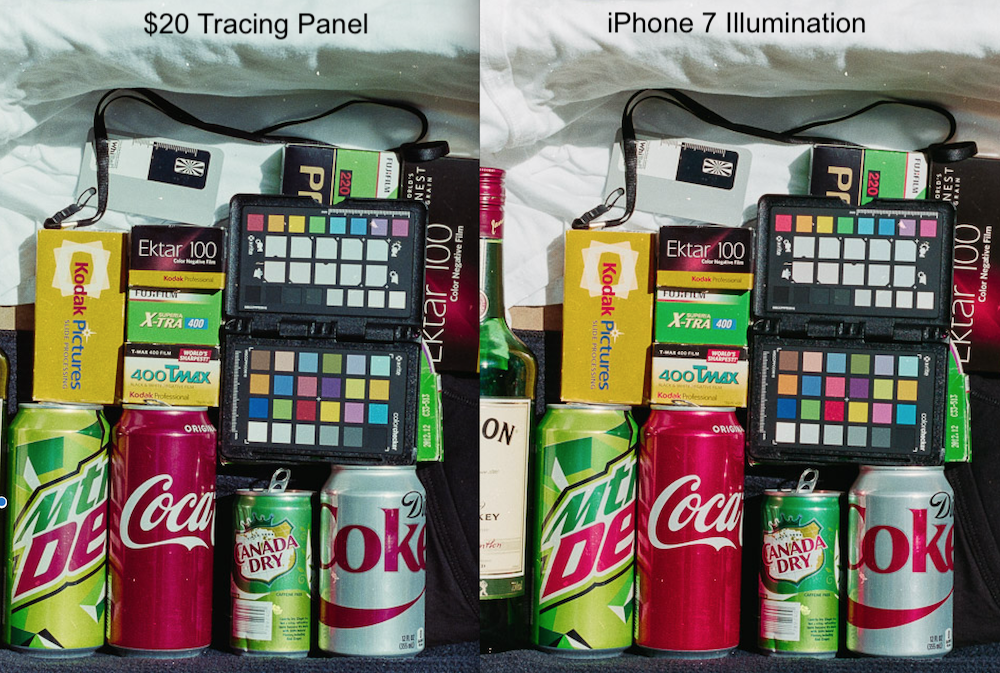
For a lighting source I was thinking of acquiring a light pad, which seems to me to be easier than setting up a remote flash rig (which I would also have to buy, but maybe it's worth it?). I don't have much money at the moment (starting a job soon but not sure how long it will last) and from what I've gathered DSLR scanning can match the quality of higher-end flatbeds (and, according to some, anything short of drum scans) which would also cost me a bit more.

I appreciate any feedback and advice! <3
 
I've recently been dabbling with using a camera to digitize film myself. The number one thing I have learned is to concentrate on your technique and repurposing existing equipment rather than buying gear to accomplish this task- especially if money is an issue. I'm in the process of setting up a dedicated station with a camera support and film holder fixed at the correct position. After reading a bunch of other photographer's experiences with this and seeing some other folks set-ups it's clear that making this simple to set up is one key to getting consistent results quickly.

I'm using a modified negative carrier from an enlarger to hold film flat, and a column and from a broken tripod mounted into a block of wood to hold my camera. There are lots of options for light sources. I tried a light box directly behind the film first and it worked ok, but I had some issues with color. Now I'm using a couple of flashes bounced off a sheet of white foam core positioned behind the film to light my film and I think it works better. The color is easily more consistent and the much highest intensity helps.

As for lenses, I wouldn't suggest buying one just for this purpose. Extension tubes are much cheaper. You want a normal or a short telephoto lens; choose whichever lens you have that gives the flattest field and shows least distortion, and let the extension tubes do the macro part. A dedicated macro lens is nice and the Nikon 55mm is one of the best, but it's only worth the investment if you want it for other uses, too.
 
I would suggest an enlarger lens may be the best bet. They are reasonable in cost (though 6-element lenses are not cheap), and designed for flat field work, which is what you are after here. I picked up an inexpensive Durst slide copier as the basis for at least smaller slides and negatives (35mm full and half frame, 127, possibly to 6x6 cm), but started out experimenting with Pentax Bellows II set-ups.
 
This is how you do it very simply and perfectly with your D3300:

Your camera has live view, so use that to focus on the grain. It will do it instantly and more accurately than MF. You can use MF, but it is much harder/fiddlier due to the resolution of your LCD.

1. Get this lens. It will AF in live view and will give 1:1 macro with your camera, which means the the film image will match your sensor image.
https://www.nikonusa.com/en/nikon-p...enses/af-s-dx-micro-nikkor-40mm-f%2f2.8g.html

2. Get this film holder for scanning film. It works perfectly as Nikon designed it for this, for the lens above.
https://www.nikonusa.com/en/nikon-p...laneous/es-2-film-digitizing-adapter-set.html

3. Get an LED light pad from Amazon. About $20.

4. Get negativelabpro.com software to convert your film images. This is by far the best, easiest, quickest way to do this. You will not have any issues with orange cast from the film back etc. I used to fiddle around creating my own profiles but this transformed my work.

If you are serious about doing this, and have lots of film, this is the way to do it. I sell prints at my gallery from this method and my customers are very very happy.
It may also make you pick up a film camera again as it is so fun to do!

There is a thread on this site showing images scanned with digicams. Check it out.
 
Huss in on the right line (above).

But, I disagree about illumination: Skip the $20 or $30 light pad. Spend $100 on a good one with good quality light (e.g. high CRI). Kaiser is a good one. Seriously, I've tested these and the cheap one won't give you as good color. In a strange quirk, using an iPhone 7, 8, or X as the light source comes out best in my tests.

More specifics:
- If you use the 55 Nikkor, at 1:2 your smallest subject area is a little bigger than the 35mm frame. You'll get maybe 18MPx, not 24.
- For a 10x12 print, I think 20 MPx is plenty. But, opinions differ.
- For medium format, one shot with your 24MPx camera will give a good image, plenty good for 10x12, but there's more in the negative.
- For color negative, the product Negative Lab Pro, as mentioned by Huss, is a real breakthrough. Works as a Lightroom plug-in. If you are working in Photoshop, see my other thread here in the scanning section on "Color-Neg..."
- For B&W negatives, you can just invert in Photoshop, then give it a big curve adjustment. or NLP does a fine job with B&W.
 
Huss in on the right line (above).

But, I disagree about illumination: Skip the $20 or $30 light pad. Spend $100 on a good one with good quality light (e.g. high CRI). Kaiser is a good one. Seriously, I've tested these and the cheap one won't give you as good color. In a strange quirk, using an iPhone 7, 8, or X as the light source comes out best in my tests.

I respectfully disagree. I have been getting fantastic colour using the $20 unit, because the key to all of this is using negativelabpro.com. It takes care (with your input of course) of any cast.

All using a $20 light pad:


All those images? Shot with Fuji C200 - the cheapest film I could buy. That is another thing about using NLP - it makes cheap film look fantastic.

Anyway, I don't know if our 1 post OP is ever coming back! So let's talk amongst ourselves..
;)
 
Anyway, I don't know if our 1 post OP is ever coming back! So let's talk amongst ourselves..
;)
He is! Just spent a while in the boonies... ;-)

I much appreciate the advice, it's very helpful. Really enjoying the knowledge and helpfulness here (although I've only been lurking in the big topics). I'll keep an eye out for an affordable 55mm or 40mm. Seems those lenses are a bit pricey my side of the pond.
 
I respectfully disagree. I have been getting fantastic colour using the $20 unit, because the key to all of this is using negativelabpro.com. It takes care (with your input of course) of any cast.)

Right, Huss. I think we are both right:
- NLP is terrific, good results automatically
- Better source means less adjusting
- But, with most any light source it's reasonably easy to adjust

Scan of Fuji 200 negative with $20 "Tracing" panel on left, iPhone 7 on right. (Surprisingly, in my tests and my judgment, with my negatives, the iPhone 7 illumination gives best color. Flash or $100 Kaiser light panel are next.) Reds are the hardest in my experience with NLP; I like the reds on right, could certainly adjust the left to match.

Below: NLP's automatic result, then WB on 4th gray square on the color checker. No other adjustments.

190310-TestBox-NLP-TikTeck-vs-iPhone7.png
 
Here's my scanning setup, made primarily for B&W negs. I started with a Nikon D3200 and 55/2.8 micro, but changed to a D3300 with 40/2.8 micro for more speed, quality and convenience. I use an LED light source and Nikon ES-1 for colour slides (and almost never do colour negs) but prefer the condenser collimated light system in the enlarger for B&W. John Mc.
http://avcmc.iinet.net.au/mck/making_digitizer_mark_three/index.html
 
If you go forward with this project, I recommend that you get the 60mm AF lens. Focusing on negatives is difficult with a manual focus lens.
 
Here's my scanning setup, made primarily for B&W negs. I started with a Nikon D3200 and 55/2.8 micro, but changed to a D3300 with 40/2.8 micro for more speed, quality and convenience. I use an LED light source and Nikon ES-1 for colour slides (and almost never do colour negs) but prefer the condenser collimated light system in the enlarger for B&W. John Mc.
http://avcmc.iinet.net.au/mck/making_digitizer_mark_three/index.html

Wow. That's a great setup! I feel like my two left hands would not help me out when putting it together, but if I find some enlargers I might look into it... First I gotta get my hands on one of those 40 mms!
 
I respectfully disagree. I have been getting fantastic colour using the $20 unit, because the key to all of this is using negativelabpro.com. It takes care (with your input of course) of any cast.

All using a $20 light pad:


All those images? Shot with Fuji C200 - the cheapest film I could buy. That is another thing about using NLP - it makes cheap film look fantastic.

Anyway, I don't know if our 1 post OP is ever coming back! So let's talk amongst ourselves..
;)

I am using a light table app on my iPad Pro for illumination, this works well, but I have found that raising the negative a few millimeters above the light source is helpful, otherwise I was getting a linen paper-like pattern that was visible when viewed at full size. You can see how beautifully the film grain is preserved below.


Olympus XA4, Derev Pan 500 by Mike Novak, on Flickr


Digicam test scans by Mike Novak, on Flickr
 
Back
Top Bottom