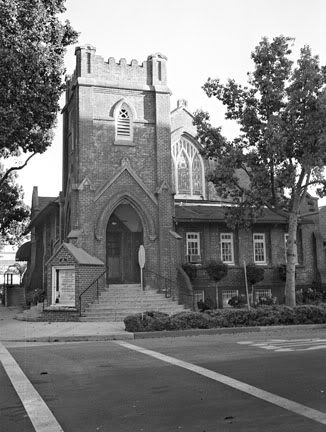
Strike two for XP2 film....

So basicly what you have all proven to me is clearly the film isn't an issue its the operator!! 😛 I won't give up quite yet... The other problem I have been running into is I do a lot of low light so the combination of not being familier with the camera and under exposing some shots, plus not being familier with the scanner and software are the real problems here!! I shall go back to the shooting and see what I can come up with! Can I download silverfast as a demo to test somewhere?
 
Yea in all honest it just happened to be what was in the camera at that moment so I figured I'd see how it worked. I was thinking of picking up some of the 800npz or what ever the new incarnation is from Fuji and then converting it to black and white. I am really trying to stay away from true black and white only because I don't do a lot of processing myself and there are few labs around here that do it. May not be an option though. we shall see

As far as those scratches are concerned I am beginning to wonder if its the camera. My first leica so I am not used to the bottom loading with the little flip open back. Maybe I need to take the air to it and blow it out a bit just to make sure there is no dust in there somewhere.
 
XP2 is one of my very few "go-to" films for both my personal work and stuff I do for clients. Kodak's BW400CN is also good, but XP2 is both scanner-friendly and printable in the wet darkroom as well, so it's my choice.

A few thoughts:

- Processing: you ought to check out the place you get your film souped at, to be sure their machinery and chemistry is more-or-less up to snuff. Shoot two rolls in quick succession and drop them off to two different labs, scan 'em, and compare.

- Scanning: the scanner you have sounds decent enough, but perhaps you're not "working" the scanner software/plug-in quite enough. If you find the software that came with the scanenr lacking, a not-crazy-expensive alternative I've come to love is VueScan , which I use a good deal with my scanners, and generally allows more control than most software bundled with scanners.

- Exposure: as with most black-and-white films, XP2 responds nicely to at least a bit of overexposure (I generally rate it at EI 320; a lot of people who use the film rate it around EI 200). Underexposure is something to avoid unless truly necessary.


Hope this helps a little.


- Barrett
 

Attachments

  • Galveston,-2003.jpg
    Galveston,-2003.jpg
    37.8 KB · Views: 0
Last edited:
I've shot it at everything from 100 to 400 in all honesty. I think these were around 100-200 so this next roll i've set to 200 to try that. I definatly think the scanning technique is part of the problem here. I need to get better at that! some decent negs wouldn't help 😛
 
On my Scan Dual IV - I definitely scan XP2 as a color film and then desaturate in PS.

Also, the tonality is different than traditional non-C41 B/W. This is not a fast film. With a Y2 filter, I shoot at an EI of 125 and with an orange filter, I shoot at an EI 64, using a hand-held meter. Without a filter, I shoot at an EI of 200 and use a #3 filter or #3 1/2 filter while printing through the neg on an enlarger inorder to bump up the contrast.
 
Have you found that Acros seems to be better rated at 50 than at 100. I shot one or two rolls of it but always thought 100 was being generous for ISO...
There is a table that lists developers, recommended developing time and recommended EI printed on internal side of acros packaging box. There is a row in table with EI 50, I don't remember for which developer (guess DDX). For my process, I tested one roll of acros, it looks I have to rate it at EI 50. Nothing wrong with this, similarly I rate PanF at 25, and Delta 100 at 80. Let's be gentlemen and trust fujifilm can do sensimetric tests according to ISO standard and their ISO number is correct.
Eduard.
 
Some suggestions, if you do not mind.

Expose XP2 at 200 ASA for the darker parts of your subject. The shadows get enough exposure and do not cause scanner noise.

The highlights are not grainy. Most of the time they are not blown out because exposing at 200 ASA decreases contrast significantly. The negatives look thick and flat, but it does not matter in the digital workflow.

Download Lightroom Beta and give it a try for post-processing, it is free:

http://labs.adobe.com/technologies/lightroom/

Please try also:

http://www.thelightsrightstudio.com/


Ukko Heikkinen
 
Hi again

Sorry - I seem to have always troublewith these attachments.

Ukko Heikkinen
 

Attachments

  • After some quick post-processing.JPG
    After some quick post-processing.JPG
    119.5 KB · Views: 0
Well you guys have made it look pretty good. Obviously I gave up on the image a bit too soon!

Not to mention the images looks much different here than it does on the work computer. Think it needs a calibration again.
 
Nick R. said:
Couldn't load, Gabriel.
I know, my server's router had the inconvenient timing of going drama queen on me in the past 24hrs. My gf unplugged it by accident, and the settings were lost (it was unplugged for way too long), so I had to remember a few trick rules. Hardware + software meltdowns aren't pretty. 😡

It should load now...
 
Ok tried again at a scan and such. I am much happier with this one though I could do better if I spent more time on it.

church1small.jpg
 
I like Kodak BW400CN a bit more these days for just dumping off at local print lab. I get reasonable results for the cost this way...
 
I prefer XP2 over Kodak's C-41 film. The scanned results are beautiful with the XP2. In fact, I use it in my non-standard tests of lenses.

Raid
 
I love the XP2 and the Kodak (whatever they call it now). But there are some tricks. Here is what I have found to help.
Use the histogram in NikonScan to maximize the range (hit the auto button or bring sliders in to the start of the curves). Make sure you crop into the 'image' area first.
Choose a point in the middle of the negative and make sure you "autofocus" on that. I scan as a greyscale but RGB (especially for the orange Kodak) should be fine also.
You can/should use the Digital ICE but be sure and add sharpening to the tune of 20/10/5 to bring back the softness caused by the ICE. This may help a huge amount right there.
And save as a TIFF or PSD. Jpeg may cost you some quality.
After that you should need very little work in PS to make a superb print!
Good Luck.
Steve
 
Back
Top Bottom