Using and Understanding ASA 400 Film

russelljtdyer

Writer
Local time
10:46 PM
Joined
Mar 4, 2010
Messages
269
Location
Milan, Italy
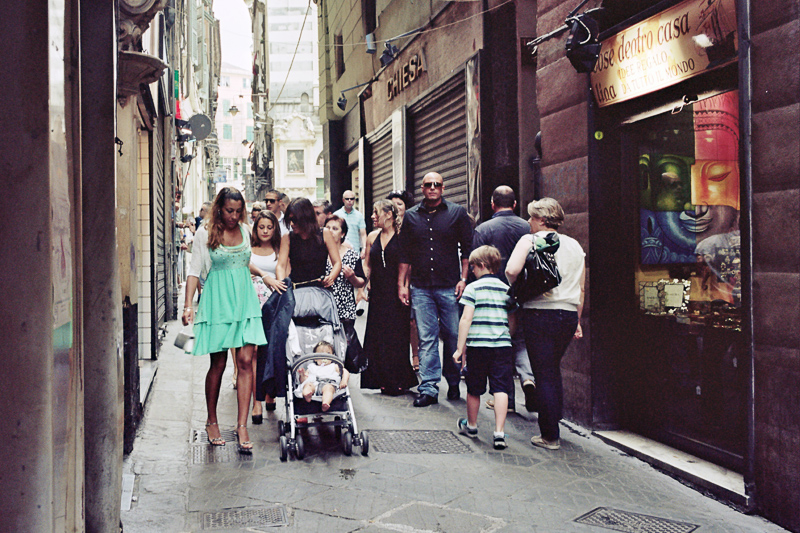
When using my Zeiss Ikon film camera, I use mostly Kodak Portra 160 film these days. The results are very good. However, there are times when I've tried to use Kodak Potra 400 film and the results were not very good. I get photos that are either too dark and very grainy--which is probably because of my exposure settings--or I get photos which I think are exposed well, but still very grainy. I'm not sure if the problem has to do with my settings or with my expectations. Below is an example of how bad the results can be:

russelljtdyer-400asa-katya-rome-20120502-rangefinders.jpg


I'm assuming the main problem with this image is my exposure settings. I was using, though, the Zeiss Ikon camera with it set to aperture priority. So I thought the shutter was adjusted automatically for proper exposure.

To try to get better at using ASA 400 film, I set up my tripod in my home and took some photos under controlled and measured conditions. I used both a Zeiss Ikon camera with a Zeiss 35mm Biogon f/2 ZM lens, and a Lumix GF-1 camera with the same lens. I set the Lumix camera to ISO 400. I also used studio lights to illuminate the room. Plus, I checked the exposure settings with a Sekonic light meter. This isn't an exact comparison, but it's close enough for me to be able to see and, hopefully, understand the differences.

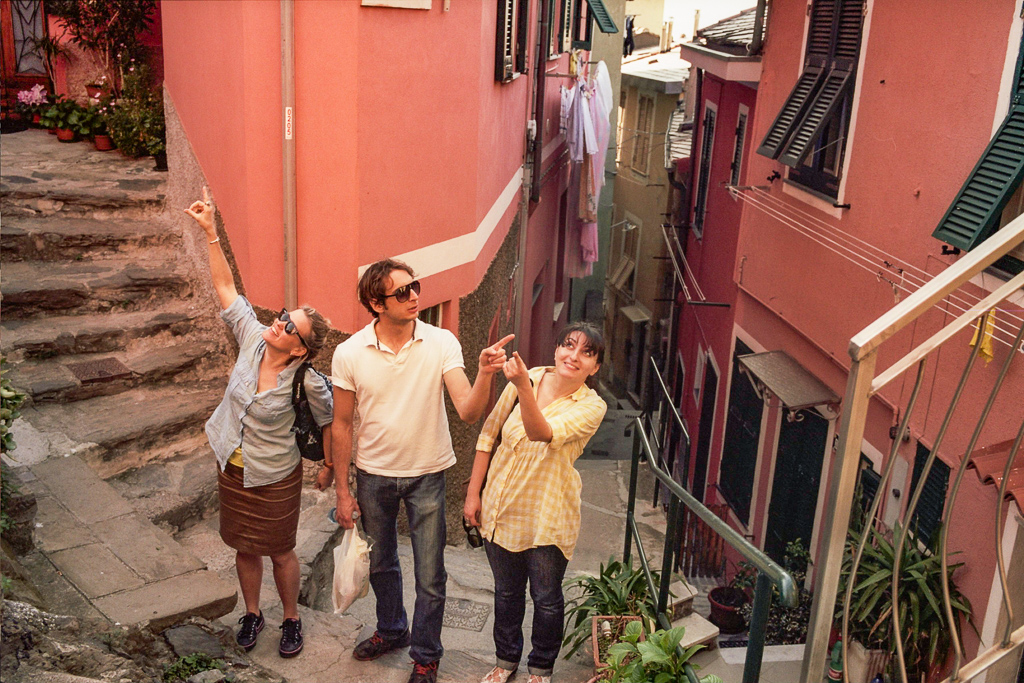
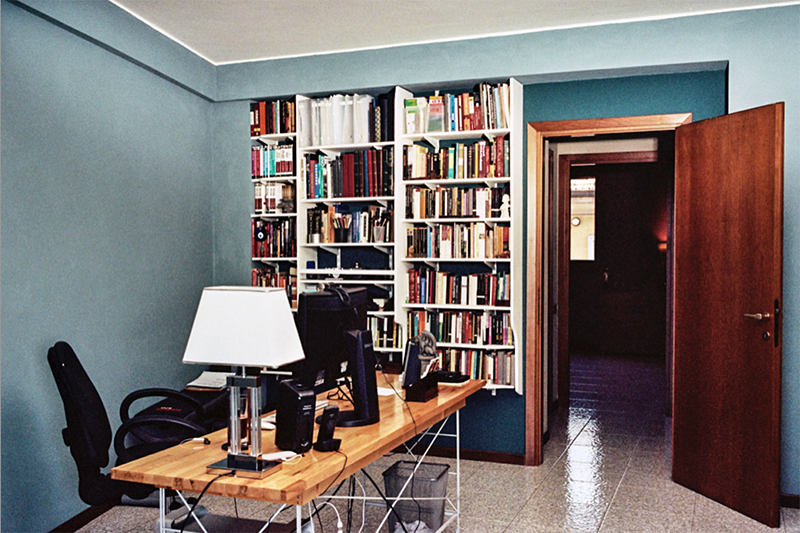
This first image was taken with the Zeiss Ikon in my office. It probably would be useful if I had noted the aperture and shutter speed, but I didn't. Other than cropping in Adobe Lightroom for better comparison between images, I didn't change anything other than set the white balance to 'auto' in these images. It's not too bad, but you can see that it's grainy and not as clean as I might like.

russelljtdyer-400asa-office-20121229-rangefinders-1.png


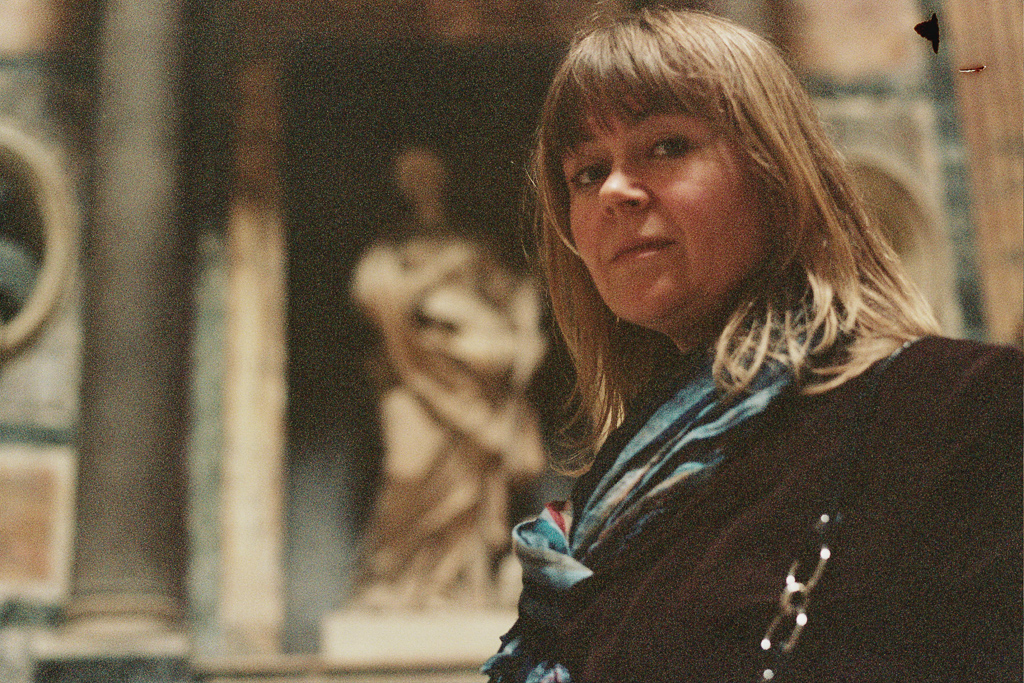
This next image was taken with the Lumix GF-1 on the same tripod and using the same lights and same lens. The color of the walls is a little different, but I can adjust that in Lightroom.

russelljtdyer-400asa-office-20121229-rangefinders-2.png


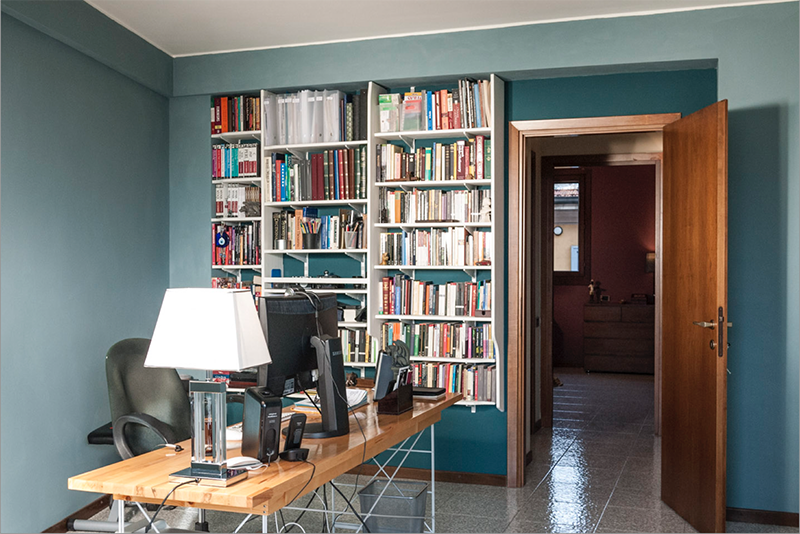
Both images look alright, but I had to set up studio lights to get the film image this way. And the film shot still has an antique look to it. Sometimes this is fine. However, I'm wondering if I can do something differently to get finer results. Is it like this because of the scanning? I get film developed at a nearby store. They put the images on a CD for me, but it's not the highest resolution possible. I have an Epson V700 Photo Scanner. Maybe if I'd scan the negatives, I could get greater clarity. Or is this all a matter of my perception? Is this what one gets from ASA 400 film and is this as good as it gets? I'd appreciate some observations and advice on this topic.
 
Hi,

It might be the scanning. I use a lab that does a CD for a few pennies more and often the prints will be fine but the CD will have a lot of noise showing, which looks like grain. This has happened with very slow fine grain film and 400ASA film.

Regards, David
 
Firstly, I wonder what the ZI is reading. My M6TTL takes a very centre-weighted reading - as does my Mamiya 7. I often have to stop and think about whether the centre is darker or brighter than the rest of the scene - and adjust accordingly. My Nikon F3 seldom ever gives me tis headache. Much of the time, I take an incident reading from my Minolta Auto-Meter IVf which is sometimes 1 to 1.5 stops different to the rangefinders. Not sure why rangefinders are set up to take such "focused" meter readings.

Forgive me if I'm teling you something you know already but over exposed is always better than under exposed when talking about print film.

Scanning could be an issue or maybe even post-procesing in your imaging software. I'm always very careful to set the white and black points in Photoshop CS3 after I've scanned the negative. Portra 400 is slightly more grainy than 160 but I've never had grain as pronounced as that shown in your photos.

Do you scan to JPEG or to TIFF? I always scan to TIFF, fix any issues, save it and then "save as" a JPEG before adding any layers, sharpening, etc. prior to posting.

Other than that, I'm a bit stumped. I've always found Portra 400 (current version, NC and VC) to be very good with grain and excellent when scanning. I suggest shooting taking a reading from your camera and then bracketing by a stop either way (record the test exposures) and see if that makes a difference. Incidentally, use a good lab for processing. All too often, I see people spend a fortune on the best cameras, lenses and film money can buy - only to have the photos ruined by cheapo, nasty corner-shop labs. False economy, in my view.

All the best.

Paul.
 
The picture of the lady is 2-3 stops underexposed, hence the lack of shadow detail.
Auto cameras can only average out exposure so it depends what is in the frame; stand your friend with her back to the sun on one edge of the frame with the light source in the centre; them print for facial detail–you'll get the same effect.

Printing underexposed detail will bring out grain as Portra is a multilayer film with the larger grains in the high speed record showing as the slow (fine grain) record has'nt enough exposure to record detail.

Your Lumix vs film test shows lack of shadow detail in the film possibly due to underexposure, look at the back of the monitor–next time open up a stop (were the settings the same?)

Some rate 400 at EI250-320 as more 'meat' in the neg gives better tonal rendition and easier printing.

Post a digisnap of the negs side by side and you'll see the difference in exposure, I can guarantee the top shot is 'thin' and lacking density.
 
the photo in your office looks like portra 400 to me. it has some grain in 35mm.

my honest suggestion is that if you like the grainless look, and I do understand that, then youre going to need to shoot 160 or medium format. either way your shutter speeds are going to suffer unless you're happy to use a flash.
 
The picture of the lady is 2-3 stops underexposed, hence the lack of shadow detail.
Auto cameras can only average out exposure so it depends what is in the frame;...

... I can guarantee the top shot is 'thin' and lacking density.


Photo_Smith is spot-on, and the processing probably didn't help you any.

Setting the white balance to "auto" is the problem with the color differentiation in your office shots. When using a fixed lighting source, you're almost always better off setting the white balance to obtain consistent results; otherwise the camera makes decisions based on what it thinks the "white" in the room is. And your Lumix shot (the second one) if you look closely is slightly over-exposed... probably at least a half stop to maybe a full stop. The desk looks washed out, and there is no detail in the lamp shade where there is detail in the ZI exposure.

And really, comparing sensors at the same ISO and then comparing noise may not be the most reliable way to be "noise free." You need to find the least noisy ISO settings for each camera and then expose accordingly.

The bottom line though is that all three of your images are perfectly presentable... they just look different.
 
The bottom line though is that all three of your images are perfectly presentable... they just look different.

The first image is beyond horrific. Anyone who knows Porta knows that you can get far far better results. Porta is one if the best scanning color negative films around. The grain should be far less noticeable.

I would trash the first photo as totally unusable.
 
Your first shot looks nasty - but I think the real problem there is that it is underexposeed, hence the overwhelming sense of gloom and grain.

As to the other shots, I think the film one is very slightly underexposed and the Luxix one very slightly over exposed.

I don't think there is anything wrong with the kit, I just think it is a question of getting used to the kit. Not all meters are the same, you just have to go by trial and error.

rjstep3
 
If you are going for grainless photos ... they invented digital for that. Grain is an essential part of film photography. That said, there are a couple ways you can keep your grain looking sharp (pun intended!)

First scan at the optimum resolution. The grain is actually smaller than the resolution you are scanning at, but the scanner fills in between the grains, making them look much bigger. Some call this "grain aliasing". You can minimize the effect by adjusting the resolution so that it is a multiple of the grain size. Adjust the rez by a couple hundered ppi between 1600 and 6400 to find the right frequency. Don't just assume that higher resolution is better. Test your scanner.

Second, expose for scanning rather than printing. A negative exposed for printing will have much more contrast than one for scanning. And it will be significantly less exposed. You want your negatives to look darker and flatter then if you were going to print it in a darkroom. This applies to color and black&white.

With color, use a color balancing filter. If you are shooting with incandescent lights, use an 80A filter for snappy reds, greens, and yellows. If you are outdoors in the afternoon, use an 85 filter - otherwise foliage will take on a very bluey look as it reflects the sky. These steps will mean that you will need less color corrections as you scan, or in post. This will keep your channels in balance, and the grain will not take on the color noise look.

At least this is what I do when I shoot color film. Which is rare anymore.
 
Still Not Clear

Still Not Clear

gAfter reading everyone's comments here and thinking about them, I've been trying to improve my abilities with film. But I still seem to have a problem and not just with ASA 400 film. It's just more obvious with ASA 400 film. I'm seeing also an image quality problem with ASA 160 film. Maybe it's my exposure settings or maybe it's my expectations that are off. I have excellent equipment and good photography skills, but it seems that any goober with an iPhone can take a better quality picture than me. Maybe I can do better than most with composition and other things, but the image quality of my photos are not at the level I think they should be.

Last Sunday I went to Genova and had lunch with a Russian woman there. I took some photos during that outing. She was impressed by my camera and lens, but I'm embarrassed to send her the photos I took with them.

This first photo was taken with a Zeiss Ikon camera and a Zeiss 35mm Biogon f/2 ZM lens. I used Kodak Portra 160 film. It was slightly cloudy, but the sun was bright; it was pretty hot. I didn't record my exposure settings, but I think I had the lens aperture set to f/8 for this shot. I don't know the shutter speed. This photo reminds me of an old, cathode-ray-tube, color television. It doesn't make me feel happy that I spent an absurd amount of money and time on the equipment I used.

russelldyer_20130623_rangefinders_160asa_2.jpg


This second shot was taken with the same camera, lens, and film. I think I put the aperture to f/5.6 at this point. Since this was taken in an alley, it was much darker. However, I had the camera on Aperture priority. The Zeiss Ikon has a good meter and should adjust properly the shutter speed to these conditions, but this image seems too grainy. Could it be that it was picking up the light reading from one of the white garments and that threw off the shutter setting? Maybe there was too wide of a range of lighting in this alley: The background by the sky is overexposed and the walls in the foreground are underexposed.

Could it be that I don't have the ASA selected correctly on the camera for ASA 160 film? In another thread from two years ago, I was told that there are two tick marks between 100 and 200 ASA on the Zeiss Ikon camera. They said to set it to the one closest to 200 for ASA 160 film. Is that not correct? Is there a better setting? Below is a photo showing where I have it set for ASA 160 film.

russelldyer_20130623_rangefinders_160asa_3.jpg


Regarding my expectations. I know that grain is part of film photography. But I think there's more grain in these photos than there should be. I don't think grain is excessive with film cameras and non-existent with digital cameras. As you can see from the photo at the start of this thread, bad exposure settings will yield excessive amounts of grain. If I can do worse, it stands to reason that I may be able to do better on my settings to yield less grain.

So that you can understand better what I'm saying, look at the photograph below. It was taken two years ago in the Cinque Terre area of Italy with the same camera and lens, with Kodak Portra 160NC.

russelljtdyer-160asa-cinque-terre-20110414-rangefinders-1.jpg


This photo has nice clarity to it without the clinical feel of a digital camera. Somehow I lost that level of image quality. This is what I'm trying to get back. Below is another shot in the same town and day, the same camera and all, but in an alley with a range of lighting like similar to the scene in Genova.

russelljtdyer-160asa-cinque-terre-20110414-rangefinders-2.jpg


This scene didn't have as wide of a range of lighting as the Genova alley, but it wasn't brightly lit either. And I still have the same level of clarity and image quality in this shot as the previous one of that day. Maybe it's because the photos were developed by a different lab and put scanned by them badly onto a CD, as David Hughes suggests above. I'm not sure. My point is that it's possible for me to do better and I want to figure out how.

This afternoon I've set up my home photography studio. I have a friend coming by later for me to take her picture. I'm going to take a series of photos of her with my Zeiss Ikon camera and Kodak Portra 160 film, and use more than one lens. I'll record the exposure settings of each photo to review later. I'll try photos with the ASA set on the camera at 100 and 200 and the two settings in between to see the results. I'll try shots with the shutter speed set over and under what the camera's light meter recommends and I'll use my Sekonic L-358 light meter to determine the exposure settings and bracket too those settings. Hopefully, I will find the sweet spot and determine where I've been going wrong. I have a few hours before she arrives, so anyone who has suggestions of what else I may try during this test session, please let me know soon. Thanks in advance.
 
It looks like the scanning is your issue, the shots from Genova have an odd blue cast that I don't get from Portra 400. You have a great lens on your ZI, great film, and a great scanner, so try using that scanner. I mostly scan color slides with my V700 rather than color negs, but the tones are great. I use Vuescan but many people enjoy the Epson software as well. Scanning (and editing in PS/LR/etc) takes some practice and you'll get results closer to your vision with time.
 
Well, 400 is probably going to have more grain than 160 but this and the colours are too far off. I fear you have a serious exposure issue. And the result is worse because of the way colour film is developped and printed (and scanned).

When your exposure is off the printing part of the process is going to try to compensate. This will make that the colours are off.

From your story I cannot really understand well which shot is taken based on what reading. Do you let the camera expose automatically? Do you use a lightmeter? How do you use the lightmeter? etc.

You really need to get some system and rigour into it if you want to understand it at all. I would first of all switch to slide film. It has far less lattitude and the developement is standardised and there is no printing stage. What you get is what it is. Any problem in exposure will stand out pretty fast. And note each and every setting: diaphragm and speed and iso and metering and lens used. If you can, together with what your lightmeter says and how you used the lightmeter (incident or reflective on what part). That will be the only way to get something meaningfull out of it.

My take on the photo's you posted is:
1: severely underexposed
2&3: about right, maybe a bit overexposure
4: overexposed and corrected during printing
5: slight underexposed and corrected
6: about right
7: a bit overexposure

OTOH neither of the photo's you posted are easy subjects for automatic exposure doing it perfectly. Almost all have a very large range from deep shadow to bright sun. The only one that doesn't is the one with the boats and it shows. If you want the colours right, the exposure has to be spot on. Underexposed and the blues will begin to dominate, overexposure and the reds will come out.
 
It seems like there is an issue with the metering in your camera.

Have you tried other metering modes to see if the problem goes away? I would personally shoot a roll using the in camera meter, and manually setting the exposure (no auto exposure), and check the meter reading against a hand held meter. Are the batteries fresh too?
 
Good idea Anthony, about using my scanner. While waiting for the model to arrive, I've been trying to scan one negative of the photos above from Genoa. I can get better clarity, but I haven't figured out how to get good color. I need more practice using VueScan to know the right combination of settings. That may help plenty.

I think you're right, Spanik, that my exposure settings is off. Yes, I need to go back to recording my exposure settings--I've gotten lazy about that. I use mostly the automatic setting for the shutter speed--I hardly every manually set it. Once the exposure is wrong, you're right, it gets only worse from there. Thanks for the assessment of each photo.

That's a good idea, tunalegs about going manual and using my Sekonic meter. I just made a spreadsheet to record the settings recommended by the camera's meter and my external meter. I do have fresh batteries in the camera.

The model is here now. I'm about to start photographing. It will be a couple of days before I'll see the results, though. Thanks for all of the advice and ideas.
 
My Zeiss Ikon meters very well but I use it on manual settings most of the time and the exposures come out quite well. The few times I have used it on Automatic I purposely dial in an extra stop of exposure using exposure compensation because it seems to want to underexpose a bit that way.

But, to be honest, you are going to have to do some meter testing with your camera to figure out what you have. I have three 8x10 cards I bought from BHPhoto (available from other sources as well) that I use to calibrate my metering. One is white, one is black and the other is gray. The cost is very reasonable.

I use an ISO 100 setting, but in your case you may want to use ISO 400 since you use a lot of Portra 400. I start with the gray card and stick it to the wall of the house outdoors in the sunlight. I then meter the card with the camera's meter. This will tell me what my camera's meter believes the correct setting is for 18% gray. This may be f16 and 1/125 at ISO 100, or it may be f11 and 1/125 at ISO 100, or it may be something else entirely. With the meter on my YashicaMat it reads between f8 and f11 at 1/500 with the Arista EDU 400 film I typically use. So I know that this camera wants to overexpose everthing about 1 1/2 stops.

I then move on and meter the white and the black card. I expect each of those to at least 3 stops different under the same lighting conditions, one below my gray card reading and one above. If that happens, and this does happen with the YashicaMat, then I know the meter is consistently off. If it is consistently over exposing I know I can use it freely by consistently changing the exposure to offset the over exposure. If it is not consistent, and I have had this happen as well, then I know that I should just ignore the camera meter and work with a handheld meter instead.
 
Last edited:
Playing with the Scanner

Playing with the Scanner

The model has gone. We took two rolls of film. Both rolls were taken with the same settings and positions. I'll get one roll developed by the store that developed the Genoa pictures and the other by the store that developed the Cinque Terre pictures, since those look fine. If the quality is still fine at that store, but the quality is still off at the other store, then maybe their processing and scanning is part of the problem.

After the model left, I went back to scanning one of the negatives from the roll of film I took in Genoa. Below is the best I've managed to achieve. To help you to compare, the second photo below is the photo from above again. I need to understand how to scan better, but I think this is better than what the store gave me on a CD. The colors seem to be truer, at least from what I remember. The water looks better to me. There seems to be more clarity in this image than the same one above.

russelldyer_20130623_rangefinders_160asa_6.jpg

Scanned at Home.


russelldyer_20130623_rangefinders_160asa_1.jpg

Scanned at the Store.
 
I just made a spreadsheet to record the settings recommended by the camera's meter and my external meter. I do have fresh batteries in the camera.

Take this together with
I have three 8x10 cards I bought from BHPhoto (available from other sources as well) that I use to calibrate my metering. One is white, one is black and the other is gray. The cost is very reasonable.

...I start with the gray card and stick it to the wall of the house outdoors in the sunlight. I then meter the card with the camera's meter. This will tell me what my camera's meter believes the correct setting is for 18% gray. [Spanik: measure then with your Sekonic and note both in spreadsheet]...

...I then move on and meter the white and the black card. I expect each of those to at least 3 stops different under the same lighting conditions, one below my gray card reading and one above. [Spanik: again each time followed by a handheld metering and spreadsheet entry]

It will probably take and afternoon but it should tell you a lot. (but it won't use any film) Just take care you read your internal meter and handheld meter in the same situation. Best would be if they see nothing else than the card in question. Otherwise you could have an error because of the different angles of view. Might be a good idea to do this with 100 and 400 setting in case your meter is correct for 100 but not for 400.

Now if after that your internal meter and handheld meter are in agreement you will have to test with film. But at least you'll know where to look.
 
Russell, the color on your scan does look more realistic. In addition to spanik's very helpul suggestion, I would recommend experimenting with the feet on the bottom of your scanner's film holding tray to adjust height. After trying all three settings, I found that scanning with the feet removed got me the sharpest scans. The lab's scan does look a bit sharper than yours, but that could be from the horrendous oversharpening that many labs add.

The ideal film height for my V700 is likely between two of its three settings, and the Betterscanning trays can accommodate this with their greater adjustability, but I don't think I need them for my V700. Something to consider, though.
 
russelldyer_20130623_rangefinders_160asa_2.jpg


This second shot was taken with the same camera, lens, and film. I think I put the aperture to f/5.6 at this point. Since this was taken in an alley, it was much darker. However, I had the camera on Aperture priority. The Zeiss Ikon has a good meter and should adjust properly the shutter speed to these conditions, but this image seems too grainy. .

The image shows underexposure, if you look at the shadow areas you'll notice they are noisy and blue. The blue layer is at the top of the stack of emulsions and normally receives light first.
The scene is dark at the edges where your lightmeter takes less reading from (presuming centre weighting) leaving the centre (bright part) correctly exposed and the shadows with little detail.
What I do in this situation is meter for the emerging detail (say under the shop window on the RHS) then stop down two stops. The detail should then be printed/scanned almost black; underexposure and subsequent lightening during scanning or printing will increase the appearance of grain and introduce colour casts.
So my prognosis is underexposure and pushing in post.
Hope you don't mind but 10 seconds in PS pulling up the shadows in curves produced this (unacceptable still) result.

151063592.jpg

All I've done is made the parts that should be black conform to that.
 
Hello russelljtdyer.
When I take your home-made scan of the sailing ship into Photoshop an apply Auto Colour and Sharpen to it I end up with the same false colours and the same added sharpness as in the picture you received from scanned from the store.
So it seems that all you get for your money from that store is "auto-everything-and-we-do-not-care-too-much-what-happens".
 
Back
Top Bottom