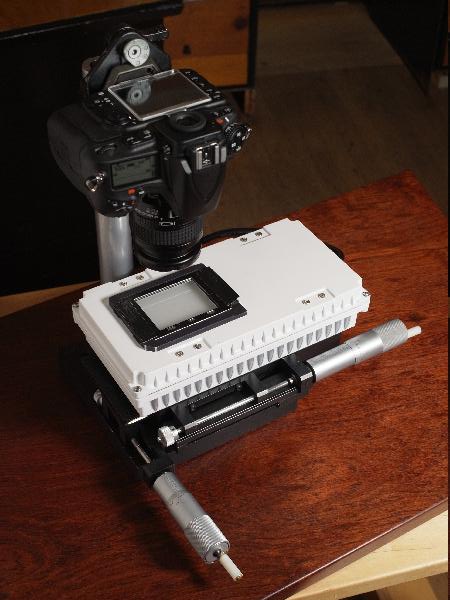
Constructing the definitive DSLR scanning setup. Communal effort!

I've read through the thread and my big question is how good can dslr scanning be? Can it match or exceed a Nikon 9000 and offer faster scanning, as well as providing security against the day the 9000 reaches its end of life?

Mike
 
^the detail results are great. There have been tests done vs drum scanners. The main issue is getting a good color profile. For color negatives. If there's not a easy plugging per emulsion, you'll be in post forever
 
I've read through the thread and my big question is how good can dslr scanning be? Can it match or exceed a Nikon 9000 and offer faster scanning, as well as providing security against the day the 9000 reaches its end of life?...
This is also discussed in the article I linked in post #58.
 
Several methods of doing that are discussed at length in the article I linked in post #58 above.

Thanks for that article, which I'd missed.

As usual from LuLa, a very thorough discussion of several techniques, but I'm baffled why they don't discuss using ColorPerfect for the final color conversion? Especially as they use MakeTiff (ColorPerfect's 'sister' application) for creating linear tiff files.

I asked the developer of Iridient Raw Dev about outputting linear tiffs from that application (Mac-only) and apparently that's supported. Together with that application's support for Olympus Pen F's stitched sensor-shift Raws, I'm really wondering whether this may be the best way to go for DSLR scanning at the moment?
 
I've spent the greater part of two days trying to make good "scans" with a BEOON that I bought from someone in Oz. It looks good: spotless with no scratches. The BEOON is a simple and effective solution for camera digitalization — and can be inexpensive if you get a good deal. It's small, solid and solves the problem of having the sensor plane parallel to the plane of the negative or transparency being digitalized.

However, using an M-Monohrom, and trying two 50mm lenses (Summilux-50 pre-ASPH and the DR Summicron) and, following the Leitz instructions in setting the lens at f/11 and the focus at infinity, I've found it extremely difficult to hit focus as well as negatives that were scanned for me on an Epson V800 at a small lab in Chiang Mai. My feeling is that the BEOON would work much better for someone using a camera with live view.

As I can't spend more time on this, I'll probably decide to sell the BEOON, at the same low price at which I bought it. I'm not about to buy a a variety of the Sony A7 just to use with the BEOON.
 
To bring this up to date: I figured out the problem with my focusing: I was stupidly setting the lens to f/11, which is the aperture the BEOON manual states should be used for copying; but, of course, the lens should be set to it's maximum aperture (f/2 for the DR Summicron) for focusing, and then stopped down — that gives perfect focus every time.

Incidentally, I find that the BEOON/MM/DR-Summicron gives substantially more dynamic range than the scan I have that was done with the Epson V800.

Still another problem, though: I found that, in the lower-left corner, there is an long, narrow, empty triangle, which I have to crop out. On LUF, someone found the same problem and stated that he could clearly see that it's due to the camera being not quite well aligned with the mask that frames the slide being copied.

That is likely to be the reason: I found that, while the BEOON I bought looks prefect, there is slight play when the camera is mounted — the tiniest amount of movement (minuscule rotation), clockwise and counter-clockwise. However, when I took two pictures at the extremes of this play, the cutoff triangle got larger in one direction of rotation, but it still remained, smaller, at the other direction of rotation.

I wonder whether there is any solution to this? If there's no solution, then it's clear that the BEOON is best when used with a camera that has live view.
 
Having been a long-time member here, I feel that I should share my DSLR setup...

First of all, here is a picture, click it to see a larger version:


Here are three more links to more pictures:
http://drtebi.com/dump/rangefinderforum/DSLR-Setup-2.jpg
http://drtebi.com/dump/rangefinderforum/DSLR-Setup-3.jpg
http://drtebi.com/dump/rangefinderforum/DSLR-Setup-4.jpg

I will try to keep it short, here the "strategy" I applied to this project:

Scanner (Camera & Lens):
Nikon D810. For the price and resolution it seemed the best choice at the time (2015). Lots of lens options available.
Nikon 60mm f/2.8 AF-D Micro lens. Really great macro lens, especially for the (used) price.

Hardware
I am a sucker for the "business & industrial" section of eBay. There are many great deals to be found for super-solid hardware that can be used to build a stand.

The rod and base is a "Newport 14" Rod with 370 Clamp and 8x8x1" Platform". I believe this equipment is used in laser/optical test labs. It's very heavy and solid. I made a simple adapter plate out of aluminum that is screwed to the clamp, and on the other side I mounted a "Manfrotto Bogen camera tripod quick release clamp & 030-14 hexagonal plate". The clamp can be adjusted in height, just enough for a 6x7 1/4 (when I stitch 4 images).

The lightbox is a box found at our "Building Resources" place. More on that later.

The lightbox sits on a non-brandname X Y Table with 2" Adjustable Travel into either X/Y direction.

Light
This is where I went a bit off the beaten path. While many use light pads or LEDs of some sort, I decided to use Solux MR16 True Daylight halogen bulb (4700K). This decision was made after reading through a post on the landscape photography forum where the importance of CRI is heavily discussed. It convinced me, and I am getting fantastic colors (much better than my Minolta MF film scanner).

The difficulty however is, to diffuse the light correctly. I ordered a sample pack of diffusion panels from Acrylite, and played around until I had it fairly even. It was OK for slides, not so for negatives. However, I later learned how to completely compensate for the error through software, which is described here. I do pretty much the same with the PhotoShop alternative "PhotoLine". It takes quite a few extra steps, but I can do it pretty fast now.

Software
For "one-shot" scans, meaning I shoot a digital picture of the entire frame, I use PhotoLine to open the images and apply the light source adjustment technique

Then I use the ColorPerfect plugin to convert the image to a positive. I have tried many many other methods for the negative to positive conversion, and while it sometimes worked, I never got consistent results. ColorPerfect is the only software that works for me, every time.

Nevertheless, once I have the ColorPerfect converted image, I go back into Linux and run the free LightZone program (also available for Mac/Windows) for final editing. I love the workflow of this program, and am very happy with the results.

Examples
Rather then fill this post with large images, please take a look at these images on Flickr, which are all in "4K" resolution, so plenty to explore:
https://www.flickr.com/photos/drtebi/albums/72157653529648714
Those were all one-shot scans from Fuji Reala 100 film, shot with a Plaubel makina 670.

Here is a one-shot DSLR scan from a Provia 100F slide, same camera:
https://www.flickr.com/photos/drtebi/19044135543/

I will follow up with a couple of links to full-size images, and also of 2×2 scans and how I stitch them...
 
DSLR Scans

DSLR Scans

As promised, here a follow-up with full-size picture links and a description of my stitching method.

I start by taking four shots of a medium format negative or slide with the setup pictured in my previous post, but the camera moved in closer to the light table. The four shots are from the bottom left and right, then from the top left and right, with a slight overlapping.

I use the XY table to move the lightbox (which is mounted to the XY table) into the appropriate positions. After some experimentation, I realized that the stitching program actually works better when the overlapping is small, rather then large. I would estimate about 10% overlap works well, if not even less.


Further it is important to put the camera into manual mode. All four images need to be exposed exactly the same. If possible, I let the camera use autofocus, which in some situations is difficult (e.g. if there is only sky).

Otherwise the camera settings are: Aperture of 6.3, Kelvin white balance of 4700K (which corresponds to my halogen light bulb), matrix metering, 64 ISO, Image Quality is RAW, and the Image Area is set to 5:4, which works best for 4 "tiles".

The stitching program I use is called "Image Compositor". It's a free program, from Microsoft. I have tried the praised Hugin stitching program, but found it to be overly complicated; I had difficulties getting good results. Image Compositor on the other hand is extremely simple and straight-forward, with only a few setup options. Of the 20 stitches or so that I have made, there were only one or two where the stitching did not work. I highly recommend the program. Unfortunately it works only on Windows (I run Windows from within Linux... cumbersome, but works).

The one caveat with Image Compositor however is, that it does not stitch RAW files. Thus I have to convert the original scans to TIFF files first. It is best to simply open each negative in a RAW editor, and save the negative as a TIFF; in other words, it has not worked for me to convert the negative to a positive before stitching.

Once the TIFF files have been created, I open Image Compositor, click on "New Panorama from Images", import the four TIFF files, and let it do its magic. Then I export the stitched file as a TIFF. That's it, there are no other settings necessary.

Next I use PhotoLine to open the stitched image and convert it to a positive with ColorPerfect.

My final edits are then all done with LightZone.

I am very pleased with the results, although I wish the stitching could be done with RAW files—the colors of my one-shot images usually turn out better than the stitched images.

Examples
Here a few examples. All are in full-size, JPGs with "high quality", converted from the original TIFF file. They are not sharpened, only minor level adjustments have been made, and most have their dust specks removed.

Click on any of the small images to see the full-size image. The small images look blurry, not sure why... I promise the big ones don't!

These are all big files, so be prepared for that...


A creek in Nevada near Capitol Reef. Shot with Plaubel Makina 670 on Fuji Provia 100F, 4x1 DSLR Scan:


An occupied house in Berlin. If you look very closely, you can see a bit of a stitching error in the center of the image, right on the corner window of the first floor, 4x1 DSLR Scan:


Zeche Bochum, Germany. Once a steel factory, now a museum. I am from that area... Shot with Fujica GW670 on Ilford FP4 Plus, 4x1 DSLR Scan:


And finally a one-shot image, not a stitch. A San Francisco Victorian near Buena Vista Park. Shot with Fujica GW670 on Fuji Reala 100, one-time DSLR Scan:


I hope this helped some of you who are investigating the DSLR scanning route. In my opinion, it is totally worth it.

Please don't hesitate to ask questions or critizise my setup. I am always looking for improvements.

And please share your own experience and DSLR scans.
 
Thanks so much for the excellent posts! Exactly what I hoped for when I started the thread. And really interesting to take a close look at the large images - get a much better idea of what's possible with this sort of setup.

I don't have an enormous amount to comment on just yet - I'm curious about the micro-adjustments you can make with the clamps and base - but otherwise I have a couple questions about the images, which are really detailed and nice.

1. I noticed there's some texture in the sky of the Berlin image - it's most visible at the extreme left side. Is this something that's showing through from the light-table underneath? Could it be avoided by a diffusing glass of some sort, or by increasing the distance under the negative?
2. The Berlin image also has some chromatic aberration where the building meets the sky. Do you think that's from the original shot? (poss a stupid question).

Very, very nice and detailed explanation of your setup! Thanks for sharing!
 
DrTebi: for what purposes you need such big "scans"?
I abandoned this method when I realized that I need scans only for preview and web presentation.
 
"Well, if you use a enlarger column and base board, chances are that they came with a free enlarger head - a very high quality light source for exactly the right purpose."

That's pretty much the long and the short of it. This is not a scan vs enlarger argument either, it's just that if someone wants to make things simple and get fantastic results, use that enlarger to make beautiful fiber prints. If you're not making prints for some odd reason, and only doing web posting, any low line scanner will work fine. I used a $40 Epson 2450 flatbed for many, many years before I went totally darkroom. From 4x5 down to 6 x 4.5 they're incredibly good, and even 35mm negs can be used very effectively for digital web sourcing or printing. There are lots of existing examples on the web of high quality scans from this old scanner.
 
While admiring DrTebi's setup, my solution is to use an essentially "off-the-shelf" setup, the sturdy Leitz BEOON copy stand for M-Mount cameras (pictured in post# 21 above). After following the thread Revisiting 35mm Film Scanners I decided on "camera scanning" using the Leitz BEOON copy stand. My objective was to scan at a high resolution so that I would not have to rescan later if I wanted to make large prints — also the ideal solution would be portable, as I'm a nomad that moves annually between Asia, Europe and North America, so that I wouldn't end up with three scanners.

In considering scanners, I rejected using equipment that was no longer produced and that required old operating systems. That eliminated the Nikon and Minolta scanners, as well as the Pakon scanner, which in any case was designed with a resolution suitable only for small prints. I also rejected using the Imacon Precsion III that I have, and which I can run with an old Mac, because it requires frequent service. It required servicing as soon as six months after I bought it some 15 years ago — and it continues to have problems. For this reason I wouldn’t buy the new Hasselblad scanners, even I was willing to send that much, because they use the same type of feed system, and rollers and bets often have to be adjusted or replaced. That left the either the Epson or the Plustek scanners. The problem with the Plustek scanners reportedly is that the dynamic range is as low as 3.6, and 4.0 can be achieved only by multi-scanning, which takes some 20-25 minutes per frame.

Then I tried the BEOON, at first with a DR-Summicron lens using the M9 and M-Monochrom. I found that the dynamic range with this setup was substantially better than that of the Epson 800 and similar to that of the Imacon Precsion III (i.e., looks like very close to 4.2 dynamic range). The maximum resolution on this Imacon is 6300 dpi and takes 15 minutes per scan: the resolution of the BEOON setup is a little less, but I don’t find the difference compelling.

While the results with the BEOON/DR-Summicron combination was satisfactory, I then tried the Leitz Focotar 2 enlarging lens. Essentially, the DR-Summicron has some field curvature while the Focotar 2 does not. In the corners the Focotar 2 san have slightly more sharpness; but the difference is so small that I haven’t needed to rescan any of of the final scans I had made with the DR-Summicron.

With the DR-Summicron I used f/11, as specified in the BEOON manual: I found that there is no deterioration from diffraction in going from f/8 to f/11 with this lens when used as a macro on the BEOON. Then, I tried the Focotar 2 at f/5.6, f/8 and f/11, and found that f/5.6 and f/8 are virtually indistinguishable; the scan at f/11 may have very slightly less sharp grain than at f/5.6 and f/8. For the time being I'm scanning with the Focotar 2 at f/8. Focusing the BEOON is easier at f/2 with the DR-Summicron and requires more care with the Focotar 2 at f/4.5.

Here are some tips on using the BEOON:

1. Obviously, the lens should be focused at it's maximum aperture and then stopped down for "scanning."

2. I connect the M9 or MM with a USB cable to my Mac. That makes it much quicker to transfer the DNG files to the computer, since you don't have take off the bottom plate and remove the SD card.

3. I set the M-Monochrom or M9 to "Mass Storage USB Connection), and connect the camera with a USB cable to the Mac: this shows the SD card on the Mac desktop; then I simply drag the DNG files to a folder, and open and invert the Images in Photoshop; then save positive TIFF images that I import into Lightroom.

4. I set the shutter at "A:" this gives a good flat image that is easy to process in Lightroom for the tonality and gradation that you want.

5. For 1:1 scanning of the full frame with the Focotar 2 use the BEOON B+C+D extension rings.


I haven't seen any difference in scans with the M9 vs those with the MM, but I've only digitalized Tri-X and l generally go for a high-contrast look. I'd be interested in learning what others have found.

Here is an informative article on Camera Scanning, which includes discussion of how to deal with color negative film, something I have not yet tried.

Below are two Tri-X pictures at ISO400 with stand development in 100:1 Rodinal for one hour. "scanned" with the Focortar 2.


Chiang Mai


Chiang Mai


_______________
Alone in Bangkok essay on BURN Magazine
 
DrTebi: for what purposes you need such big "scans"?
I abandoned this method when I realized that I need scans only for preview and web presentation.

I've been testing slightly bigger prints and would like to have the possibility of some very large prints in the future. I'd say that's the main use-case for this sort of setup - or at least one of them.
Others may also have other needs - I think it's a mistake to assume that everyone has the same end result in mind.

Yes, that is exactly one answer to the question why I scan at such high resolution.

But the other reason is, that I have a "4K" monitor since a few years now. It's actually the first one that was ever produced, an old IBM T221, a dinosaur today, but with an amazing 3840 x 2400 resolution. At that resolution you will definitely see the differences. I resize and sharpen the scans to fit this resolution, which gives me great on-screen images.

But even on the "Retina" screen of a Macbook a higher resolution makes a difference.

I really recommend any photographer to at least try out a high resolution screen to look at your photos, you will be amazed... (maybe just bring a USB stick to an apple store and try it there ☺).

And higher resolution screens have started to come to the market already, like the 5K screen (5120×2880) of the iMac or Dell monitor.

I have made many many comparisons of one-shot and 2×2 stitches, and I concluded that it is in most cases really worth it to scan at such a high resolution, even if you will "only" look at the final images on a 4K screen. My D810 does a much better job capturing detail in the stitched images... it seems to me, that the 36 MP are not enough to get out everything from a medium format slide or negative (considering all other factors that may influence resolution).
 
Thanks so much for the excellent posts! Exactly what I hoped for when I started the thread. And really interesting to take a close look at the large images - get a much better idea of what's possible with this sort of setup.

I don't have an enormous amount to comment on just yet - I'm curious about the micro-adjustments you can make with the clamps and base - but otherwise I have a couple questions about the images, which are really detailed and nice.

1. I noticed there's some texture in the sky of the Berlin image - it's most visible at the extreme left side. Is this something that's showing through from the light-table underneath? Could it be avoided by a diffusing glass of some sort, or by increasing the distance under the negative?
2. The Berlin image also has some chromatic aberration where the building meets the sky. Do you think that's from the original shot? (poss a stupid question).

Very, very nice and detailed explanation of your setup! Thanks for sharing!
Well, you have caught me!

The Berlin image has not been "dusted". But I thought I upload it as is, to give you an idea of how much dust will show up.

I probably did not put a lot of effort into dusting the slide before the scanning either. But let me assure you that you can never get rid of all dust before scanning. Removing dust spots in post-processing is after all the most time-consuming part of the DSLR scanning.

Regarding the chromatic aberration, I believe this was an earlier scan, where I did not apply the light source adjustment yet. Here is the same image but scanned with my Minolta Dimage Multi Pro:
https://www.flickr.com/photos/drtebi/8524444038

The sky does look a lot better there... well, it's a learning curve, I am sure my setup could still benefit from many improvements!
 
I noticed there's some texture in the sky of the Berlin image - it's most visible at the extreme left side.
I just realized you were not talking about the dust... I am not sure where the texture that you see on the left side is coming from. As I mentioned before, it was an earlier scan; I also believe that this slide was already mounted, so it could actually be a reflection from the edge of the slide mount.

I have not noticed this problem in other scans of mine, so I don't think it is a "typical" problem with DSLR scanning, but was rather a "beginners error" on my part.

Cool. I hope you didn't interpret my questions as criticisms! I really like the quality of the captures, and the amount of detail is stunning. I just want to isolate the strengths and weaknesses of the technique compared to conventional film-scanning.

Thanks again for the detailed and really informative posts!

I interpreted it as constructive criticism, which I appreciate very much, how else can I learn what I need to improve...

I have done another scan today and paid attention to that texture problem—it did not re-appear. I assume it was a reflection from the slide mount.

By the way, you also asked about the micro adjustment dials. These allow me to move the lightbox (on which the negative or slide is mounted) from right to left, and forward/backward, or X Y as they say in the fine mechanic world. When I do a stitched scan, 2×2 images, I use those dials to move the lightbox into position. The numbers on the dials help me to remember previous positions.

For example, I start at the bottom left of the image, take a shot, and remember the X position. Then I move the lightbox via the dials to the bottom right, and take another shot. Now I move it to the Top right position, take another shot, and finally I move it to the top left position, dialing the X position to the same number as it was in the first shot. I hope that makes sense...

It doesn't have to be perfect, the Image Composite Editor does a really good job of aligning the shots, even if they are a little off. Great program for the price (free).
 
Back
Top Bottom