DrTebi
Slide Lover
In response to @danitoma, here a few detailed images of my film holder. Note that all images are linked to a full-size image, so click any image if you need to see more detail.
It was initially made for 6×7 slides. For 35mm film, it could be wider, e.g. wide enough to mount six negatives.
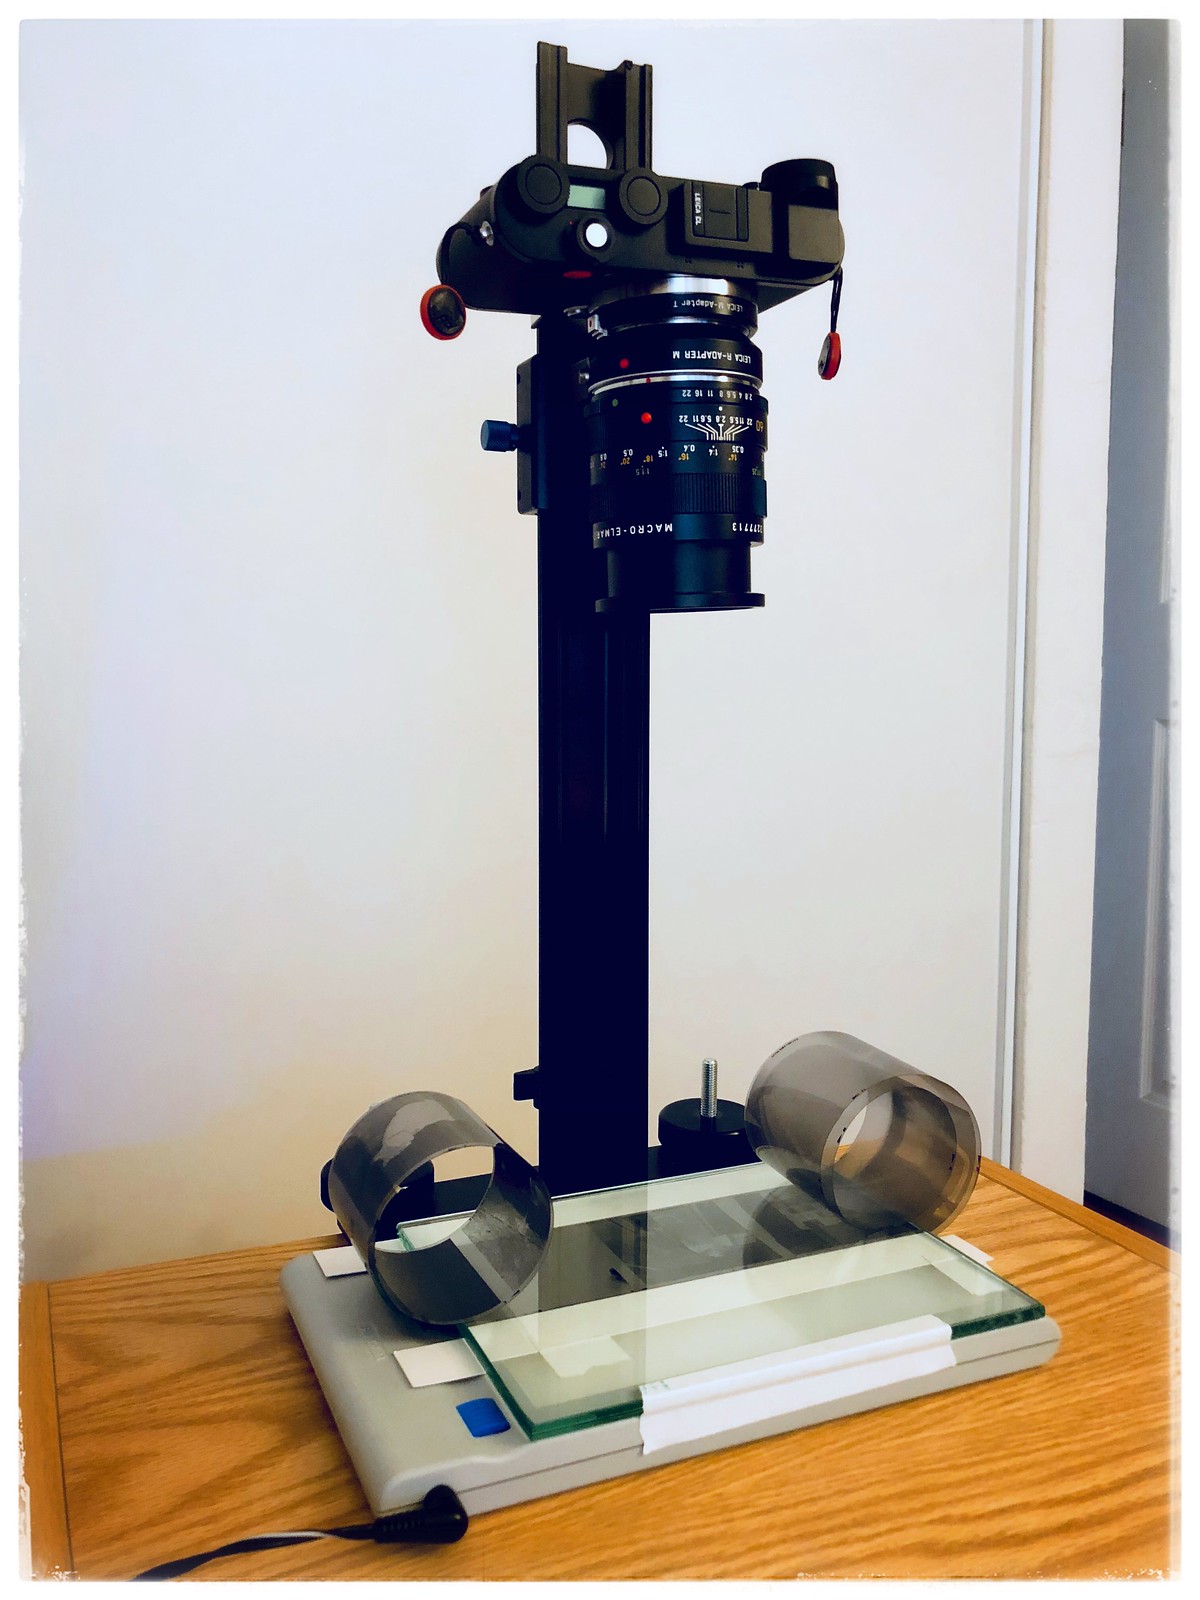
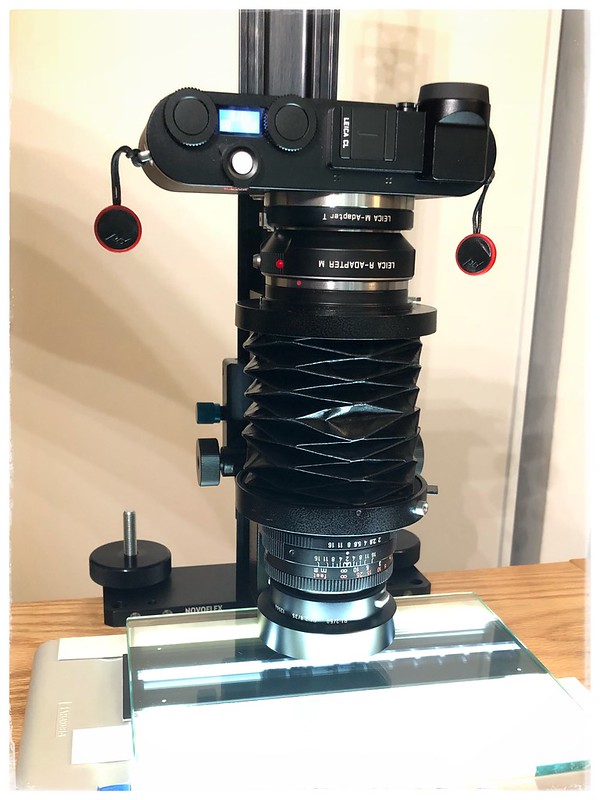
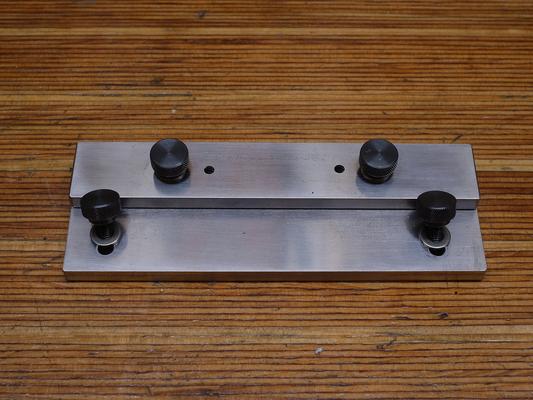
First a shot of the whole apparatus:
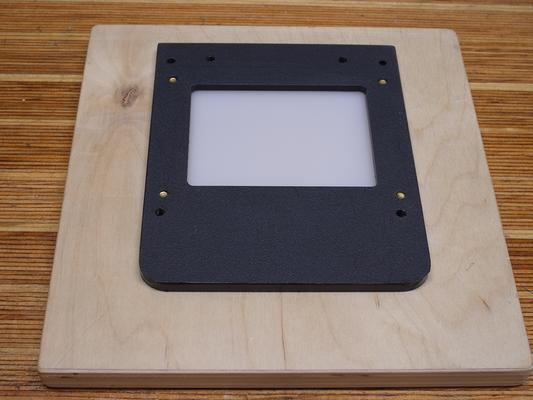
The base is just a piece of plywood, with a window cut-out, which is also beveled. Plywood is not necessarily ideal, since it is prone to shed off some dust. A few layers of shellac could solve this though. This is the bottom of said piece:

On top of that is a piece of hard plastic, about 1/4" thick. The plastic has a cut-out for a diffusion piece (also plastic). It is mounted into a recess on the bottom of the black piece. The plywood and plastic piece are screwed together. It is quite easy to drill and tap plastic, and holds well.
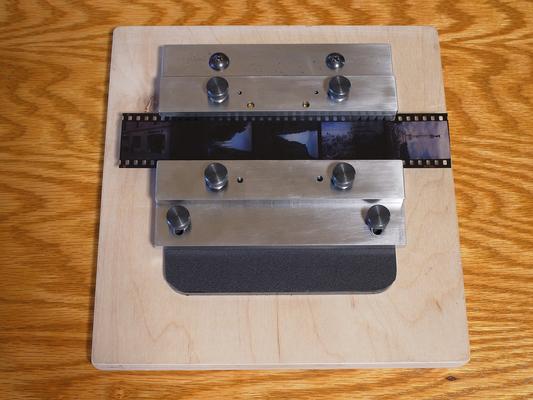
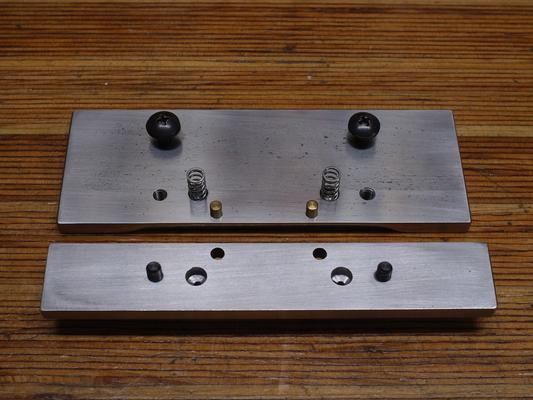
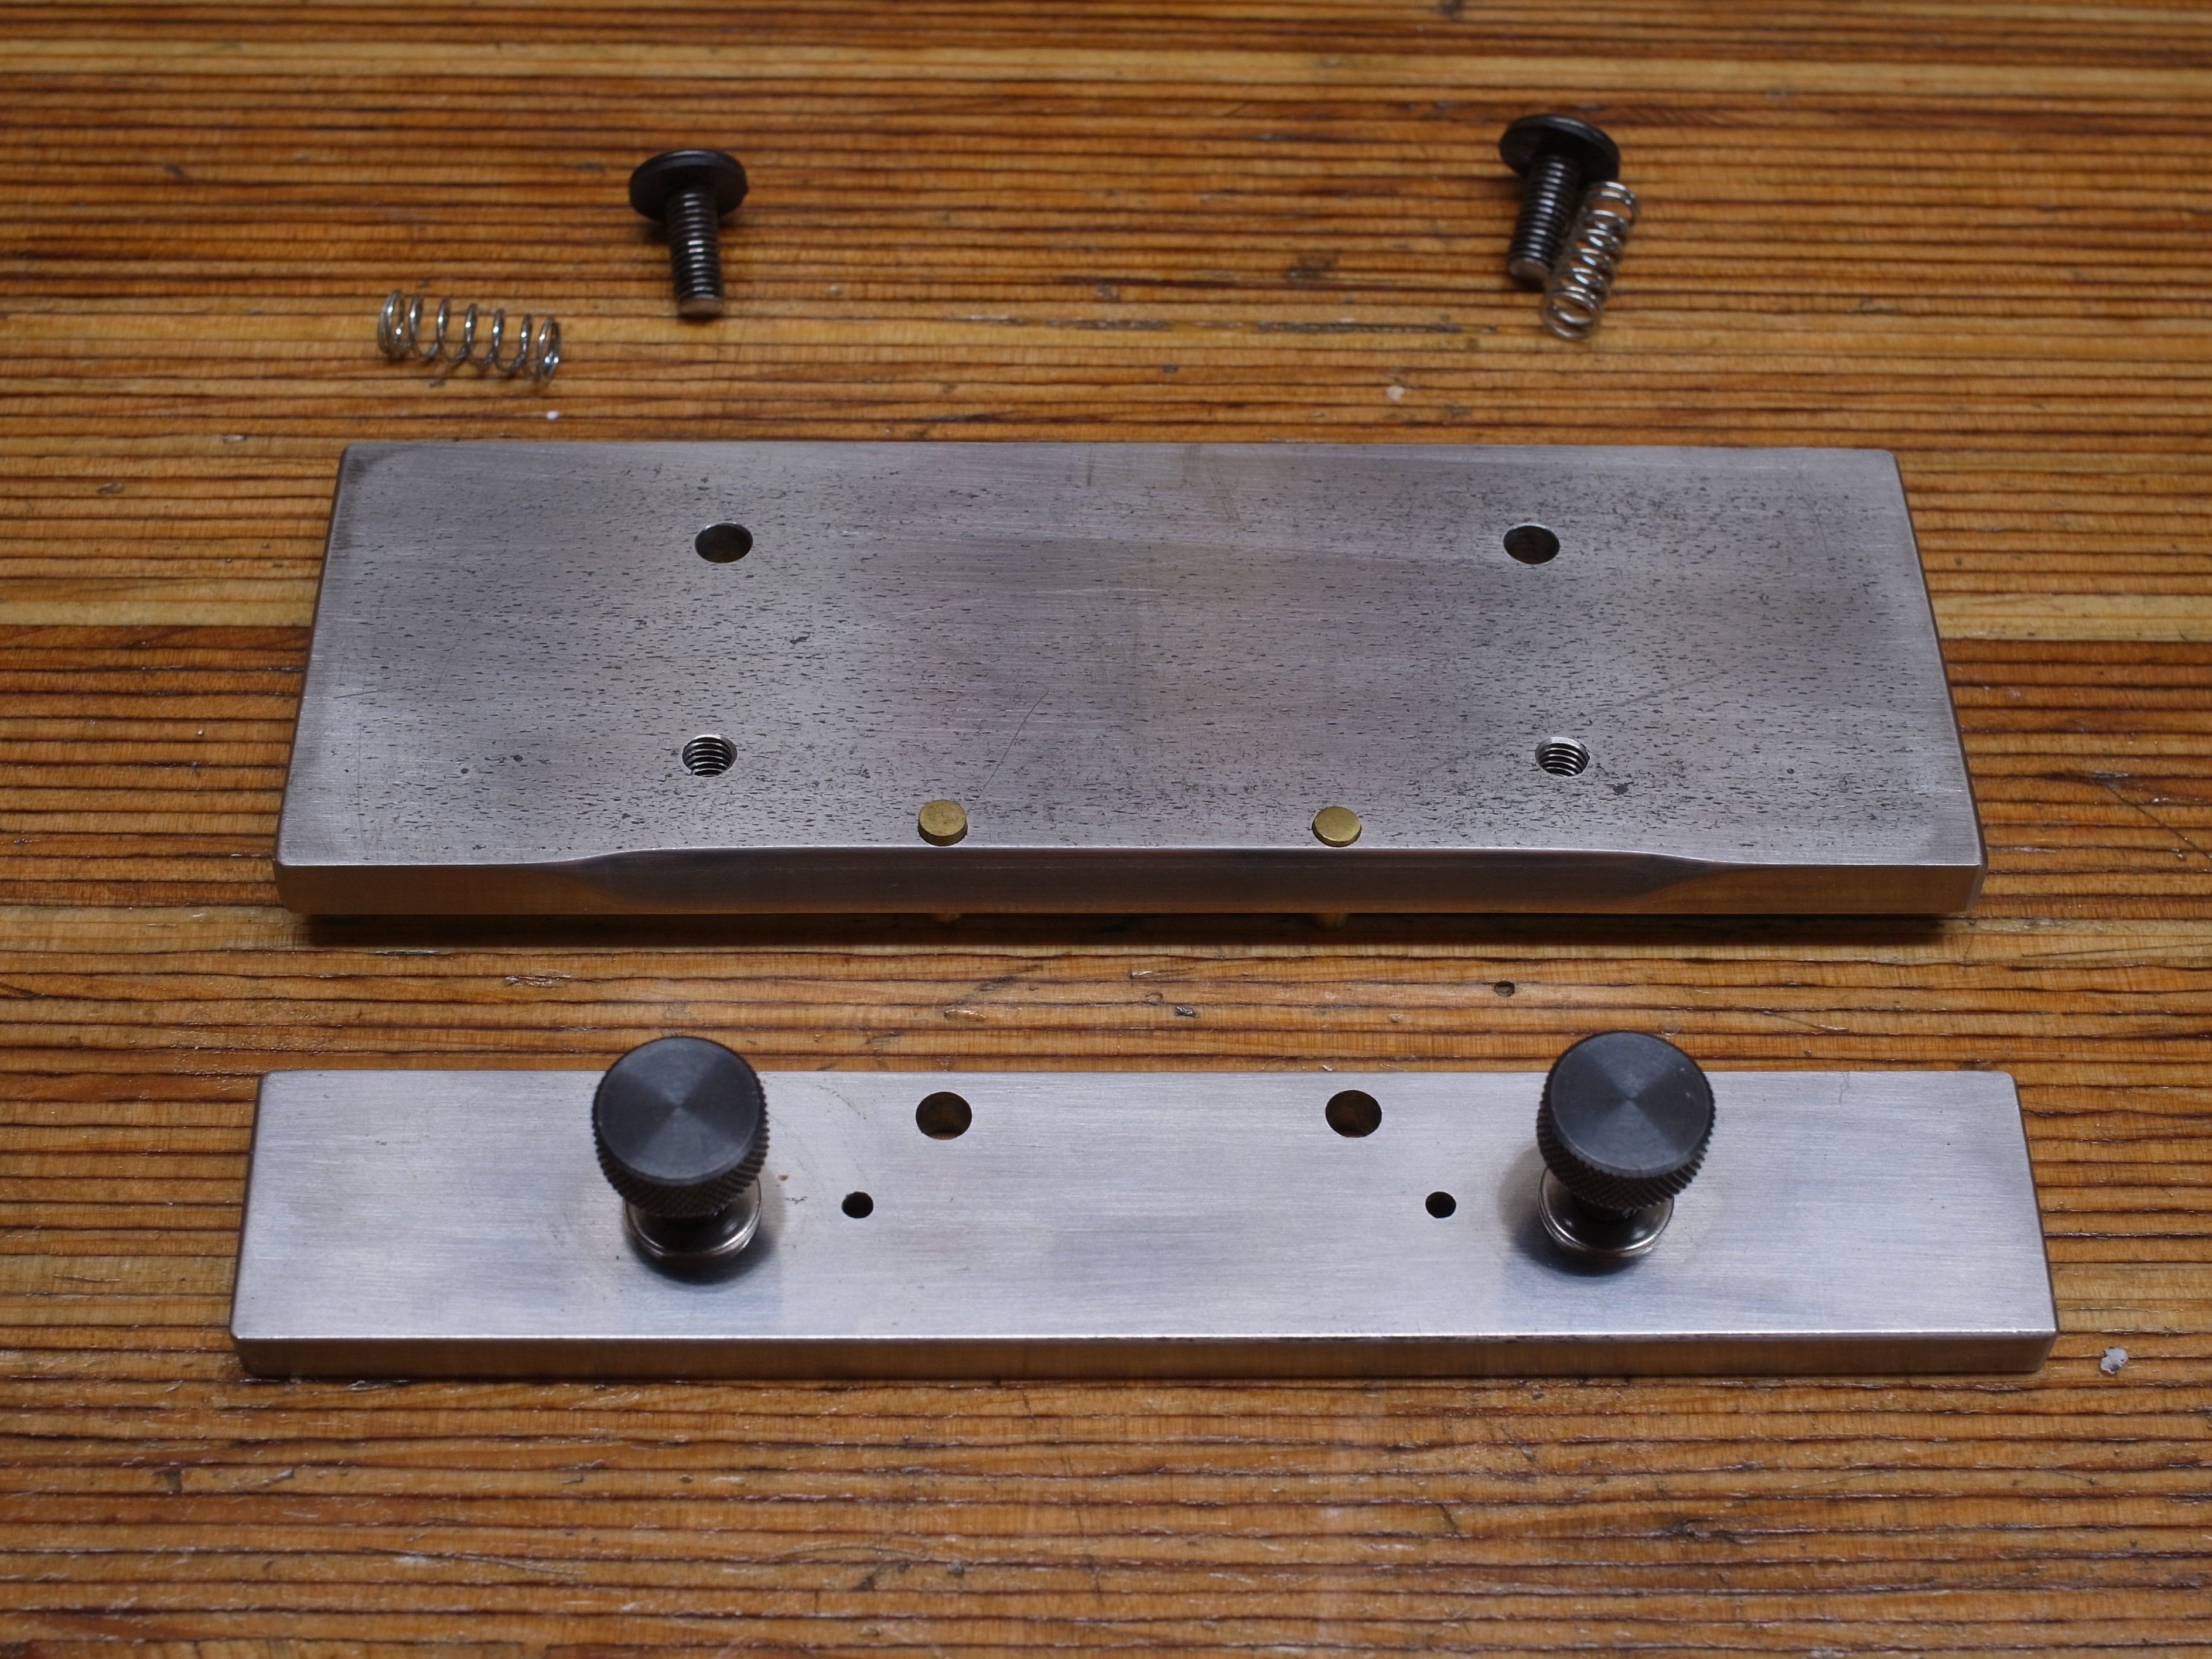
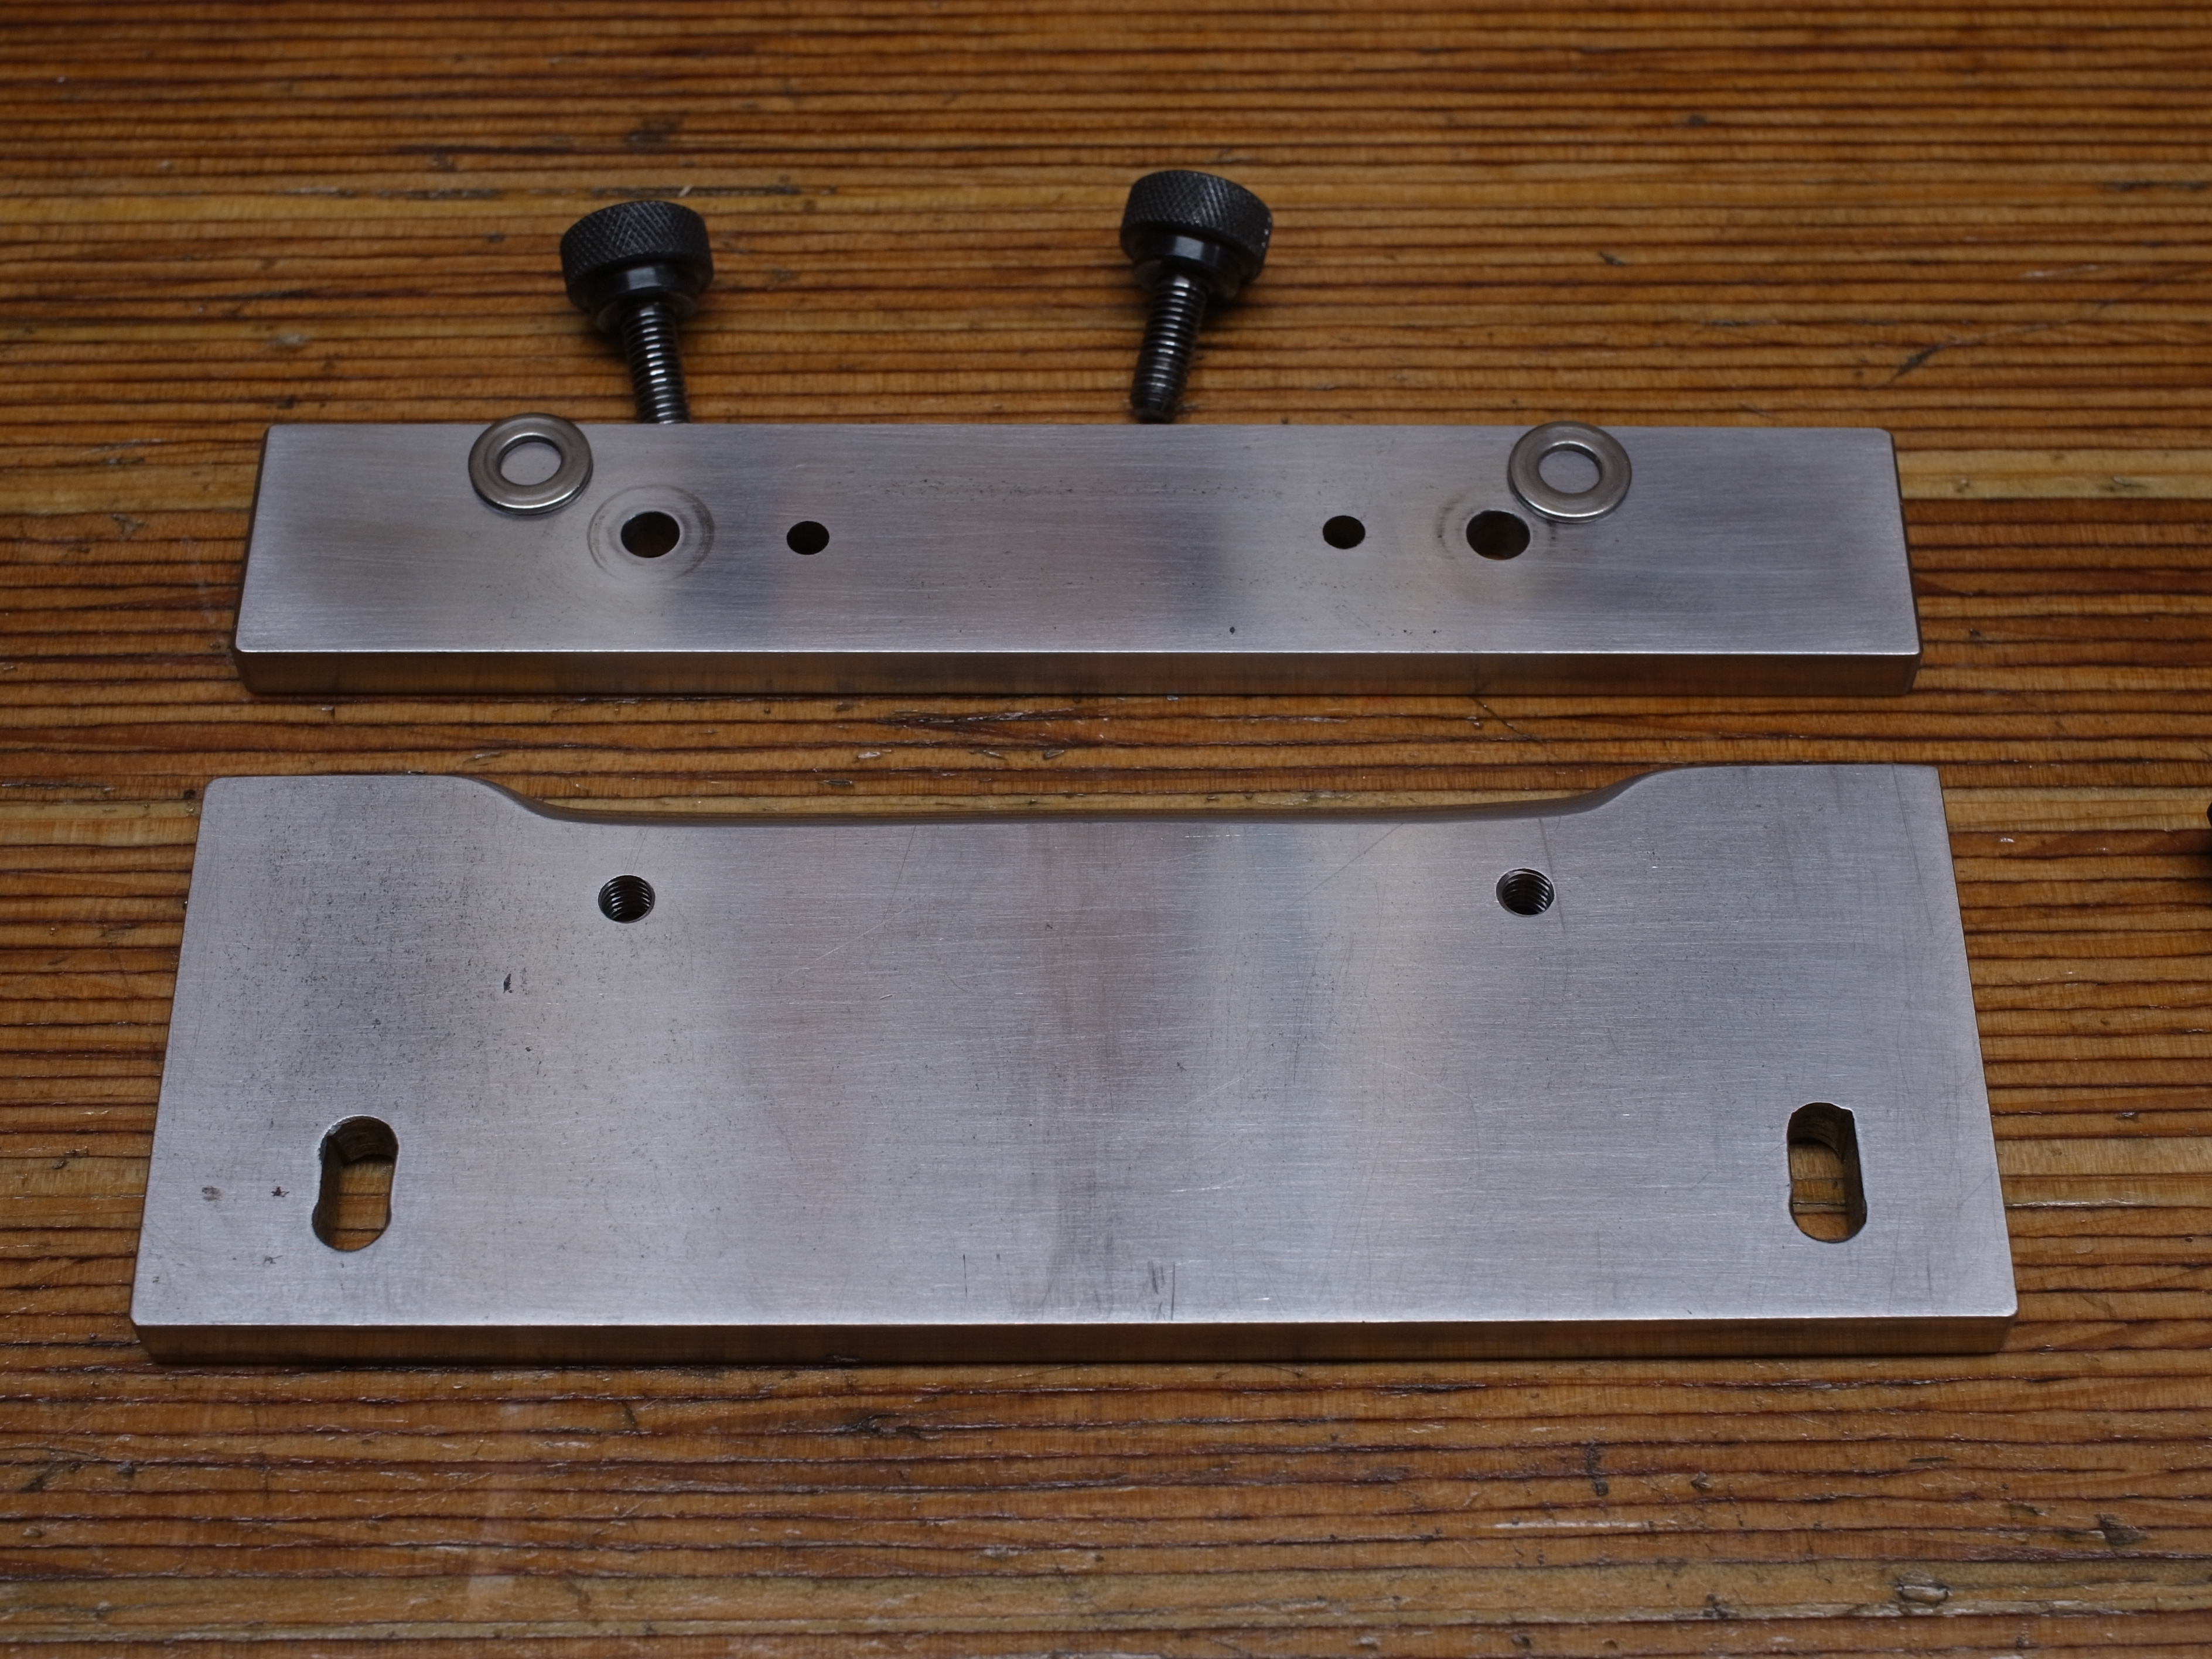
Now come the more interesting parts, the steel pieces that actually hold the film strip. These are 1/4" thick steel pieces, about 3/4" and 1 1/2" wide. A bit over 5" long. The bottom piece as two holes in the back; the black Phillips screws pass through into threaded holes in the black plastic piece. This holds the bottom piece to the black piece.
On the front of the bottom piece are two small holes for the brass alignment pins. These stop the negative from slipping in too far.
Then there are two threaded holes into which the thumb screws go, mounting the top piece to the bottom piece.
The remaining two holes are blind holes (they don't go through the entire steel piece). These fit a compression spring. Mating blind holes are in the top piece, so that the springs are actually trapped in these blind holes, and when mounting the top to the bottom, the springs push the top piece up. This makes it much easier to mount the negatives.
You will notice that there are tiny holes in the blind holes... I drilled these through the top and bottom piece all in one go, so that I would have a guide to where exactly to drill the larger blind holes... easier than trying to measure everything exactly.
Here the same pieces from the other sides. The alignment pins should ideally also sit in blind holes...

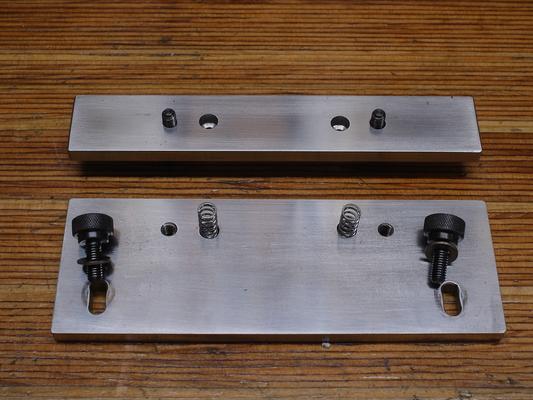
And this is the bottom part. For the most part it's the same as the other part:
It doesn't have the alignment pins, I figured the ones on the other part are sufficient.
As you can see in the next picture, there are again springs in blind holes.
The difference in this piece is, that the bottom piece is mounted through slots to the black piece. That way it can be moved back and forward. When I clamp a negative, I leave the bottom part loose within its slots, mount the negative between the top parts, then slightly pull down the slot-mounted part to flatten the negative, and finally tighten the piece to the black piece.
It sounds a lot more complicated that it is... just look at the pictures, it's fairly simple.
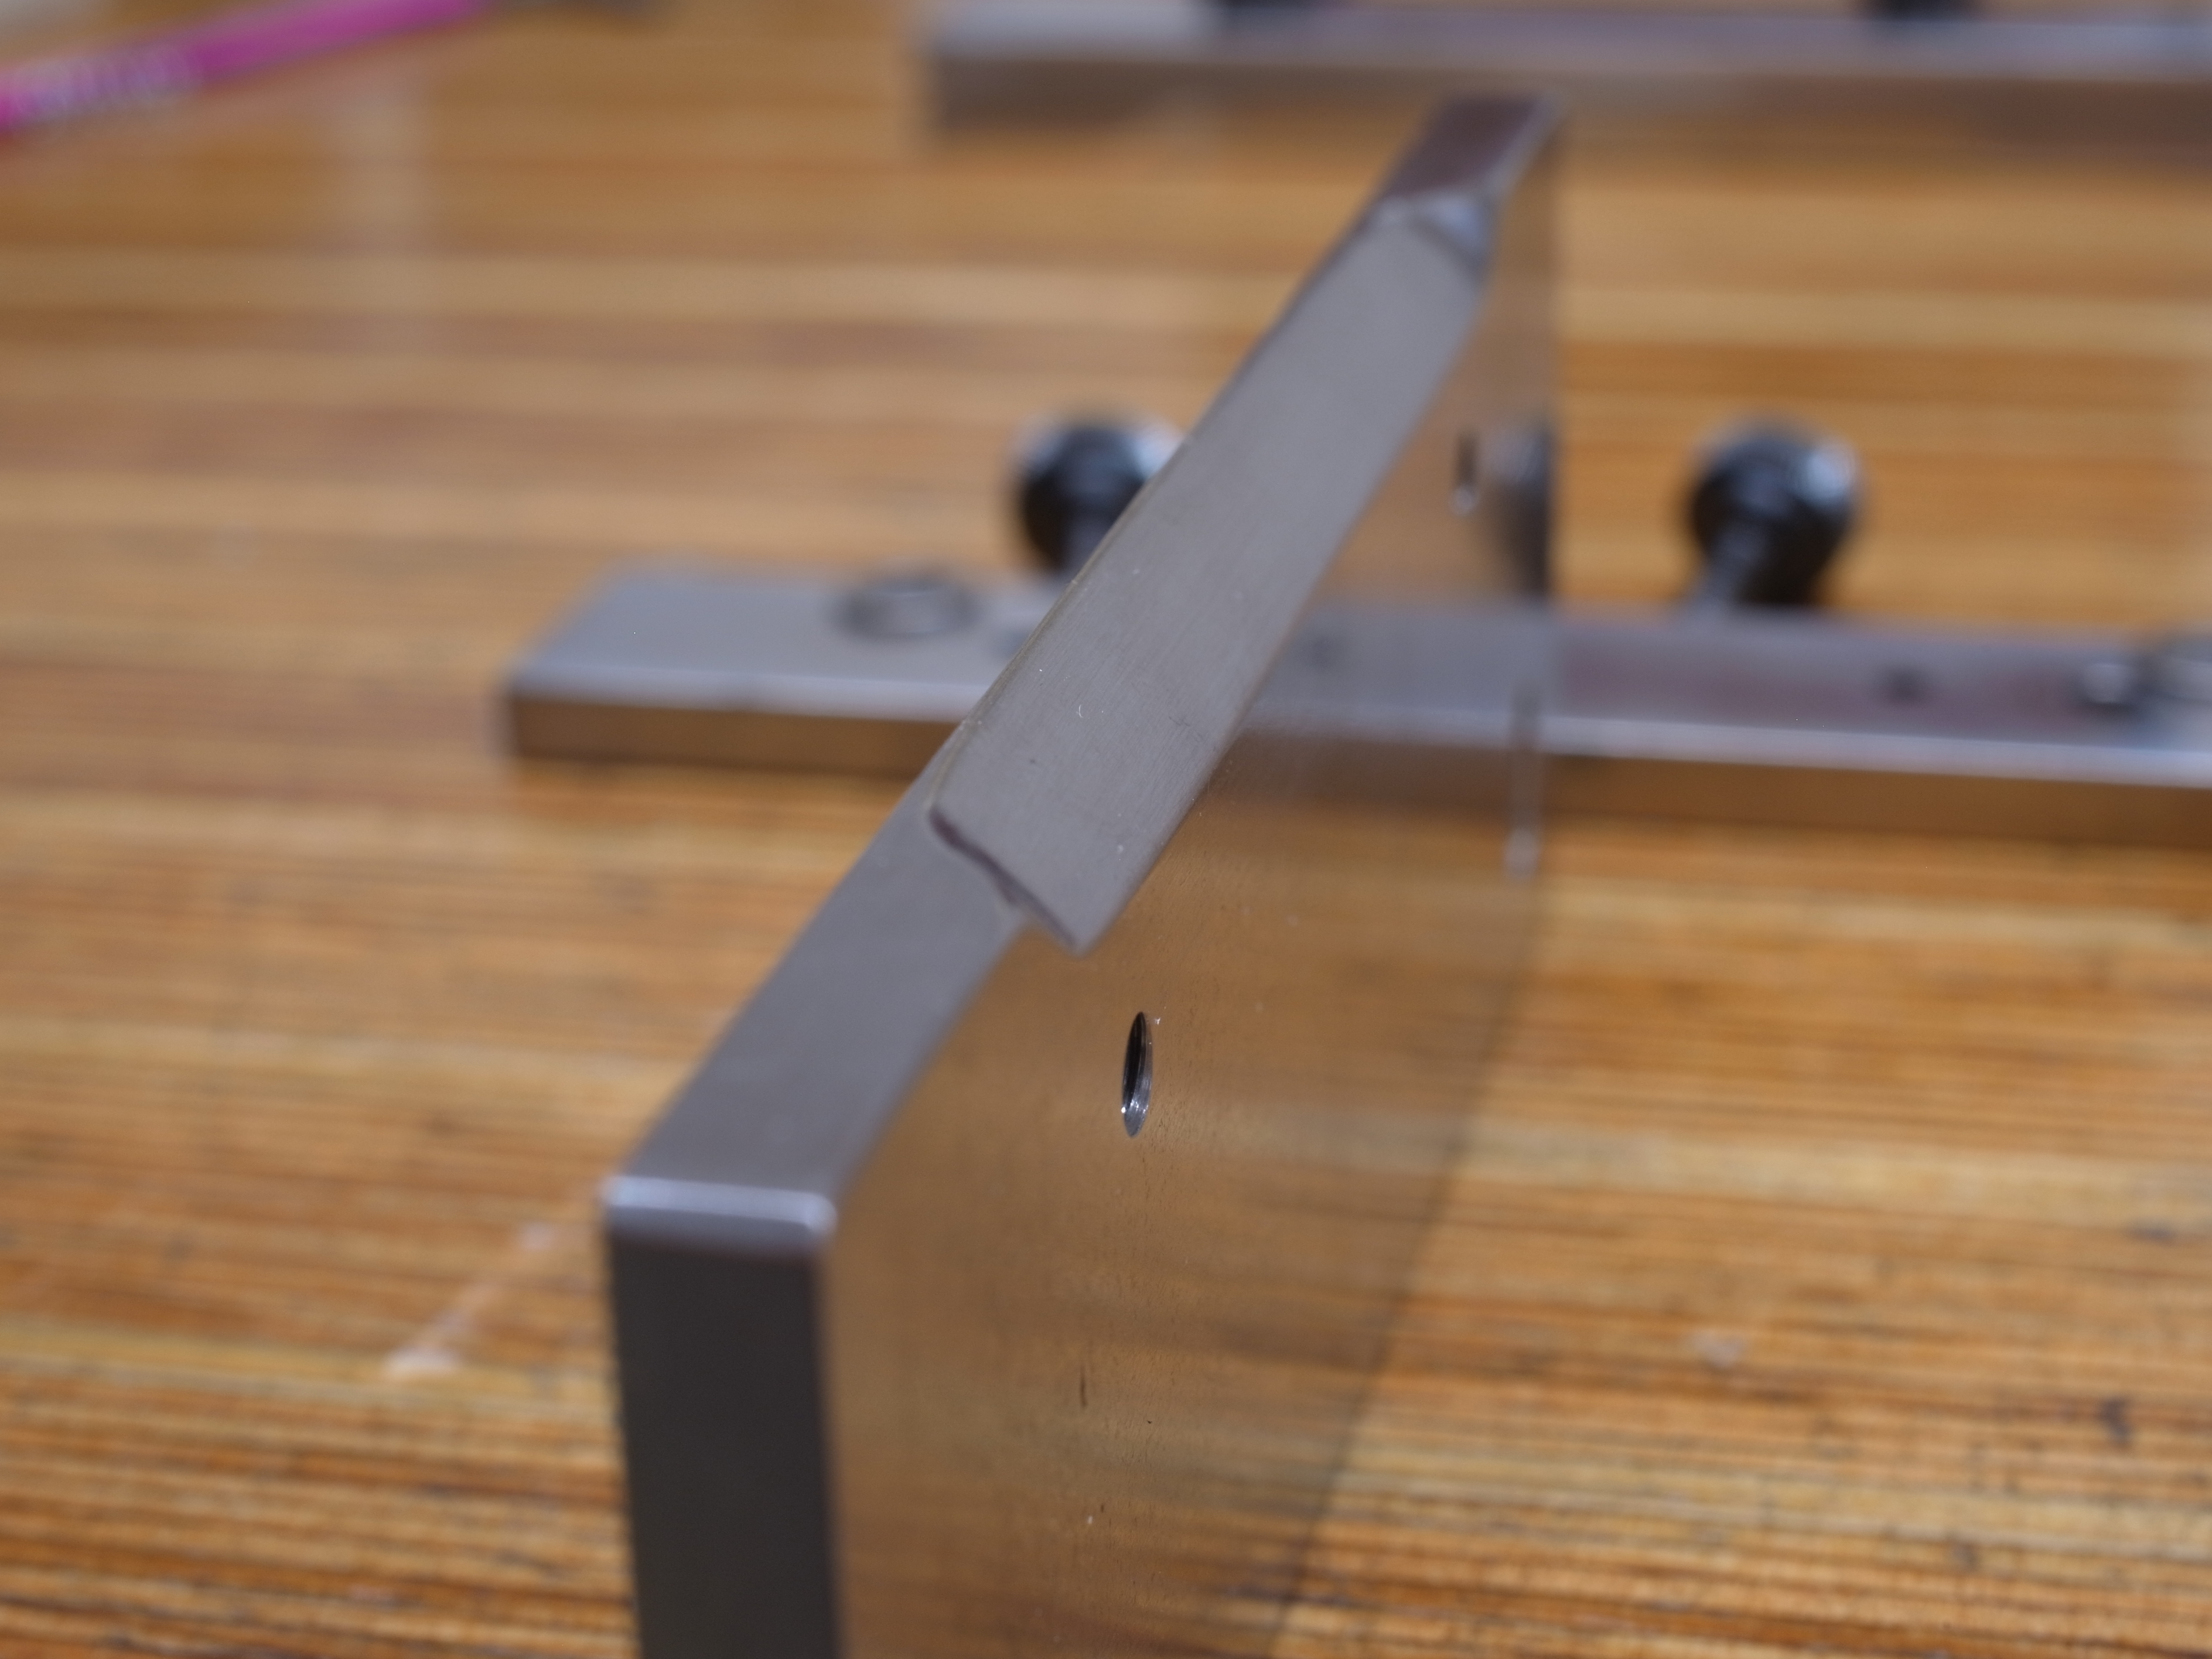
Here the same piece from the other side:
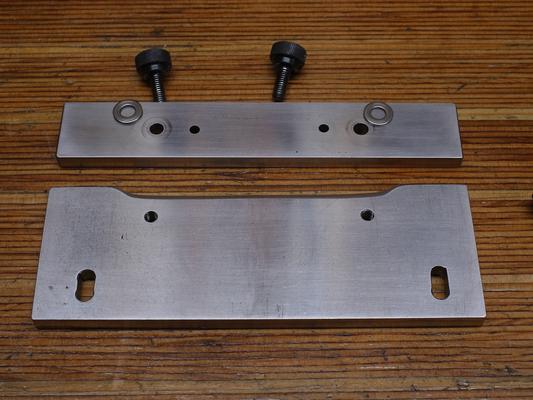
You can see the bevel I filed into the edges. At first these were straight, and caused some reflections. The bevel prevents that. I could have also just painted the edges mat-black I suppose... Reflections are something to watch out for when using steel or aluminum.

Notice that I originally had pretty much the same thing built all out of the black plastic. That didn't work... the plastic, once you put a bit of tension on it, is too slippery to hold the negatives in place, and also tends to bend.
I already had the steel lying around, just did a bunch of sanding to get it nice. The screws, thumb screws, compression springs, and washers are all from my favorite place to find parts, McMaster-Carr. They've got everything for the DIY-minded person... and a great web site that makes it easy to find parts.
I used these thumb-screws. And these compression springs.
I highly recommend a drill-press and a good tapping set if you should build this yourself, or something similar. Getting all the holes lined up is a bit of a challenge. I kind of like doing a bit of metal work (I do a lot of woodworking otherwise), so this was a fun project for me 😉
Last but not least...
I am not saying this is the ultimate way to mount negatives for DSLR scanning... There are much simpler ways to mount negatives, which may be sufficient for you. The "DigitaLIZA" for example is what Godfrey uses.
The main reason I built this holder is to avoid any glass, and to have a way to mount negatives very flat. I had a lot of trouble with anti-newton glass, which is also just another layer to collect dust.
It was initially made for 6×7 slides. For 35mm film, it could be wider, e.g. wide enough to mount six negatives.
First a shot of the whole apparatus:
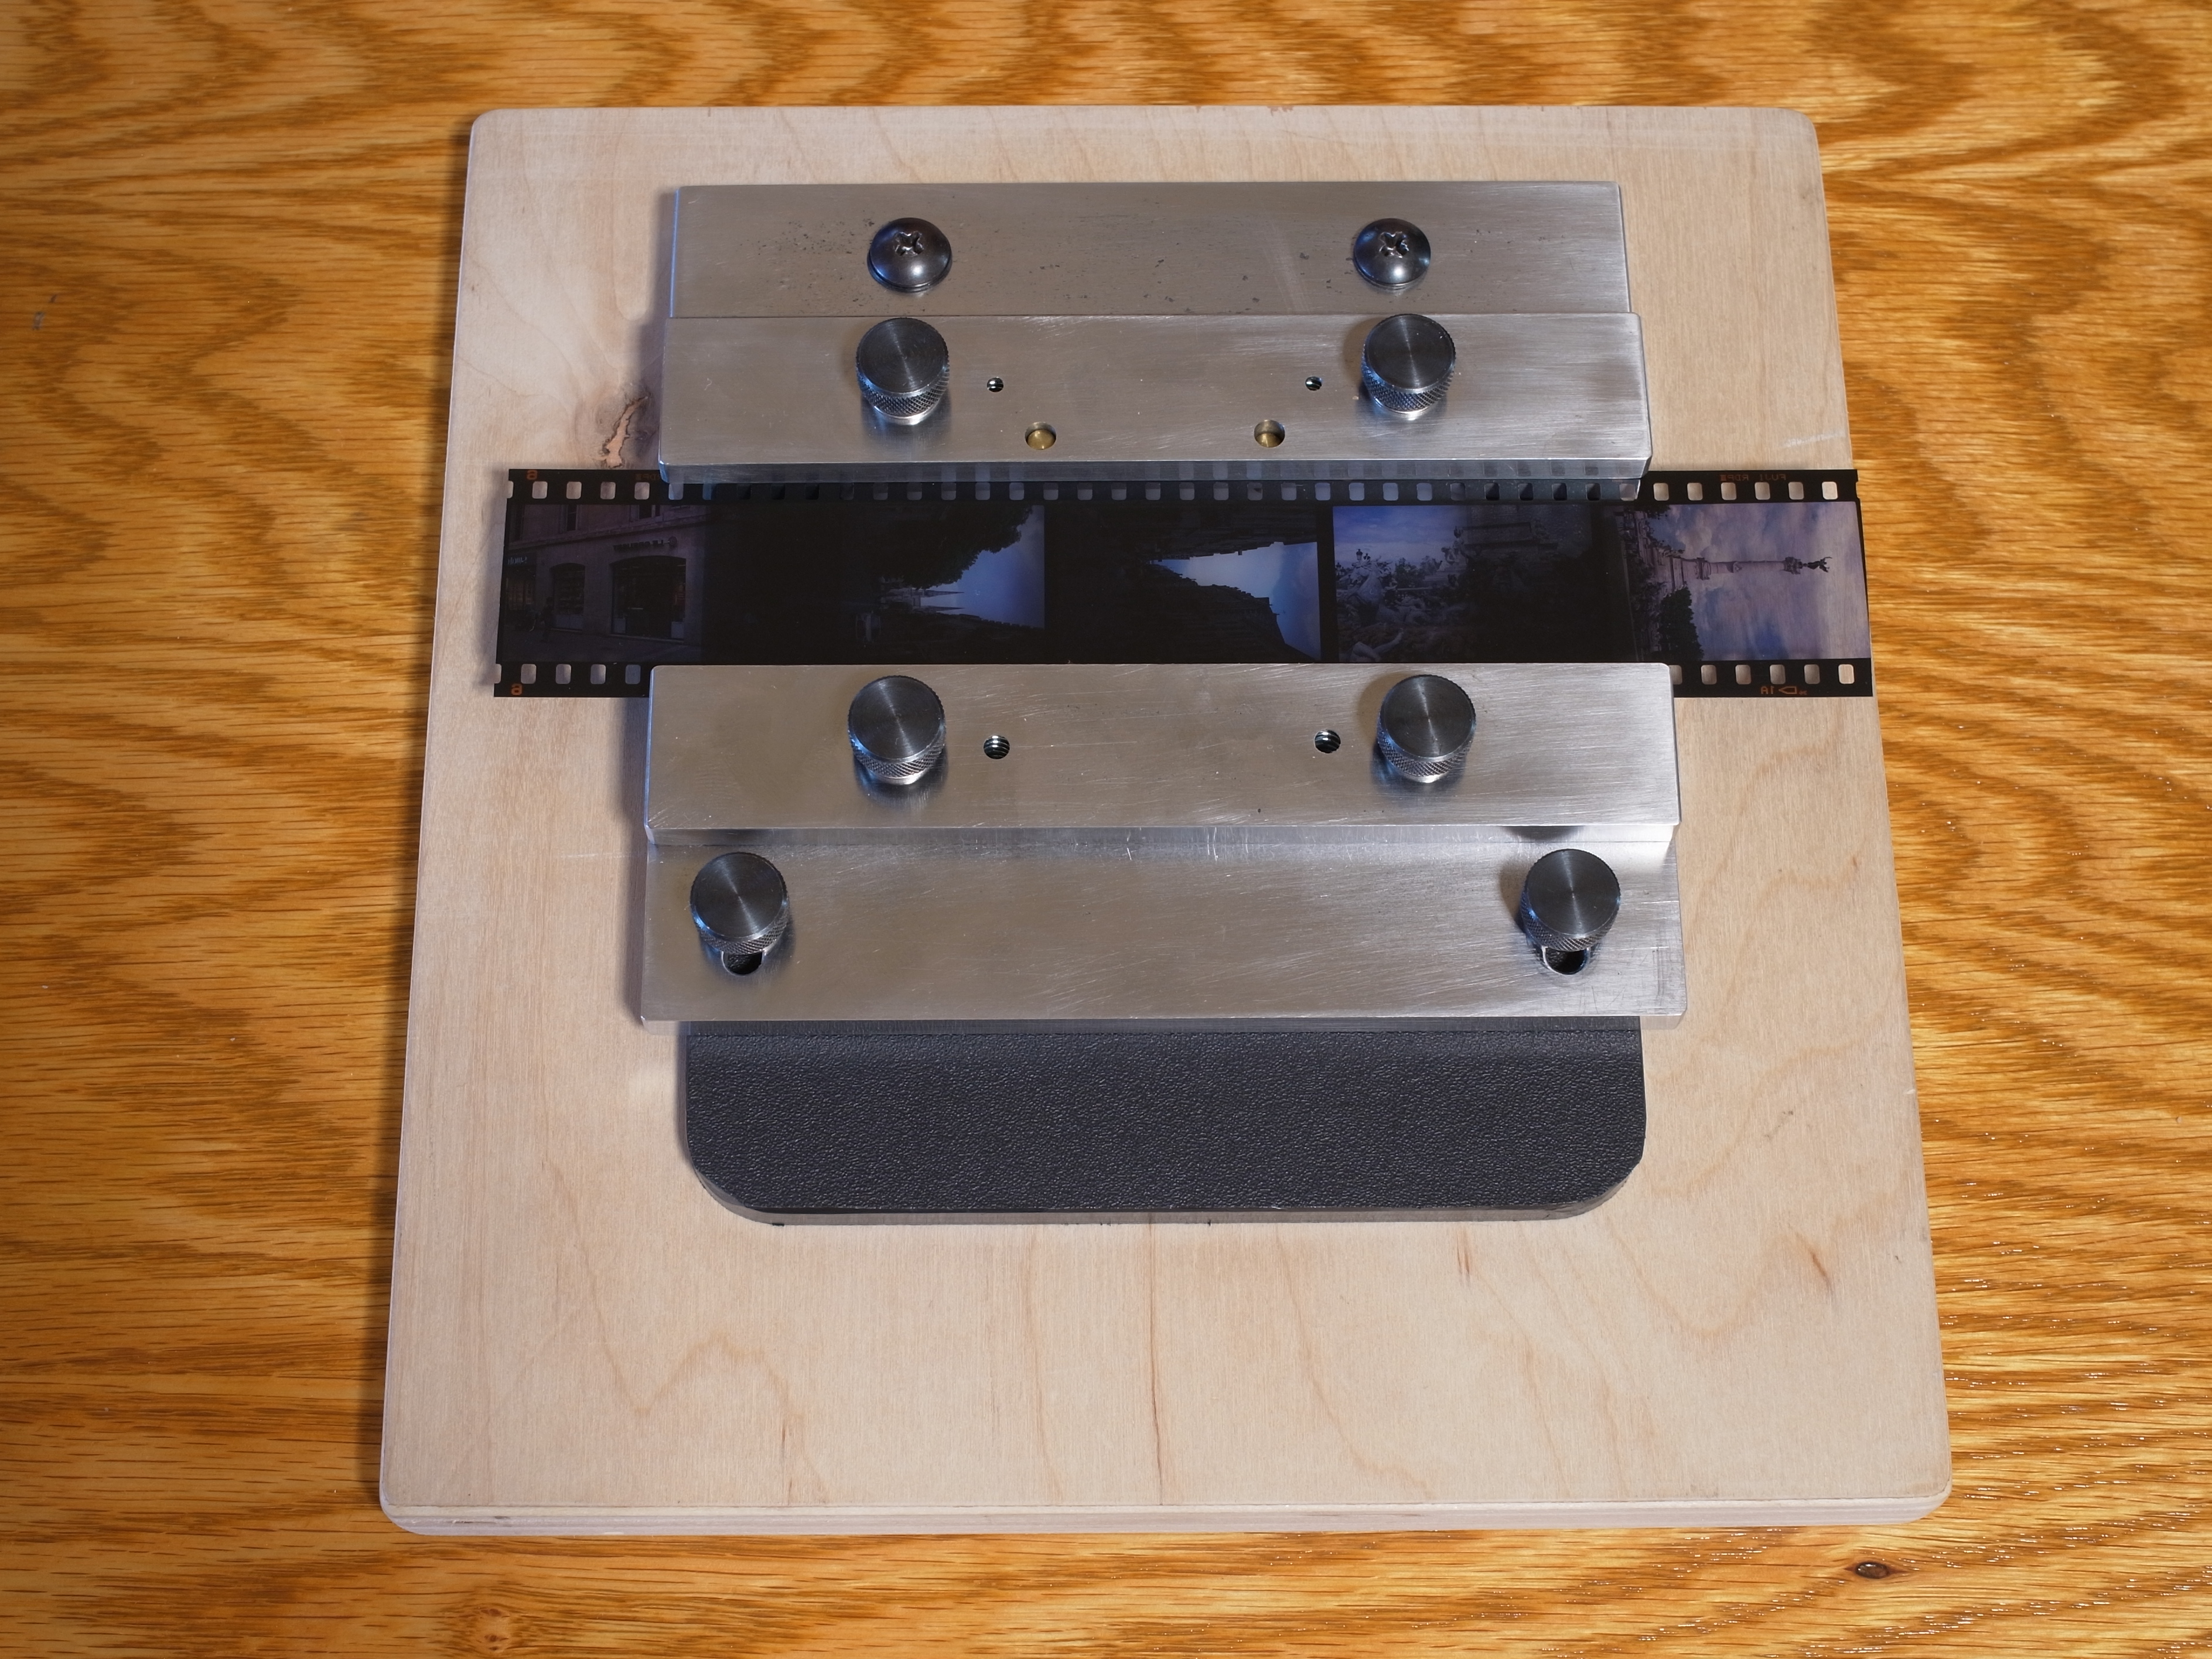
The base is just a piece of plywood, with a window cut-out, which is also beveled. Plywood is not necessarily ideal, since it is prone to shed off some dust. A few layers of shellac could solve this though. This is the bottom of said piece:
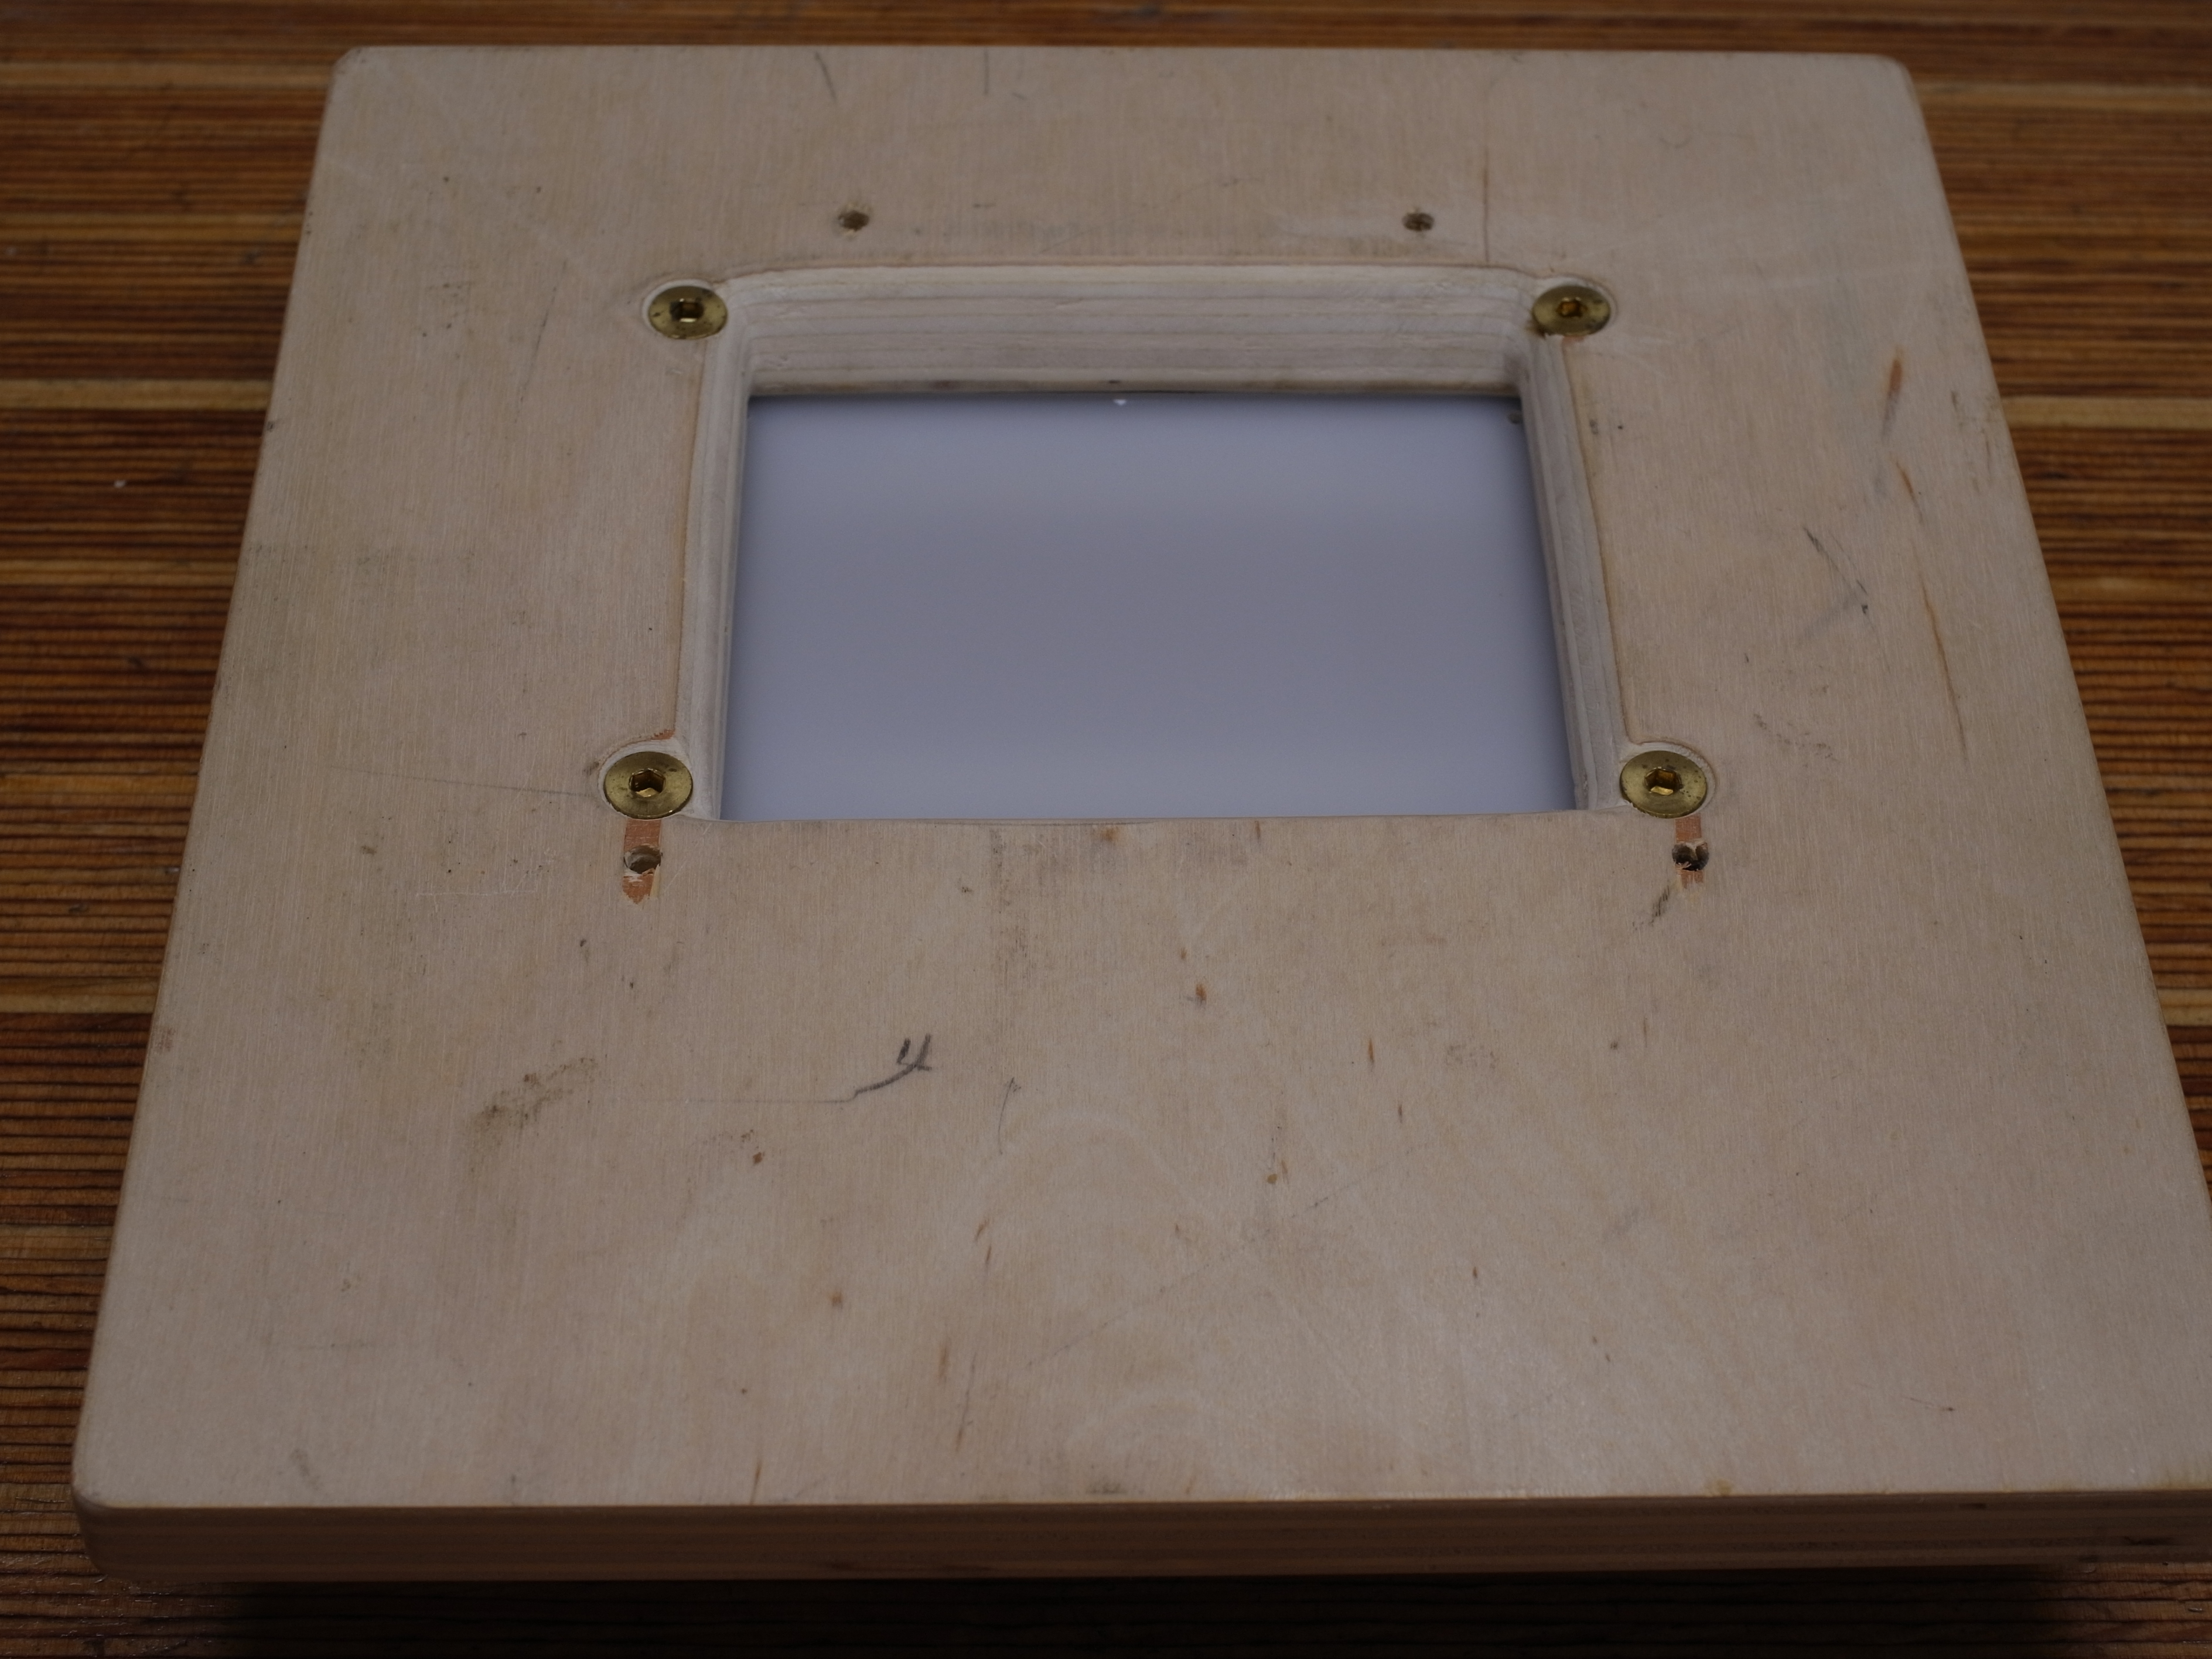
On top of that is a piece of hard plastic, about 1/4" thick. The plastic has a cut-out for a diffusion piece (also plastic). It is mounted into a recess on the bottom of the black piece. The plywood and plastic piece are screwed together. It is quite easy to drill and tap plastic, and holds well.

Now come the more interesting parts, the steel pieces that actually hold the film strip. These are 1/4" thick steel pieces, about 3/4" and 1 1/2" wide. A bit over 5" long. The bottom piece as two holes in the back; the black Phillips screws pass through into threaded holes in the black plastic piece. This holds the bottom piece to the black piece.
On the front of the bottom piece are two small holes for the brass alignment pins. These stop the negative from slipping in too far.
Then there are two threaded holes into which the thumb screws go, mounting the top piece to the bottom piece.
The remaining two holes are blind holes (they don't go through the entire steel piece). These fit a compression spring. Mating blind holes are in the top piece, so that the springs are actually trapped in these blind holes, and when mounting the top to the bottom, the springs push the top piece up. This makes it much easier to mount the negatives.
You will notice that there are tiny holes in the blind holes... I drilled these through the top and bottom piece all in one go, so that I would have a guide to where exactly to drill the larger blind holes... easier than trying to measure everything exactly.

Here the same pieces from the other sides. The alignment pins should ideally also sit in blind holes...
And this is the bottom part. For the most part it's the same as the other part:
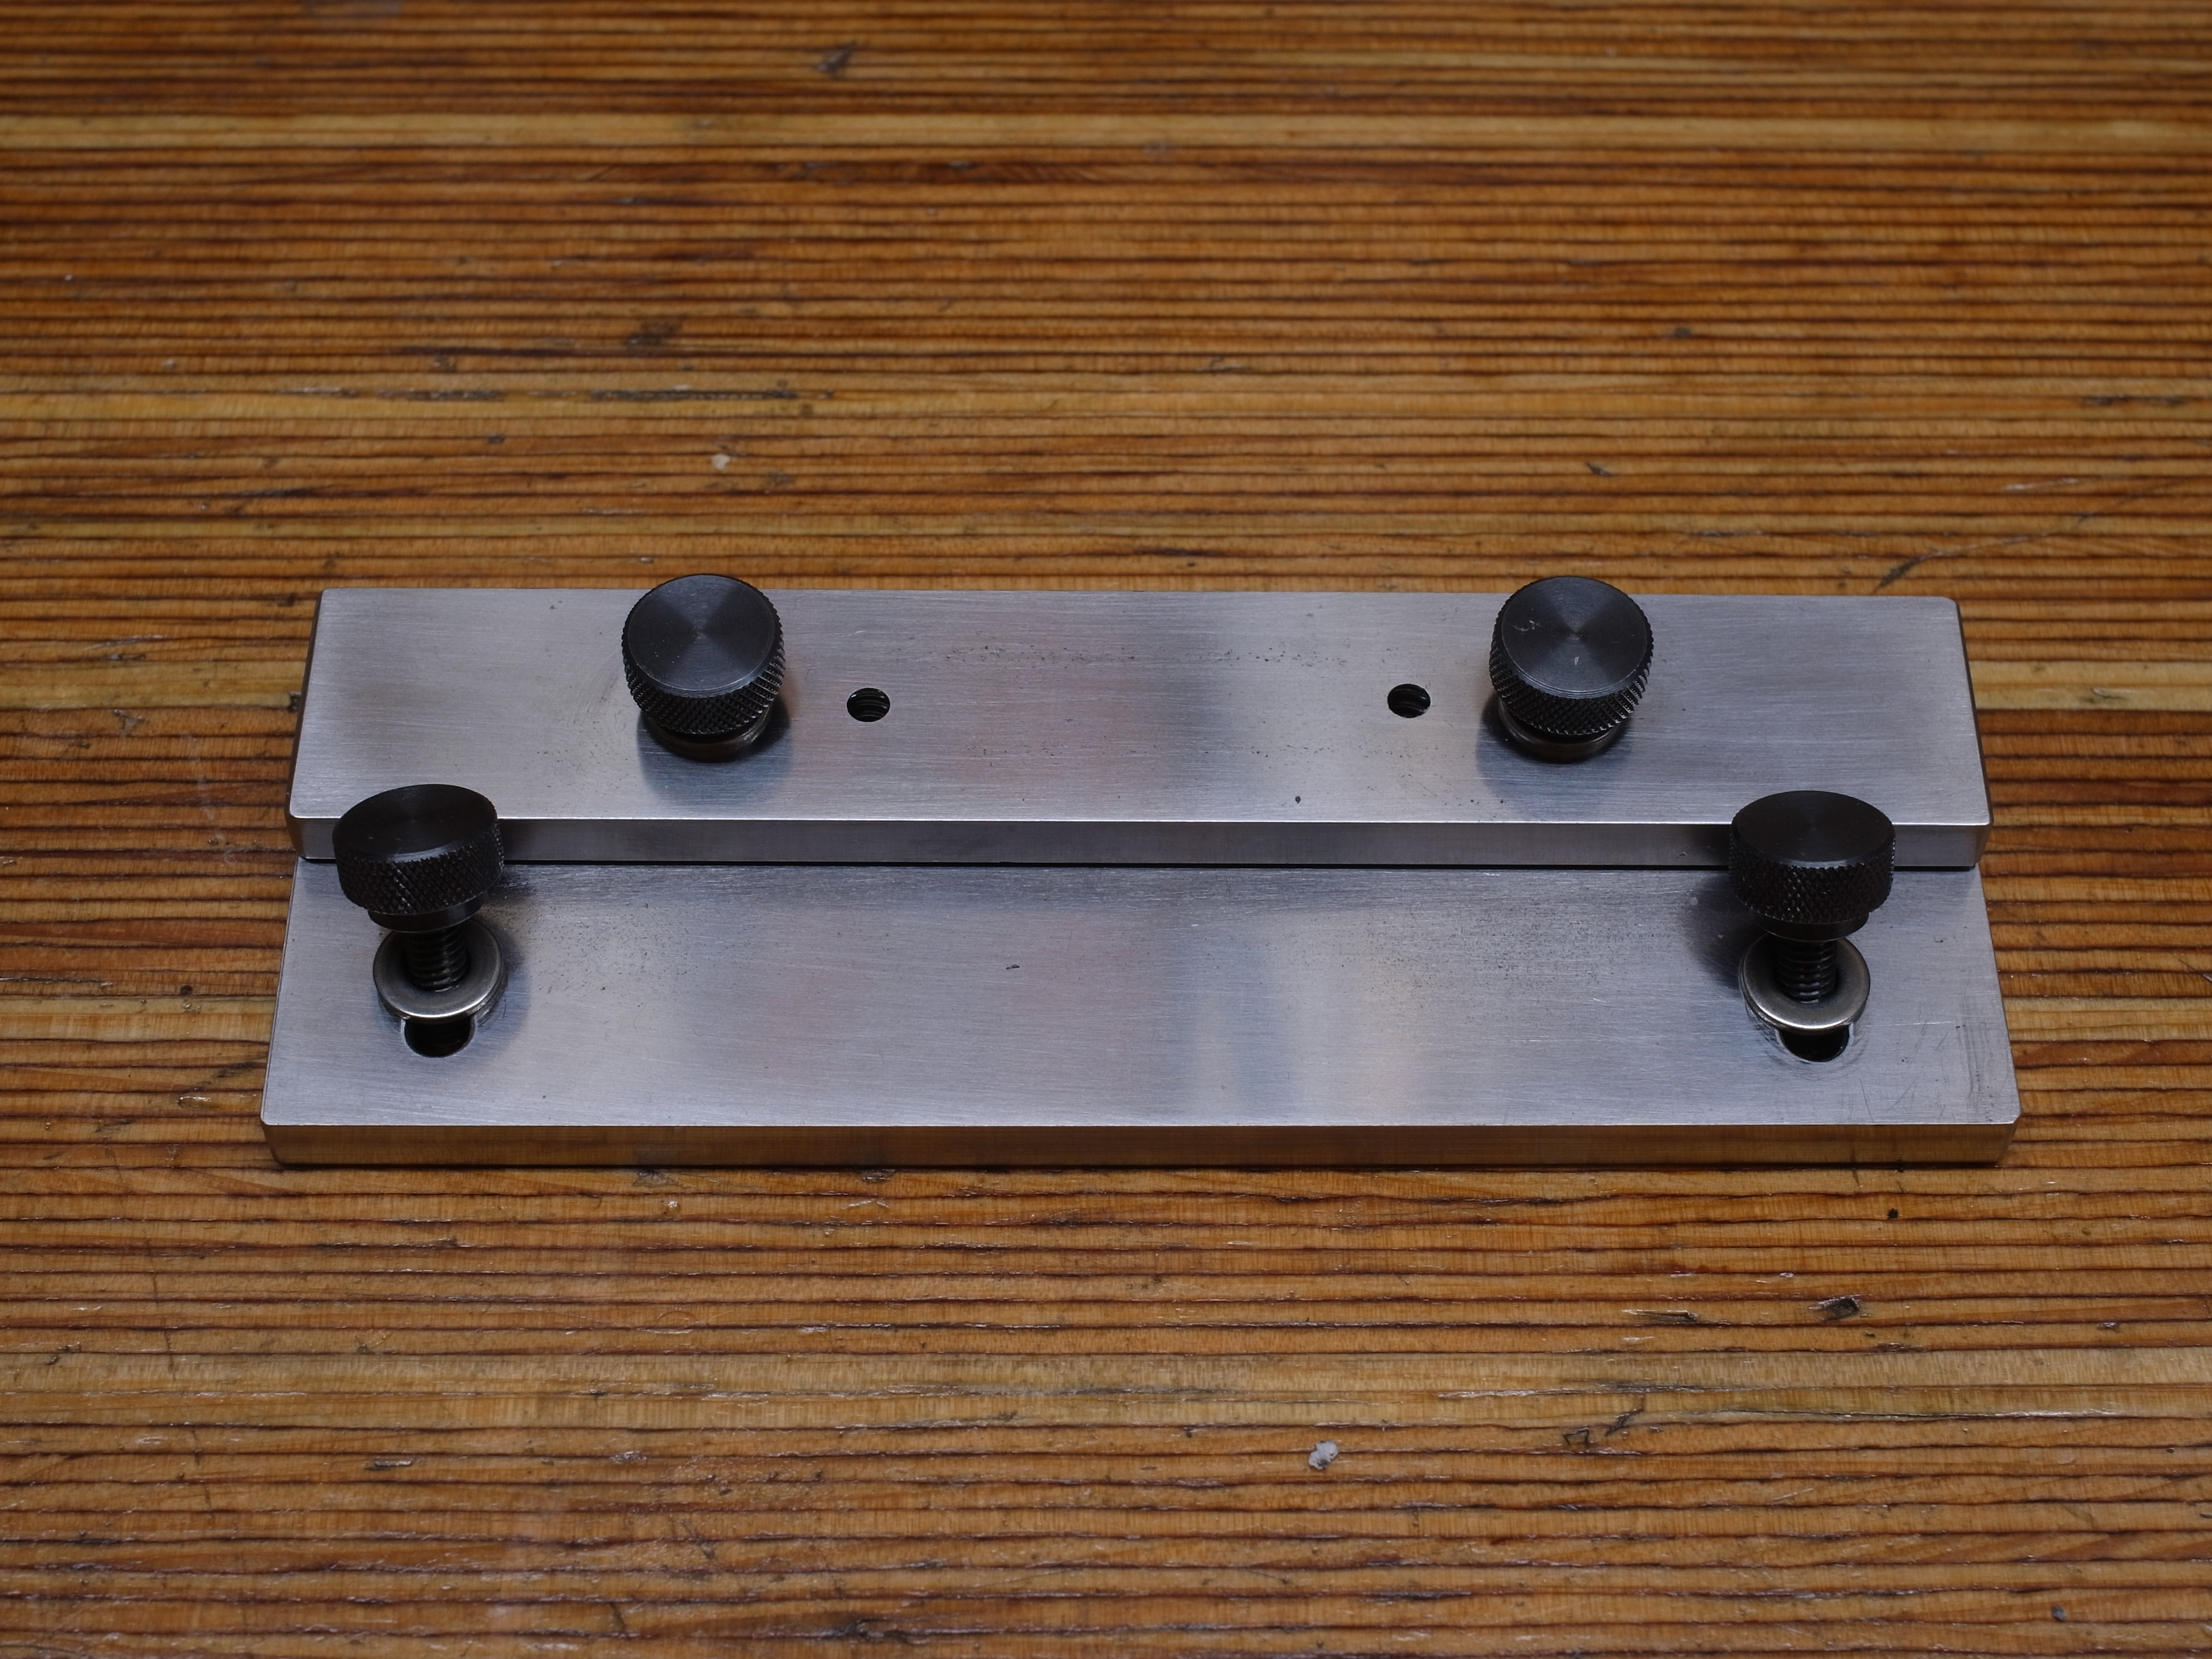
It doesn't have the alignment pins, I figured the ones on the other part are sufficient.
As you can see in the next picture, there are again springs in blind holes.
The difference in this piece is, that the bottom piece is mounted through slots to the black piece. That way it can be moved back and forward. When I clamp a negative, I leave the bottom part loose within its slots, mount the negative between the top parts, then slightly pull down the slot-mounted part to flatten the negative, and finally tighten the piece to the black piece.
It sounds a lot more complicated that it is... just look at the pictures, it's fairly simple.

Here the same piece from the other side:
You can see the bevel I filed into the edges. At first these were straight, and caused some reflections. The bevel prevents that. I could have also just painted the edges mat-black I suppose... Reflections are something to watch out for when using steel or aluminum.
Notice that I originally had pretty much the same thing built all out of the black plastic. That didn't work... the plastic, once you put a bit of tension on it, is too slippery to hold the negatives in place, and also tends to bend.
I already had the steel lying around, just did a bunch of sanding to get it nice. The screws, thumb screws, compression springs, and washers are all from my favorite place to find parts, McMaster-Carr. They've got everything for the DIY-minded person... and a great web site that makes it easy to find parts.
I used these thumb-screws. And these compression springs.
I highly recommend a drill-press and a good tapping set if you should build this yourself, or something similar. Getting all the holes lined up is a bit of a challenge. I kind of like doing a bit of metal work (I do a lot of woodworking otherwise), so this was a fun project for me 😉
Last but not least...
I am not saying this is the ultimate way to mount negatives for DSLR scanning... There are much simpler ways to mount negatives, which may be sufficient for you. The "DigitaLIZA" for example is what Godfrey uses.
The main reason I built this holder is to avoid any glass, and to have a way to mount negatives very flat. I had a lot of trouble with anti-newton glass, which is also just another layer to collect dust.