MarcoIIIc
Member
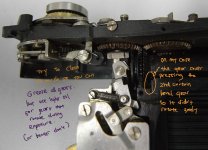
I have CLA'd 4-5 of these over the last 10 years or so, and while the information available over the last few years has improved, not much further understanding of the shutter adjustments have emerged since Rick Oleson's excellent drawings and notes now probably a couple of decades old. My first few CLA's went very smoothly but when I started measuring shutter speeds and repairing a few less minty cameras the true complexity of this shutter emerged.
I would like for this thread to focus on the CLA of these masterpieces in mechanical complexity and bounce my understanding off some of you that might have been here already. This because unlike for the other rangefinder from the 50's, commercial repair of these camera is scarce and sometimes ridiculously priced.
There is starting to be a good amount of information available:
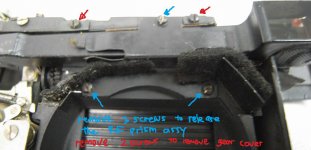
So lets get into the details of shutter speed adjustments, These can be grouped into three settings:
Slow speeds:
I start with the high speeds:
I would like for this thread to focus on the CLA of these masterpieces in mechanical complexity and bounce my understanding off some of you that might have been here already. This because unlike for the other rangefinder from the 50's, commercial repair of these camera is scarce and sometimes ridiculously priced.
There is starting to be a good amount of information available:
- Rick Oleson's Notes
- The official Repair Manual
- A couple of good youtube video.
So lets get into the details of shutter speed adjustments, These can be grouped into three settings:
- Slow speeds (1, 2, 5, 10) with full delay escapement engagement.
- Middle speeds (25, 50, 100) partial escapement engagement.
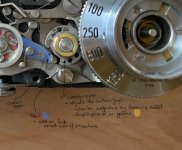
- High speeds (250, 500, 1250) shutter spring tension only.
Slow speeds:
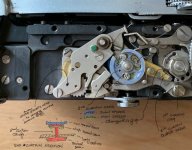
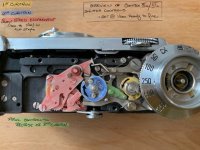
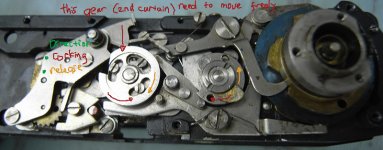
- Shutter Spring Tension (sets base curtain travel speed)
- Position of the Slow Speed Cam on 2nd Curtain. (sets engagement of the escapement? not really)
- Any thing else I am missing?
- Shutter Spring Tension (sets base curtain travel speed)
- Position of the Slow Speed Cam on 2nd Curtain. (sets engagement of the escapement? not really)
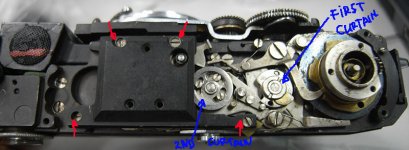
- Position of the 1st Curtain Cam. (sets the curtain "gap" - time between 1st/2nd curtain release)
- Position of the High Speed Cam on 2nd Curtain. (fine tunes the curtain "gap")
- Any thing else I am missing?
- Shutter Spring Tension (sets base curtain travel speed)
- Position of the 1st Curtain Cam. (sets the curtain "gap" - time between 1st/2nd curtain release)
- Position of the High Speed Cam on 2nd Curtain. (fine tunes the curtain "gap")
- Any thing else I am missing?
I start with the high speeds:
- Adjust the shutter tension. How much? great question. Wish I had a good answer. I release all tension (from an un-tensioned shutter) and increase tension until I get no shading at 1/500 or I have approached 1/2 a turn of tension from slack. The Zeiss Ikon Manual shows 3/4 turn for tension but it is not very clear to me what the starting point is.
- I adjust the first curtain cam to get a good measured 1/250s.
- I get back to tensioning the shutter until the shading at 1/1250 just starts to disappear (max is 3/4 turns!).
- I measure my 1/250 again.
- I fine tune the "gap" with the 2nd curtain high speed cam.
- I measure 1/1250.
- 1/1250 good then I move on to the slow and middle speeds, if not I go back to point 5 or tweak the shutter tension.
- Measure what the high speed adjustment got me for middle and slow speeds.
- Fiddle with the Slow speed cam on the 2nd curtain (and see very little change... if any at all).
- Ask myself repeatedly if any other ways of adjusting the slow and middle speeds exist.
- Call it a day, button it up, it's an analog camera that's 50 years old and still provides better images than the other German brand which can be CLA'd and adjusted in 1.5 hours.