Leica LTM Making a Leica Standard clone

Leica M39 screw mount bodies/lenses
Gordon,

More great info - I'm getting itchy fingers waiting for my Zorki to arrive! I don't know which version it actually is, but it seems to have the vulcanite pattern embossed in the metal of the body. That may prevent application of an Aki leatherette, so I will probably have to chemically strip the existing paint and reapply something (more hassle than I had hoped for, but it only cost $30 including the Industar, so not too bad).

I'm going to hold off on deciding which way to cover the speed control until I get the body in my hands - I'm still wondering if I could make a wooden pattern and spin some aluminum, rather than turn it. It would be lighter, and easier to achieve the double curvature seen on the russky copies. We'll see.

I am making arrangements to get a black CV 25mm Skopar with finder, so I will have the choice of 25mm, 35mm Jupiter and 50mm Industar (I don't think my Canon 50mm f1.4 is going anywhere near the rat cam!

Checked out your website - very impressive, nice info and good links. Boy, did you have some serious facial hair in your youth! I'm one of those who takes about 6 weeks to grow a very scruffy goatee, so somewhat envous of a decent full-set. One of your pics looks very anti-Vietnam demo candidate - right on!

Gordon, thanks for a most interesting and illuminating project, I will have to document by build and compare notes - watch this space!
 
Hi Gordon,
the ratcam it's a great idea, I wonder how much nice it would be with a Cv minifinder and a skopar 28/3,5 or 35/2,5 pancakeI on!
 
John -- I'm not familiar with the process you describe as "spinning". I'm familiar with lathes, flat patterns, and milling. Is it like forming a soft metal over a block by hammering on it? I look forward to your additions to this space. The cover I have is a short term solution and I want something more permanent. If I had the time and money I would make a 3D model on my CAD program and get it cut on an NC mill but it's been too many years since I've done something like that.

Nico -- I've looked long and hard at the CV minifinder. It would be perfect on a camera like this. I'm not sure it would be perfect for my eyes. I wish I could look through one. I'm on a small budget (too little money spread out over too many formats) so it's hard to spend that kind of money for something that might not work. But it would be cheaper than two finders and it would look very nice. Then I would add an Orion 15 28mm to the Jupiter 12. If money was available the CV lenses would be great. I do like that CV 25/4. That's what is tempting me.
 
Gordon,

I think the forming by hammering over a former or plug is called Planishing (?).

Spinning used to be a very popular method of producing round, hollow shapes in copper, brass and aluminum from the before 1900's to the 1960's. many aircraft spinners were made of spun aluminum in WWII (sorry!).

It involves thin sheet metal that is made fully soft by heat treatment. The sheet is then clamped in a lathe between a male former, or mandrel, and a rotating tailstock. You then start the motor and draw the flat sheet over the former while the whole thing turns as one. It needs a shaped tool and some lubrication, plus the judicious application of pressure on the tool. Deeper shapes may require working in several phases, with further annealing of the work inbetween.

Have a look at the attached, it should help you get started.

I think that a hard wood mandrel would be sufficient to make a few covers, but I'm not sure that i am up to developing a "pretty" shape, merely functional. The only thing this will not provide is a non-round shape, but if you look at the russky copies, they all seem to have a perfectly round speed cover - could be this is how they are made??

I have snagged the Skopar 24mm f4 and wait with eager anticipation for it and my Zorki......

Gordon Coale said:
John -- I'm not familiar with the process you describe as "spinning". I'm familiar with lathes, flat patterns, and milling. Is it like forming a soft metal over a block by hammering on it? I look forward to your additions to this space. The cover I have is a short term solution and I want something more permanent. If I had the time and money I would make a 3D model on my CAD program and get it cut on an NC mill but it's been too many years since I've done something like that.

Sorry about all the edits for my poor spelling - hope they did not generate a rash of new message warnings!
 

Attachments

  • spinning.pdf
    211.9 KB · Views: 1
Last edited:
John,

Now I understand spinning. However, I think the only way the russkies got round covers is by removing the post and cam for the B setting. If you keep the B setting you will have to make a non-round shape. I think I've figured out how to hammer form a piece. When I get the film shot in my Zorki Standard I will make some detailed measurements of the shutter mechanism and come up with a shape. I will cut that out of a piece of wood, put a drilled rod through he hole, clamp the aluminum with a nut and washer and start beating on it with a hammer. I think it will work. I think alloys suitable for spinning would be good for hammer forming since it will need to be elastic so thanks for the PDF. I will look for some 1100-0 aluminum.

I still haven't figured out how to attach the cover to the top place. The only thing I can come up with is a couple of drops of epoxy. A little heat from a hair dryer and it will pop loose if I need to remove it.

I'm continually amazed at what a small package the Zorki Standard is. I picked up a FED 2 today and was *huge* compared to the little Zorki. I will be working on being able to frame without a viewfinder -- zen framing.
 
Gordon,

I guess you may know spinning a "swaging" in the colonies? I understand that some clever folks can spin an eliptical shape, but we are looking for a squared off circle. Did the original Standard have the B setting? I saw a pic today and that has a round cover.

Anyway, if you can't get fully soft aluminum, you could try annealing your own - rub it with some soap and heat until the oap goes black - then quench in cold water. Another alternative might be copper, that forms very well over a dolly with a hammer. Alternatively, you could solder up your flat form.

Attaching the cover was sort of worrying me too, I don't want to try making little "L" shaped brackets and trying top screw it on - far too tedious and fraught with difficulty! I considered the epoxy route and would add to your suggestion in that the use of a filler medium (say talc) can effectively thicken the epoxy while it sets, and reduce it's overall strength for later removal - just a thought.

I can hardly wait to get started, but my body has to come from Mother Russia, and the lens from Germany, so I have to wait for the postman <grr>. I'm also looking at a very nice IIIC at the right price just at the moment - when will this GAS ever stop????? [Homer Simpson mode off]

Nico,

I have seen that page - great idea, and one that I may follow up to produce a 50mm vf, if I can find the right sort of lenses (I have a wide/tele finder already).
 
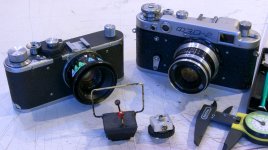
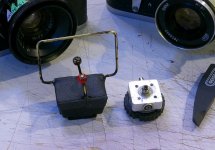
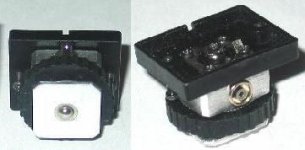
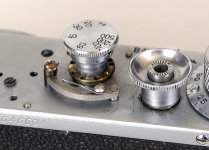
I've been out shooting with the Zorki Standard. I'm really liking it. I picked up my broken FED 2 the other day and hadn't realized how much bigger it was compared to the Zorki Standard. The little Zorki is really small and light. I'm also getting used to using the Gordodot wireframe. I'm liking it, too. Even though the Gordodot is working fine, the esthetics do leave a little to be desired. The base is visually to bulky, the wireframe is on at a slight angle, which really doesn't affect anything, but I've been wanting to do something about it. And the black put on by the Sharpie Magic Marker wasn't that magic. It comes off but it let me know that the wireframe wants to be black. I finally found the metal foot that I bought some time ago to replace the plastic foot on my Vivitar 283. It never made it on the 283 and I've moved up to a Metz C-45 so it is never going to be going on the 283. You can get them on eBay for under $10. Search for Vivitar 283 foot. I removed the plastic top. The next step is to drill out the flash bits in the center, drill some holes to insert the wireframe, file the metal down a bit, paint it black and I will have the improved Gordodot Mark II.

I'm almost through with a roll of Tri-X. When that's done I will pull of the shutter mechanism cover for some detail measurements. Then the paper cover goes back on while I work on a form for hammer forming an aluminum shutter mechanism cover. This camera is too much fun.
 

Attachments

  • newgordodot1-800.jpg
    newgordodot1-800.jpg
    87.8 KB · Views: 3
  • newgordodot2-800.jpg
    newgordodot2-800.jpg
    107.1 KB · Views: 3
  • newgordodotfoot.jpg
    newgordodotfoot.jpg
    12.9 KB · Views: 3
Gordon,

Nice update - it will be interesting to see your results.

I'm wondering about trying a vacuum-formed bellhousing - at least that would allow the use of a complex shape without bruised thumbs ;)

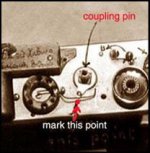
I have a question about the stripdown of the top plate. Looking at the two pics below, does the black "doughnut" simply unscrew, and is it separate from the securing screw for the B setting? Your pic is nice and clear, but the one from the Fedka site is rather blurred.

My body has still not arrived :(
 

Attachments

  • fakestandard4.jpg
    fakestandard4.jpg
    12.8 KB · Views: 2
  • zorkistandard-3.jpg
    zorkistandard-3.jpg
    82.6 KB · Views: 2
My camera came as in the picture, from Oleg. I'm pretty sure the doughnut is a support for the accessory shoe and can be removed without affecting the B setting mechanism, which works just fine on my camera. As long as what you end up with looks like mine it should be OK.
 
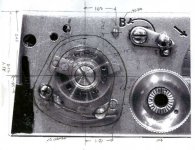
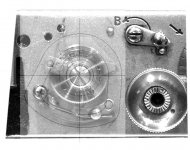
I've developed the shape of the shutter mechanism cover. I took a photo of the top of the camera and then printed it out large on a piece of paper. I can convert measurements taken on the print and scale them down. This makes it much easier and a lot more accurate than directly measuring the camera. The width of the camera body is the reference dimension. There is some motion of the cam so I have two pictures superimposed showing the full range of motion. (Digital does come in handy.) Add a little clearance and there is the plan view. Now I need to transfer that to my CAD program (hopefully this weekend) so that it can be printed out to scale and glued to a piece of hard wood that is the appropriate thickness. Then cut away. This will make the form for shaping the aluminum over. I've never actually done any hammer forming, but I have read about it. :) It should be interesting. It should be a lot smaller than the cover on the Leica Standards.

This is about the most fun camera I've ever used.
 

Attachments

  • sutter-mech-cover.jpg
    sutter-mech-cover.jpg
    66.2 KB · Views: 2
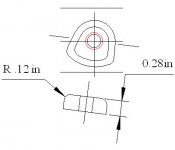
It turns out that most of the dimensions I wrote down weren't needed. (Some are even wrong. I'm not saying which. :) ) I scaled some points off of the pencil sketch (above) and drew it up on my CAD program. I saved it as a bmp file and brought it back into Photoshop to check clearances. It needed a little tweaking. Then I put a filled in version on the photograph to get a better idea what it would look like. It's going to be small. Now to find an appropriate piece of wood, print out the drawing, glue it on top of the wood, and start removing wood.

The hole in the wood is for some 1/2 threaded rod to hold on to the little sucker with. The red circle is the clearance hole that will be in the cover. I've been planning on hammer forming aluminum but this could be used as a form for fiberglass, too. Or how about a carbon fiber covering?
 

Attachments

  • zorki-cover-2.jpg
    zorki-cover-2.jpg
    77.3 KB · Views: 3
  • zorki-cover-3.jpg
    zorki-cover-3.jpg
    29.7 KB · Views: 3
  • zorki-cover-4.jpg
    zorki-cover-4.jpg
    14.8 KB · Views: 3
Gordon,

This is getting very interesting - I like the idea of carbon-fibre, but don't you think it's a bit high-tech for a rat-cam? :p

I am atrting to wonder if you will need to beat this out of sheet - if you made a female shape as well, you might be able to simply press it if the material was soft enough - even a bench vise would do that.....
 
It just may be that, on the matter of whether a turned piece would cover the Zorki 1 shutter mechanism, I was full of bovine excrement. Another thread mentioned that DAG Camera had some OKARA orange slip on filters for the Leica IIIc rangefinder for better contrast. So I found my way over to DAG and sure enough they do and at a reasonable price. But they also had a chrome shutter mechanism cover for a Leica Standard for $20. Since the picture was from the top, I moved it into photoshop and placed over the top of my Zorki 1 picture. The angle of the two pictures is a little different so everything doesn't quite line up right but it does look like it might work; enough that I ordered it. I was sure that a round piece wouldn't work. I can't recall when I've ever been wrong before. :) Stay tuned.
 

Attachments

  • shuttercover.jpg
    shuttercover.jpg
    32 KB · Views: 1
Gordon,

Now that you have bought the chrome one, what do the rest of us do? Not to mention the hike in prices once word gets out :D

Still waiting for my Zorki 1 :(
 
john neal said:
Now that you have bought the chrome one, what do the rest of us do? Not to mention the hike in prices once word gets out :D(

Bwah-ha-ha-ha-ha! It's mine! All mine! :)

John -- If it works I will do a full set of measurements and post them here. If this works it could be turned on a lathe or you could spin them. You could start a cottage industry making little shrouds for Zorkis.
 
Gordon Coale said:
John -- If it works I will do a full set of measurements and post them here. If this works it could be turned on a lathe or you could spin them. You could start a cottage industry making little shrouds for Zorkis.

Oh no! Definitely not! I have enough troubles as it is :angel:

Seriously though, it will be interesting to see how this works, and how you will secure it - I'm assuming it doesn't rotate with the speed knob, as it has a line on it to indicate the set speed. How are they secured on the genuine article?

BTW - still waiting for my Zorki, but on the upside, I should have the first results from my new CV Snapshot Skopar / IIIc tomorrow :D
 
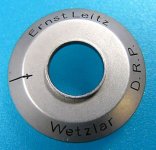
The Leica Standard shutter mechanism shroud came in today. I was right to begin with. It won't work on the Zorki. The post for the B setting cam is too tall. I've been real busy so I didn't get a chance today to look closer at the fit. I think it interferes with some of the B setting cam. I will look at it more closely tomorrow and take some dimensions off it and hopefully take some pictures. I did find out how it attaches. It's threaded on. There must be a matching threaded boss on the top plate. A mystery solved. Now back to my original cover design. I have all the bits. I just need to start carving on the wood for the form and search for a suitably soft beer can for aluminum to hammer on.
 
Back
Top Bottom