
You are using an out of date browser. It may not display this or other websites correctly.
You should upgrade or use an alternative browser.
You should upgrade or use an alternative browser.
Scanning with a digital camera
- Thread starter Huss
- Start date
- Latest activity Latest activity:
- Replies 932
- Views 114K


mob81
Well-known


titrisol
Bottom Feeder
The whites seemed washed out, have you tried recovering those highlights?
ColSebastianMoran
( IRL Richard Karash )
A little experiment with Adox CMS II. This is extremely fine grain film, ASA ~20, film base is ususual, it's completely clear. I understand the recommended development will give a fuller range of tones, but this was developed for high contrast.
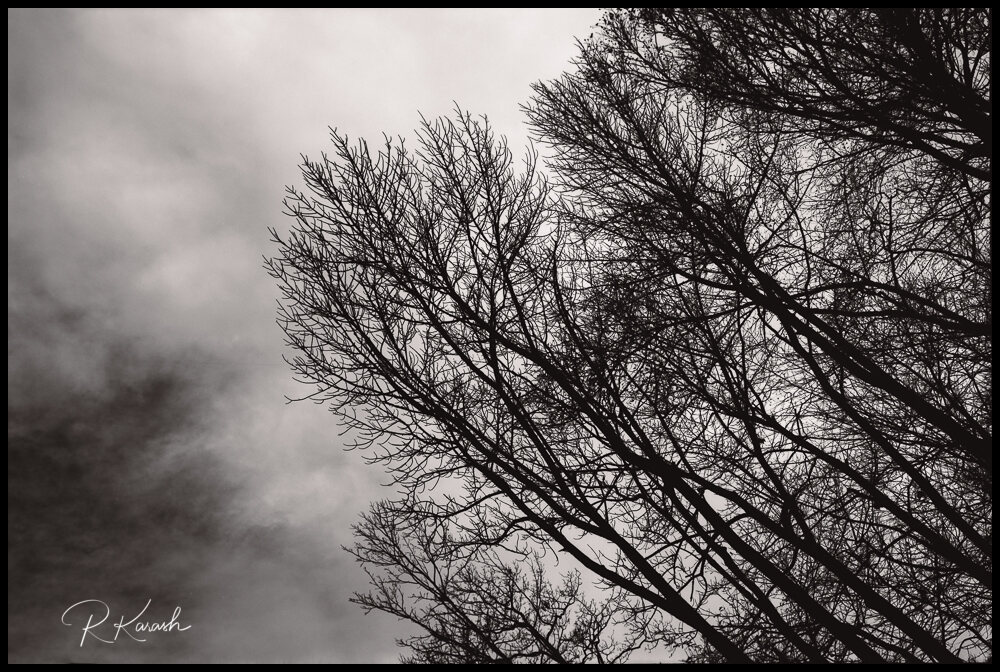
This is 1000 pixels for the RFF page, but I can tell you that pixel peeping at the full res 42MPx file, it's hard to see any film grain. Anyone else using this film?
Cam-scan Sony A7Rii, 70 f/2.8 Sigma Macro ART, NLP.
This is 1000 pixels for the RFF page, but I can tell you that pixel peeping at the full res 42MPx file, it's hard to see any film grain. Anyone else using this film?
Cam-scan Sony A7Rii, 70 f/2.8 Sigma Macro ART, NLP.
ColSebastianMoran
( IRL Richard Karash )
Only thing I did discover is that the end of the strip frames don't always sit flat - it seems to be better for frames that are either in the middle of a strip or a couple of frames in.
I have experienced this and have a theory: Turnn the film holder upside down, look at both sides. Figure out how to position the moveable pieces so that the very end of the film is supported above and below.
My theory is that if the end of the film is unsupported, it sags 1mm or so, enough to cause focus and possibly distortion problems.
titrisol
Bottom Feeder
I haven't tried this film yet but used to love its older sibling (Efke KB25)
Enlargements of 35mm had grain that looked almost like MedFormat and development in Rodinal 1+100 gave incredibly long tonality
Then they came with the Rollei TP which was also very good.
Enlargements of 35mm had grain that looked almost like MedFormat and development in Rodinal 1+100 gave incredibly long tonality
Then they came with the Rollei TP which was also very good.
A little experiment with Adox CMS II. This is extremely fine grain film, ASA ~20, film base is ususual, it's completely clear. I understand the recommended development will give a fuller range of tones, but this was developed for high contrast.
inzite
Well-known
67ii + 105 f2.4 + pro400h, scanned with d800e + 105 micro + negative labs pro
 INZ_7134 by Ricky Cheong Photography, on Flickr
 INZ_7137 by Ricky Cheong Photography, on Flickr
INZ_7134 by Ricky Cheong Photography, on FlickrINZ_7137 by Ricky Cheong Photography, on Flickrinzite
Well-known
67ii + 105 f2.4 + astia 100, scanned with d800e + 105 micro + negative labs pro
 INZ_7144 by Ricky Cheong Photography, on Flickr
INZ_7144 by Ricky Cheong Photography, on Flickrinzite
Well-known
67ii + 105 f2.4 + pro400h + tmax400, scanned with d800e + 105 micro + negative labs pro
 INZ_7180 by Ricky Cheong Photography, on Flickr
 INZ_7165 by Ricky Cheong Photography, on Flickr
 INZ_7154 by Ricky Cheong Photography, on Flickr
INZ_7180 by Ricky Cheong Photography, on FlickrINZ_7165 by Ricky Cheong Photography, on FlickrINZ_7154 by Ricky Cheong Photography, on Flickrpeterm1
Veteran
After thinking about it for a while, I bought a Pentax (M42) bellows adapter and, using a Pentax Takumar 55mm f1.8 (late version) scanned a couple of hundred slides from 30 or so years ago when my then partner and I went sailing and diving in the South Pacific. The camera I used was a Sony NEX 5 and the images were processed in Lightroom. Though there was some cropping needed due to its crop sensor but not too much and I am pretty happy with the results achieved. Some examples.
 Deep Dive by Life in Shadows, on Flickr
 Eye of the Wind, Wreck Diving - South Pacific by Life in Shadows, on Flickr
 Eye of the Wind - Marshall Bennett Islands - New Guinea_2 by Life in Shadows, on Flickr
 Eye of the Wind - Marshall Bennett - Laughlan Islands - New Guinea_4 by Life in Shadows, on Flickr
 Eye of the Wind - Marshall Bennett - Laughlan Islands - New Guinea_5 by Life in Shadows, on Flickr
Deep Dive by Life in Shadows, on FlickrEye of the Wind, Wreck Diving - South Pacific by Life in Shadows, on FlickrEye of the Wind - Marshall Bennett Islands - New Guinea_2 by Life in Shadows, on FlickrEye of the Wind - Marshall Bennett - Laughlan Islands - New Guinea_4 by Life in Shadows, on FlickrEye of the Wind - Marshall Bennett - Laughlan Islands - New Guinea_5 by Life in Shadows, on FlickrRonald M
Veteran
You trash my scans because of some fixable banding and then post these as counter examples? I can't tell if this is hilarious or some kind of absurd farce.
DSLR copy work can't properly compensate for the orange mask, and you'd need to do HDR work to bring back the available dynamic range. A pixel shift camera would be better for this but you still have the color issues. DSLR work is only decent for B&W and Chrome. Even then you would benefit from a wet scan because slides even in their mounts are not flat. Who cares if you can AF on the center if the edges are out of focus. Even if you can get them in the DoF you'd have a warped image.
I think you're seeing your camera resolve detail and deciding that it's then ok if the sand is green and the skin tones are some kind of sickly orange. And for the 35mm image, if you think that's what Portra 400 is supposed to look like, then I don't know what to tell you.
Not true. White balance off black (clear) or inter frame mask.
Invert with curves, straight line UL to LR.
Fine tune color balance with levels using individual R, G & B color channels on the histogram highlights and shadow points for that channel.
BTW and image can be color balanced this way.
CS6 does all this well.
Ronald M
Veteran
You trash my scans because of some fixable banding and then post these as counter examples? I can't tell if this is hilarious or some kind of absurd farce.
DSLR copy work can't properly compensate for the orange mask, and you'd need to do HDR work to bring back the available dynamic range. A pixel shift camera would be better for this but you still have the color issues. DSLR work is only decent for B&W and Chrome. Even then you would benefit from a wet scan because slides even in their mounts are not flat. Who cares if you can AF on the center if the edges are out of focus. Even if you can get them in the DoF you'd have a warped image.
I think you're seeing your camera resolve detail and deciding that it's then ok if the sand is green and the skin tones are some kind of sickly orange. And for the 35mm image, if you think that's what Portra 400 is supposed to look like, then I don't know what to tell you.
Not true. White balance off black (clear) or inter frame mask.
Invert with curves, straight line UL to LR.
Fine tune color balance with levels using individual R, G & B color channels on the histogram highlights and shadow points for that channel.
BTW and image can be color balanced this way.
CS6 does all this well.
titrisol
Bottom Feeder
Cool series!!!
The Pentax Bellows is a great value for the money!
The Pentax Bellows is a great value for the money!
After thinking about it for a while, I bought a Pentax (M42) bellows adapter and, using a Pentax Takumar 55mm f1.8 (late version) scanned a couple of hundred slides from 30 or so years ago when my then partner and I went sailing and diving in the South Pacific. The camera I used was a Sony NEX 5 and the images were processed in Lightroom. Though there was some cropping needed due to its crop sensor but not too much and I am pretty happy with the results achieved. Some examples.
Tim Gray
Well-known
Well, very late to the party, I finally got around to testing a bunch of different setups and mostly worked out a good flow for myself.
- The Negative Supply film carrier for 35mm is VERY nice. Other setups worked fine for me (Nikon ES-2, etc.) but if you this thing is really nice (as it should be). The Skier system doesn't look too bad either - I might try it out just for the light source.
- I'm using a Sony A7rII with a 90mm macro lens.
- Color negative results easily rival what I was getting with a Nikon Coolscan V. Way faster too.
- Negative Lab Pro seems very nice and is probably worth it if it works for you. It doesn't for me as I don't really use Lightroom. I feel like I've fiddled around and got something that works quite well for me with just ACR and Photoshop. I do think it can be done with white balance in your raw developer, and then prudent use of curves/levels in PS. I wish there was a more direct way to set gain/offset like in motion picture color tools...
- I can do film borders, so of course I'm going overboard with it.
Here are two cat samples 🙂

sleepy in the sun by Tim Gray, on Flickr

cat by Tim Gray, on Flickr
- The Negative Supply film carrier for 35mm is VERY nice. Other setups worked fine for me (Nikon ES-2, etc.) but if you this thing is really nice (as it should be). The Skier system doesn't look too bad either - I might try it out just for the light source.
- I'm using a Sony A7rII with a 90mm macro lens.
- Color negative results easily rival what I was getting with a Nikon Coolscan V. Way faster too.
- Negative Lab Pro seems very nice and is probably worth it if it works for you. It doesn't for me as I don't really use Lightroom. I feel like I've fiddled around and got something that works quite well for me with just ACR and Photoshop. I do think it can be done with white balance in your raw developer, and then prudent use of curves/levels in PS. I wish there was a more direct way to set gain/offset like in motion picture color tools...
- I can do film borders, so of course I'm going overboard with it.
Here are two cat samples 🙂
sleepy in the sun by Tim Gray, on Flickr
cat by Tim Gray, on Flickr
jrose125
Established
I went from using a flatbed scanner to "digitizing" with my Sony a7 with past summer.
The setup I use consists of the following:
- 55mm f/3.5 Micro-Nikkor Ai (Gobe F to NEX Adapter)
- PrimeCables Desk Mounted Monitor Stand
- 1/4" to 3/8" Tripod adapter (used to mount the camera onto the Monitor Plate of the Monitor Stand)
- Cheap generic micro-USB LED Panel
- Lomography Digitaliza Scanning Masks (35mm and 120)
I also used gaffers tape on the LED panel leaving just enough space for a 6x9 cm negative.
I personally use Lightroom Classic with the Negative Lab Pro Plugin to process my negatives. It's not a perfect setup, but I'm quite satisfied with my results for the time being! I would like to eventually upgrade the Monitor Stand to a Copy Stand, but it does the trick for now and is remarkably steady for such a low price (around $40 CAD with shipping/tax).
A few examples:

Leica M3| 50mm f/2.8 Elmar| Ektar 100

Leica M6 TTL| 35mm f/2 Summicron V3| Kodak Double-X

Nikon FM2N| 50mm f/1.4K| Ilford HP5+
The setup I use consists of the following:
- 55mm f/3.5 Micro-Nikkor Ai (Gobe F to NEX Adapter)
- PrimeCables Desk Mounted Monitor Stand
- 1/4" to 3/8" Tripod adapter (used to mount the camera onto the Monitor Plate of the Monitor Stand)
- Cheap generic micro-USB LED Panel
- Lomography Digitaliza Scanning Masks (35mm and 120)
I also used gaffers tape on the LED panel leaving just enough space for a 6x9 cm negative.
I personally use Lightroom Classic with the Negative Lab Pro Plugin to process my negatives. It's not a perfect setup, but I'm quite satisfied with my results for the time being! I would like to eventually upgrade the Monitor Stand to a Copy Stand, but it does the trick for now and is remarkably steady for such a low price (around $40 CAD with shipping/tax).
A few examples:
Leica M3| 50mm f/2.8 Elmar| Ektar 100
Leica M6 TTL| 35mm f/2 Summicron V3| Kodak Double-X
Nikon FM2N| 50mm f/1.4K| Ilford HP5+
inzite
Well-known
Well, very late to the party, I finally got around to testing a bunch of different setups and mostly worked out a good flow for myself.
- The Negative Supply film carrier for 35mm is VERY nice. Other setups worked fine for me (Nikon ES-2, etc.) but if you this thing is really nice (as it should be). The Skier system doesn't look too bad either - I might try it out just for the light source.
- I'm using a Sony A7rII with a 90mm macro lens.
- Color negative results easily rival what I was getting with a Nikon Coolscan V. Way faster too.
- Negative Lab Pro seems very nice and is probably worth it if it works for you. It doesn't for me as I don't really use Lightroom. I feel like I've fiddled around and got something that works quite well for me with just ACR and Photoshop. I do think it can be done with white balance in your raw developer, and then prudent use of curves/levels in PS. I wish there was a more direct way to set gain/offset like in motion picture color tools...
- I can do film borders, so of course I'm going overboard with it.
Here are two cat samples 🙂
awesome "scan"s! I've got my eyes on the 120 film carrier from negative labs! Gotta get the 120 before i save for 35mm as buying both at the same time is just so wallet burning!
67ii + 105 f2.4 + pro400h, "scanned" with d800e + 105 micro + negative labs pro
 INZ_7167 by Ricky Cheong Photography, on Flickr
 INZ_7181 by Ricky Cheong Photography, on Flickr
 INZ_7163 by Ricky Cheong Photography, on Flickr
 INZ_7166 by Ricky Cheong Photography, on Flickr
Filzkoeter
stray animal
Scanning with a digital camera has been a total gamechanger for me. Couple years ago I nearly abandoned film because of the amount of work and time it took to get my negatives digitized (and then often to subpar results).
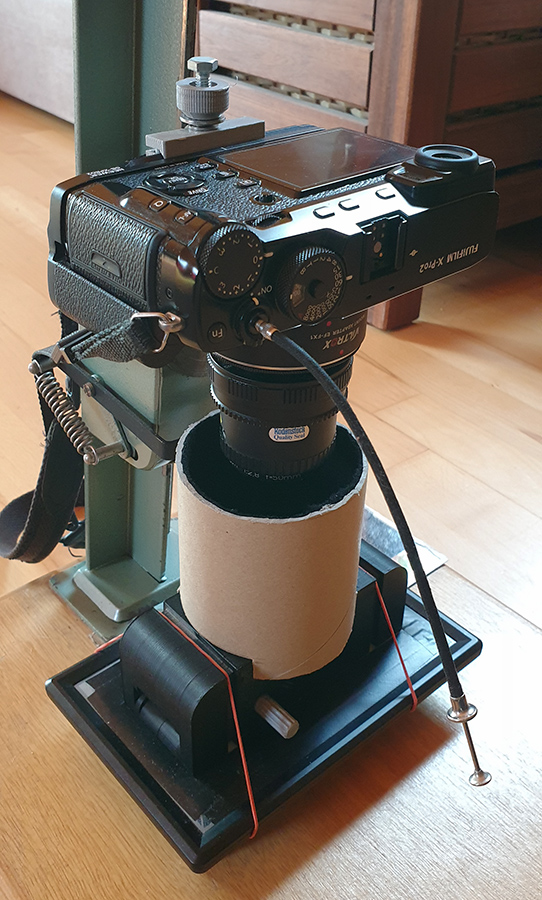
My rig consists of my XPro2, mounted to an old enlarger that I repurposed to be a copy stand. A 3D-printed Kamerakraft negative holder (with a small crank to advance the frame), a Raleno video light (CRI95+) which is very bright, diffused and gives a very even illumination.
Using a Rodagon 50/2.8 enlarger lens mounted to a helicoid for focusing + to a good quality Canon Eos to FujiX adapter I had laying around anyway. A cardboard tube lined with black felt cuts down stray light.
At base iso (200), 1/60 and f8 I expose slightly to the right, so the light is plenty bright. Tried a dedicated 1:1 7artisans macro lens, but the Rodagon is _much_ better with a flatter field.
This setup allows me to digitize a whole roll of 35mm film in probably less then 5 minutes. And we're talking here about 20megapixel resolution (because of the borders I keep in) that is sharp down to the grain right into the corners!
Tim Gray
Well-known
I would like to eventually upgrade the Monitor Stand to a Copy Stand, but it does the trick for now and is remarkably steady for such a low price (around $40 CAD with shipping/tax).
I purchased a small LPL copy stand for this purpose, thinking I would be annoyed by workarounds intended to save money. While the stand does provide easy vertical adjustment, its not particularly stable, nor does it prevent you from not having your camera parallel to the copy surface. I've had to shim the mount to keep the camera level and use a remote to trigger the shutter to prevent vibration.
So... It sounds like your solution isn't that bad for the cost. I'm sure if I went big time with an expensive large copy stand, I'd be better off, but I'm not going to do that. The Negative Supply stand made out of 8020 looks pretty rigid. There's also this little guy (no easy vertical adjustment) that I bet is pretty rigid and not too expensive:
https://www.dold-mechatronik.de/Reprostativ-V5-kit
twvancamp
Thom
Scanning with a digital camera has been a total gamechanger for me. Couple years ago I nearly abandoned film because of the amount of work and time it took to get my negatives digitized (and then often to subpar results).
Agreed about the gamechanger--I am enjoying my film work so much more since I've abandoned my flatbed.
Thanks for the link to Kamerakraft. Did you do the 3D print yourself? I'd have to outsource it but that looks like a great holder.
Filzkoeter
stray animal
Thanks for the link to Kamerakraft. Did you do the 3D print yourself? I'd have to outsource it but that looks like a great holder.
I 3D printed it myself, epoxied everything together and spray-painted it flat black 😀
There are 3 parts: two halves for the main body and the crank.
It holds the film pretty flat and the advance mechanism works great.
Similar threads
- Replies
- 3
- Views
- 256
- Replies
- 3
- Views
- 361
- Replies
- 4
- Views
- 654
- Replies
- 0
- Views
- 218