You are using an out of date browser. It may not display this or other websites correctly.
You should upgrade or use an alternative browser.
You should upgrade or use an alternative browser.
Camera-Scan Challenge for Color-Neg, as Automatic as Possible
- Thread starter ColSebastianMoran
- Start date
- Latest activity Latest activity:
- Replies 349
- Views 55K
ColSebastianMoran
( IRL Richard Karash )
Time to summarize:
Time to summarize:
Key things I've concluded about camera-scans of color Negatives
1. Getting enough resolution is easy, color and tonality are more difficult
2. Illuminate the negative with a high CRI source (incandescent, LED, or flash)
3. Shoot RAW with a good macro lens
4. Simple inversion gives the weakest results. Better w/ purpose-built software or a non-linear inversion.
[ Edit Fall, 2018 with a new option ]
- Camera scan capture of the negative, shoot RAW, import into Lightroom
- Run Negative Lab Pro, a new Lightroom plug-in
See this thread here on RFF about NLP. I now recommend this option: very good color, almost fully automatic, and it's in Lightroom.
[ Edit March 19, 2018 with a new option ]
A new and very effective process:
- Camera scan capture of the negative, shoot raw, open in Photoshop, holding histogram away from the edges.
- Sample film rebate or a VERY dark shadow area to get film base
- Run Adrian Gabor's CN-Scan-Inversion action, available here. See result in #127 this thread.
[ Remainder of text below from Nov 2017 ]
Minimalist approach:
- Camera scan capture of the negative, shoot raw, open in Photoshop or Lightroom
- Levels adjustment to give a good histogram (centered, wide, but not to the edges)
- Invert the image
- Bend the inversion curve, or add one more curves adjustment, bringing down all the mid-tones
- Add an "auto" adjustment
Better Color:
- Camera scan capture of the negative, shoot raw, open in Photoshop
- Levels adjustment to give a good histogram (centered, not to the edges)
- Invert the image with Jack Jzagaja's curve, or apply ColorPerfect (ColorNEG option)
- Add an "auto" adjustment
Very Good Color Method #1 (via Photoshop)
- Camera scan capture of the negative, shoot raw
- Use MakeTiff or dcraw to create linear tiff with no adjustments (will look very dark)
- Open in Photoshop and apply ColorPerfect (ColorNeg, film type, clipping, gray point, perhaps +sat)
- Add a Photoshop "auto" adjustment
Very Good Color Method #2 (via VueScan)
- Camera scan capture of the negative, shoot raw
- Use MakeTiff or dcraw to create linear tiff with no adjustments (will look very dark)
- Launch VueScan. Input from file. Select options (film type, check clipping, gray point)
- Select destination & file type, then hit "Scan" to process the image
- Adjust in program of your choice
- (Silverfast reportedly can do the same thing.)
Notes:
- MakeTiff is free, whether or not you buy ColorPerfect
- DCraw is free, but it's a command-line program, no easy user interface
- They do the same thing, results are a little different
- The DCRaw command: dcraw -v -w -H 0 -o 0 -q 3 -4 -T fileName
- ColorNeg settings: FilmType, ShadowClip 1.0, HighlightClip 0.25 250, rest to taste
Comments?
Last edited:
ColSebastianMoran
( IRL Richard Karash )
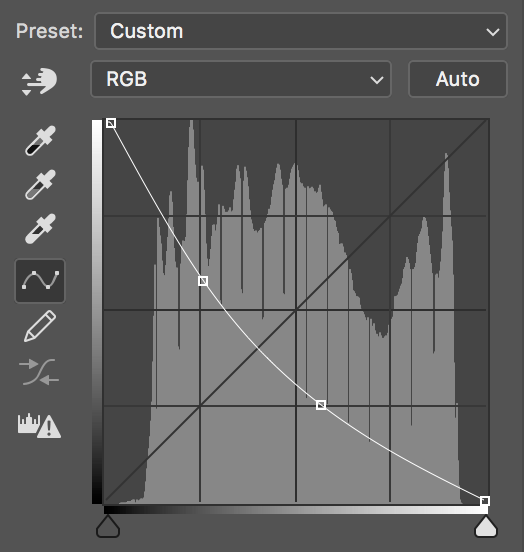
For the "simplest" approach, bending the curve something like this seems to work OK:
ColSebastianMoran
( IRL Richard Karash )
So, anyone please post a link to a RAW file, camera-scan capture of a color negative, and let's try to get good color with an almost-automatic process.
jkjod
Well-known
I do know with photoshop and color perfect you can “batch” process several files at once with “setting from last scan”. So basically you edit one photo with the correct film profile, and then batch the rest - the only thing you must physically do is save the photos.
I go between the Luminous Landscape preset (more involved than just autos TBH) and using MakeTiff and color perfect. So I’m fairly familiar with both. Sometimes the Lu-La looks pretty good, but generally the ColorPerfect version looks better. So, ColorPerfect in PS with “batch” process is pretty one click as it gets really.
I go between the Luminous Landscape preset (more involved than just autos TBH) and using MakeTiff and color perfect. So I’m fairly familiar with both. Sometimes the Lu-La looks pretty good, but generally the ColorPerfect version looks better. So, ColorPerfect in PS with “batch” process is pretty one click as it gets really.
jzagaja
Well-known
Photoshop inversion curve:
1) based on DCraw (with levels):
https://drive.google.com/file/d/1XgqdK2Fk18vUCxnWOornqqec0P91YSqF/view?usp=sharing
2) based on MakeTiff:
https://drive.google.com/file/d/1tJLJfrWiV0VEtDkKxA4pqZ58bQYPPCU-/view?usp=sharing
1) based on DCraw (with levels):
https://drive.google.com/file/d/1XgqdK2Fk18vUCxnWOornqqec0P91YSqF/view?usp=sharing
2) based on MakeTiff:
https://drive.google.com/file/d/1tJLJfrWiV0VEtDkKxA4pqZ58bQYPPCU-/view?usp=sharing
jbielikowski
Jan Bielikowski
Pepper grain like from drum scanner 🙂
Scanner make exact noises like a pepper mill 😉 I like those greens you get.
brbo
Well-known
try this: http://bielikowski.com/up/mws_0017.tif 108mb! 48bit SilverFast RAW made with PacificImage PF 3600 Pro. It's a Kodak Ektar 100 with Rollei 35SE.
Hmm... Not too happy with straight inversion:

Looking into what to do so the script would get me closer to something like this (which says Ektar(ish) to me, though it's overdone for my taste):

ColSebastianMoran
( IRL Richard Karash )
Hmm... Not too happy with straight inversion:
I have NOT been happy with straight inversions. The white and black points are OK, but all the tones in between are too hot. That's exactly what one should expect, it's the non-linear response of film. For math types: the film characteristic curve has a straight line portion in log-log space.
@brbo, try the same straight inversion, but do it with curves, and bend your curve like I showed in #63 above. It will look a lot better.
ColSebastianMoran
( IRL Richard Karash )
Photoshop inversion curve:
1) based on DCraw (with levels):
https://drive.google.com/file/d/1XgqdK2Fk18vUCxnWOornqqec0P91YSqF/view?usp=sharing
I understand: Convert your RAW with this DCraw command, then invert in Photoshop using the above curve.
dcraw.exe -v -w -H 0 -o 0 -q 3 -4 -T fileName.arw
I understand: Run your RAW file through MakeTiff, then invert in Photoshop using the above curve.
ColSebastianMoran
( IRL Richard Karash )
Photoshop inversion curve:
1) based on DCraw (with levels):
https://drive.google.com/file/d/1XgqdK2Fk18vUCxnWOornqqec0P91YSqF/view?usp=sharing
Jack, that curve does a nice job with the output of DCraw. This, with NO tweaks, I did not even add the usual "Auto" adjustments after inversion. Bravo! I would add +sat in red, and the Fuji green is a little off, but this is workable.
Thank you for the curves!

mlu19
Established
ColSebastianMoran
( IRL Richard Karash )
Photoshop inversion curve:
1) based on DCraw (with levels):
2) based on MakeTiff:
Jack, could you post again a link to your curve for inverting the output of Camera Raw (that is, a gamma encoded image)?
ColSebastianMoran
( IRL Richard Karash )
Friends, when you post something, say how you got there.
And, I request that you show us what you can do mostly auto.
And, I request that you show us what you can do mostly auto.
ColSebastianMoran
( IRL Richard Karash )
@mlu19 and @jzagaja, those conversions of the grassy scene look quite good.
ColSebastianMoran
( IRL Richard Karash )
Friends, here's a camera-scan of a color negative, just a test shot with a Yashica GX. You're welcome to try your conversion hand on this one.
Steps, negative illuminated by 3000°K Sony ARW file (25MB)
Steps, negative illuminated by 3000°K Sony ARW file (25MB)
ColSebastianMoran
( IRL Richard Karash )
ColSebastianMoran
( IRL Richard Karash )
FWIW, here is a web page by "frogymandias" on our same topic. He documents five approaches to process camera-scans of color negatives. He has a couple of sample RAW files, inviting us to try them. (This page appears to be from 2014.)
meloV8
Established
In all, it is missing the reference scans of negatives from the Pakon scanner 🙂
ColSebastianMoran
( IRL Richard Karash )
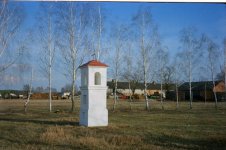
One more, FWIW, here is the same test box shot on Ektar.
As expected, it's easier to get saturated reds from Ektar than the shots on Fuji. Surprisingly to me, it's easier to get the right Fuji green as well.
As expected, it's easier to get saturated reds from Ektar than the shots on Fuji. Surprisingly to me, it's easier to get the right Fuji green as well.
Similar threads
- Replies
- 1
- Views
- 119
- Replies
- 68
- Views
- 3K
- Replies
- 2
- Views
- 304
- Replies
- 7
- Views
- 2K