Darkroom Renovation Phase 1

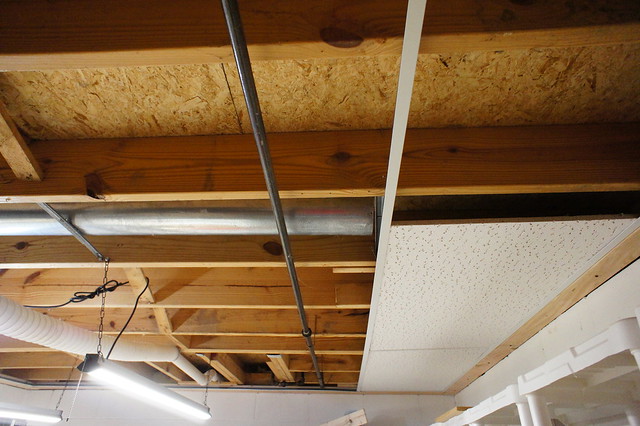
Tuesday we start on installing the drop ceiling.

Also installing the vent unit (had to special order that), for the hot air pipe running through the darkroom ceiling. Should make it comfortable in there. One section of pipe hangs low and we will leave that exposed, below the finished drop ceiling. Permanently installed my big miter saw to the Harbor Freight Heavy Duty Miter Table. Ready to cut some 2x4s......

All wood will be cut in the garage, and pre drilled with pilot holes right after cutting, with my mini drill press. Then screwed together down in the darkroom. My shop vac has a new filter so we are good to go. After the ceiling is complete, we build the work tables to go under the sinks. And redoing electrics and new plumbing into the new space, that will requiring some thought regarding best placement.

Bought a Bondo fiberglass patching kit, and Bondo resin (for underside of sink), to restore my 4x4 foot Kreonite green sink. That we will do outside.................

Trying to keep costs down, but not cut ANY corners.
 
Great choice on the poly cart!

I have a few made by Rubbermaid and they are rock solid after many years of abuse.
 
Hey Devin,
Yep I think it will do the job. I'll drill and install a drain and hose (to the drain line) just in case. Seventeen gallons of water is a lot to get rid of in the event of a leak.

I've ordered and received 26 19x24 inch "Blotter Sheets" from Freestyle. I'll be using those for print drying. And my old "Kodak Blotter Roll" as well. Petersons Photographic had a plan for making a heated "drying box" using those blotters. Maybe I'll build one.

About the last thing I'll need is a large dry mount press. Need to build a table for that also.
 
Dan, Petersen's "Blueprint" books in that same series also have plans for darkroom stuff.

I've wondered how well a copy of the softlight using daylight CFL's or LED's would work. Since they don't create as much heat as incandesant light bulbs, I'd think you could use quite a few more of them in the softlight.
 
Dan, Petersen's "Blueprint" books in that same series also have plans for darkroom stuff. I've wondered how well a copy of the softlight using daylight CFL's or LED's would work. Since they don't create as much heat as incandesant light bulbs, I'd think you could use quite a few more of them in the softlight.


I bought the first "How to make Photo stuff" book, then a whole set of the Peterson's books popped up cheap, so I grabbed that too.
I'd imagine twelve photofloods in a light bank gets rather warm. Imagine the power consumption!
 
I bought the first "How to make Photo stuff" book, then a whole set of the Peterson's books popped up cheap, so I grabbed that too.
I'd imagine twelve photofloods in a light bank gets rather warm. Imagine the power consumption!

The risk of fire is what'd worry me...
 
Hey Devin,
Yep I think it will do the job. I'll drill and install a drain and hose (to the drain line) just in case. Seventeen gallons of water is a lot to get rid of in the event of a leak.

I've ordered and received 26 19x24 inch "Blotter Sheets" from Freestyle. I'll be using those for print drying. And my old "Kodak Blotter Roll" as well. Petersons Photographic had a plan for making a heated "drying box" using those blotters. Maybe I'll build one.

About the last thing I'll need is a large dry mount press. Need to build a table for that also.

How large? I have one I want to get rid of
 
Work is proceeding at a good clip. We are about half done installing the new drop ceiling. I'm getting very confident with the vintage Mitre Saw on the new Harbor Freight saw stand. Making lots of sawdust and vacuuming it up right away. :smile:
 
Plans Matte Print Dryer by Nokton48, on Flickr

Here's the Petersons Photographic article from the 70s, that I've been thinking about. I have fresh blotter sheets from Freestyle (25 of them 20x24), and I've ordered corrugated cardboard sheets same size (a carton of them), which will dry a pile of 16x20s in a couple of days time. By building this matte print dryer, it would speed up the drying process to just a few hours.

When I get more of the major darkroom building tasks completed, I will start to accumulate the materials to build this project.
 
Dan, I just checked-the dry mounting press is a Technal model 500 with a 12" X 15" platen.

If you're planning on building the matte print dryer, I have 2 muffins fans I'll ship you for postage. They're NOS removed from scrapped surplus CCTV camera housings.

FYI, the "Eagle Cone Heater-120VAC-660 watts" is no more. Near as I can tell, Eagle went out of business years ago. However, I got curious and found a company that makes the same thing-www.processheating.com. Pretty much the same thing as the Eagles-$32.00 each.
 
Thanks for the offer. Yes I could use the muffin fans. Send me a PM.

I saw the cone heaters while data mining. Personally I think two 650W cones might be a fire hazard inside a plywood box? Lower wattage units are available. I was thinking about a pair of 250 watt'ers. Take longer to dry, but might be safer? What do you think?
 
Ilford Multigrade 6x6 Set NOS by Nokton48, on Flickr

I grabbed the NOS set of 6x6" Ilford Multigrade filters. I think I can just lay the gel on top of the neg carrier, should be far enough out of focus? My Omega heads to not have a filter tray, although I suppose I could build one out of metal? Or just lay the gels on top. What do you Guys think?

I have a bit of VC paper in house.......... But mostly old frozen graded
 
Here you can see the drop ceiling starting to go in. You can see the 2x4's we ran around the perimeter above the concrete block walls. We need to rearrange some ductwork; will finish that hurdle on Monday. The gas pipe will run below the drop ceiling; don't want to mess with it, and if we ever decide to sell the house (which I seriously doubt!!), want to have it still hooked up (used to have a gas fireplace and it could be easily hooked back up). In the near right corner ducting will hang down, then go up into the drop ceiling. Easiest way to deal with it. Also this plan preserves the extra tall ceiling height.


I am pleased so far! When we finish the ceiling the real photo fun will begin.

Darkroom Drop Ceiling by Nokton48, on Flickr
 
Yeah, the thought of 660 watts of heat in a plywood box worries me. Since I just knew you couldn't resist the idea of building the dry mount press, I found a source of 14 gauge Nichrome wire....

www.jacobs-online.biz $38.50 for 85 feet. Almost enough to make 2 mounting presses.

On the matte print dryer...perhaps using a used blow dryer for a heat source? That's what I used for a heat source for my RC print dryer and my film dryer. Good output and easy to find cheap at yard sales and thrift stores.


On the mounting press....I'd make sure I had it plugged into a GFI outlet or on a GFI circuit. Of all the projects Parry Yob came up with, I'd say that's the one that I feel is the most dangerous. I can see several ways to get the crap shocked out of you!
 
Back
Top Bottom